HP StorageWorks 16-EL SAN Switch 2/16 version 3.1.x - Installation Guide - Page 38
Sliding the Switch into an HP 9000 Series or EIA Rack
 |
View all HP StorageWorks 16-EL manuals
Add to My Manuals
Save this manual to your list of manuals |
Page 38 highlights
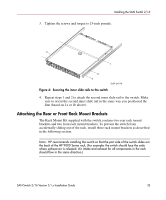
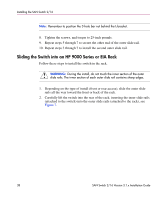
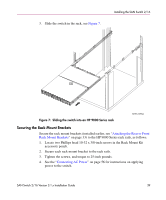
Installing the SAN Switch 2/16 Note: Remember to position the 3-hole bar nut behind the L-bracket. 8. Tighten the screws, and torque to 25-inch pounds. 9. Repeat steps 5 through 7 to secure the other end of the outer slide rail. 10. Repeat steps 3 through 7 to install the second outer slide rail. Sliding the Switch into an HP 9000 Series or EIA Rack Follow these steps to install the switch in the rack. WARNING: During the install, do not touch the inner section of the outer slide rails. The inner section of each outer slide rail contains sharp edges. 1. Depending on the type of install (front or rear access), slide the outer slide rails all the way toward the front or back of the rack. 2. Carefully lift the switch into the rear of the rack, inserting the inner slide rails (attached to the switch) into the outer slide rails (attached to the rack), see Figure 7. 38 SAN Switch 2/16 Version 3.1.x Installation Guide
-
 1
1 -
2
-
3
-
4
-
5
-
6
-
7
-
8
-
9
-
10
-
11
-
12
-
13
-
14
-
15
-
16
-
17
-
18
-
19
-
20
-
21
-
22
-
23
-
24
-
25
-
26
-
27
-
28
-
29
-
30
-
31
-
32
-
 33
33 -
 34
34 -
 35
35 -
 36
36 -
 37
37 -
 38
38 -
 39
39 -
 40
40 -
 41
41 -
 42
42 -
 43
43 -
44
-
45
-
46
-
47
-
48
-
49
-
50
-
51
-
52
-
53
-
54
-
55
-
56
-
57
-
58
-
59
-
60
-
61
-
62
-
63
-
64
-
65
-
66
-
67
-
68
-
69
-
70
-
71
-
72
-
73
-
74
-
75
-
76
-
77
-
78
-
79
-
80
-
81
-
82
-
83
-
84
-
85
-
86
-
87
-
88
-
89
-
90
-
91
-
92
-
93
-
94
-
95
-
96
-
97
-
98
-
99
-
100
-
101
-
102
-
103
-
104
-
105
-
106
-
107
-
108
-
109
-
110
-
111
-
112
-
113
-
114
-
115
-
116
-
117
-
118
-
119
-
120
 |
 |