HP StorageWorks 16-EL SAN Switch 2/16 version 3.1.x - Installation Guide - Page 64
How to Change the Core PID Format, Locate the line, Core Switch PID Format: 0..1. Type either 0 or
 |
View all HP StorageWorks 16-EL manuals
Add to My Manuals
Save this manual to your list of manuals |
Page 64 highlights
Installing the SAN Switch 2/16 How to Change the Core PID Format In order for the switches to interoperate properly, all of them must have the same Core PID format. Use these steps to change the Core PID format, if necessary. Caution: Remember that you must change the Core PID format before connecting fiber cables. 1. If the switch is configured for zoning, type cfgDisable to disable zoning. 2. To disable the switch, type SwitchDisable and press Enter. 3. Type configure and press Enter. The following prompt displays: 4. Configure... 5. Type y at the Fabric parameters prompt, 6. Fabric parameters (yes, y, no, n): [no] y 7. Locate the line, "Core Switch PID Format: (0..1)." Type either 0 or 1 to match the SAN's existing PID format. 8. Continue to press Enter until you have completed the configure section and returned to the admin prompt. 9. Type SwitchEnable and press Enter. 10. After setting the PID Format to match the the other switches in the fabric, go to the "Connecting the Switch to the LAN" section on page 62 for instructions on connecting Fibre Channel cables. 11. If necessary, type cfgEnable to re-establish zoning. Note: Once the switch PID format is set, it is stored in the flash memory of the switch, and it is NOT necessary to set it again during subsequent firmware upgrades. 64 SAN Switch 2/16 Version 3.1.x Installation Guide
-
 1
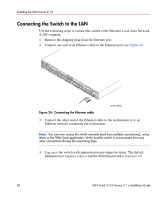
1 -
2
-
3
-
4
-
5
-
6
-
7
-
8
-
9
-
10
-
11
-
12
-
13
-
14
-
15
-
16
-
17
-
18
-
19
-
20
-
21
-
22
-
23
-
24
-
25
-
26
-
27
-
28
-
29
-
30
-
31
-
32
-
33
-
34
-
35
-
36
-
37
-
38
-
39
-
40
-
41
-
42
-
43
-
44
-
45
-
46
-
47
-
48
-
49
-
50
-
51
-
52
-
53
-
54
-
55
-
56
-
57
-
58
-
 59
59 -
 60
60 -
 61
61 -
 62
62 -
 63
63 -
 64
64 -
 65
65 -
 66
66 -
 67
67 -
 68
68 -
 69
69 -
70
-
71
-
72
-
73
-
74
-
75
-
76
-
77
-
78
-
79
-
80
-
81
-
82
-
83
-
84
-
85
-
86
-
87
-
88
-
89
-
90
-
91
-
92
-
93
-
94
-
95
-
96
-
97
-
98
-
99
-
100
-
101
-
102
-
103
-
104
-
105
-
106
-
107
-
108
-
109
-
110
-
111
-
112
-
113
-
114
-
115
-
116
-
117
-
118
-
119
-
120
 |
 |