HP StorageWorks 16-EL SAN Switch 2/16 version 3.1.x - Installation Guide - Page 50
Installing the outer rails (HP 9000 Series or comparable EIA rack)
 |
View all HP StorageWorks 16-EL manuals
Add to My Manuals
Save this manual to your list of manuals |
Page 50 highlights
Installing the SAN Switch 2/16 Note: This kit contains both left rails and right rails. The rails are marked with Right and Left to distinguish the rails from each other. 4. Assemble the outer rails by completing the following steps: a. Attach the left outer rail and the right outer rails to the rear mounting brackets using (2) 1/4-20 hex nuts with captive star lock washers attached loosely as shown in Figure 16. Don't tighten them. The nuts will be tightened later in step 8. Figure 16: Installing the outer rails (HP 9000 Series or comparable EIA rack) 50 SAN Switch 2/16 Version 3.1.x Installation Guide
-
 1
1 -
2
-
3
-
4
-
5
-
6
-
7
-
8
-
9
-
10
-
11
-
12
-
13
-
14
-
15
-
16
-
17
-
18
-
19
-
20
-
21
-
22
-
23
-
24
-
25
-
26
-
27
-
28
-
29
-
30
-
31
-
32
-
33
-
34
-
35
-
36
-
37
-
38
-
39
-
40
-
41
-
42
-
43
-
44
-
 45
45 -
 46
46 -
 47
47 -
 48
48 -
 49
49 -
 50
50 -
 51
51 -
 52
52 -
 53
53 -
 54
54 -
 55
55 -
56
-
57
-
58
-
59
-
60
-
61
-
62
-
63
-
64
-
65
-
66
-
67
-
68
-
69
-
70
-
71
-
72
-
73
-
74
-
75
-
76
-
77
-
78
-
79
-
80
-
81
-
82
-
83
-
84
-
85
-
86
-
87
-
88
-
89
-
90
-
91
-
92
-
93
-
94
-
95
-
96
-
97
-
98
-
99
-
100
-
101
-
102
-
103
-
104
-
105
-
106
-
107
-
108
-
109
-
110
-
111
-
112
-
113
-
114
-
115
-
116
-
117
-
118
-
119
-
120
 |
 |
Installing the SAN Switch 2/16
50
SAN Switch 2/16 Version 3.1.x Installation Guide
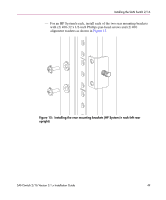
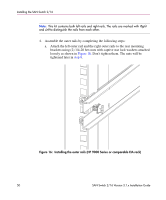
Note:
This kit contains both left rails and right rails. The rails are marked with
Right
and
Left
to distinguish the rails from each other.
4.
Assemble the outer rails by completing the following steps:
a.
Attach the left outer rail and the right outer rails to the rear mounting
brackets using (2) 1/4-20 hex nuts with captive star lock washers attached
loosely as shown in
Figure 16
. Don’t tighten them. The nuts will be
tightened later in
step 8
.
Figure 16:
Installing the outer rails (HP 9000 Series or comparable EIA rack)