HP StorageWorks 16-EL SAN Switch 2/16 version 3.1.x - Installation Guide - Page 81
Configuring the IP and Fibre Channel Address, New Password
 |
View all HP StorageWorks 16-EL manuals
Add to My Manuals
Save this manual to your list of manuals |
Page 81 highlights
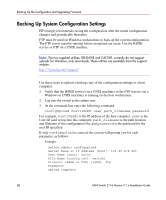
Managing the SAN Switch 2/16 6. At the New Password prompt, enter the new password exactly as entered to the previous prompt. 7. Press Enter to commit the configuration to the firmware. Configuring the IP and Fibre Channel Address The SAN Switch 2/16 is shipped with a default IP address of 10.77.77.77. Use these steps to change the default IP Address and configure the Fibre Channel IP address of the switch. 1. Log in to the switch as the admin user. 2. At the command line, enter the following command: ipAddrSet An interactive session is opened and you are prompted for configuration values. Press Enter to skip a prompt and leave the parameter value as is. 3. At the Ethernet IP Address prompt, enter the new IP address for the Ethernet port on the switch. Press the Enter to continue. 4. At the Ethernet Subnetmask prompt, enter the address of the subnetmask, if applicable. Press Enter to continue. 5. At the Fibre Channel IP address prompt, enter the Fibre Channel IP address for the switch. Press Enter to continue. 6. At the Fibre Channel Subnetmask prompt, enter the address of the subnetmask, if applicable. Press Enter to continue. 7. At the Gateway Address prompt, enter the IP address of the gateway system if applicable. Press Enter to continue. The configuration is then committed to the switch firmware. 8. You are then prompted either to make the IP address changes active now or at the next reboot. Enter y at the prompt to have the IP address changes take effect immediately. SAN Switch 2/16 Version 3.1.x Installation Guide 81
-
 1
1 -
2
-
3
-
4
-
5
-
6
-
7
-
8
-
9
-
10
-
11
-
12
-
13
-
14
-
15
-
16
-
17
-
18
-
19
-
20
-
21
-
22
-
23
-
24
-
25
-
26
-
27
-
28
-
29
-
30
-
31
-
32
-
33
-
34
-
35
-
36
-
37
-
38
-
39
-
40
-
41
-
42
-
43
-
44
-
45
-
46
-
47
-
48
-
49
-
50
-
51
-
52
-
53
-
54
-
55
-
56
-
57
-
58
-
59
-
60
-
61
-
62
-
63
-
64
-
65
-
66
-
67
-
68
-
69
-
70
-
71
-
72
-
73
-
74
-
75
-
 76
76 -
 77
77 -
 78
78 -
 79
79 -
 80
80 -
 81
81 -
 82
82 -
 83
83 -
 84
84 -
 85
85 -
 86
86 -
87
-
88
-
89
-
90
-
91
-
92
-
93
-
94
-
95
-
96
-
97
-
98
-
99
-
100
-
101
-
102
-
103
-
104
-
105
-
106
-
107
-
108
-
109
-
110
-
111
-
112
-
113
-
114
-
115
-
116
-
117
-
118
-
119
-
120
 |
 |