HP StorageWorks 8/80 HP StorageWorks 8Gb SAN Switch hardware reference manual - Page 54
Interpreting POST results, Maintaining the 8Gb SAN Switch, Installing an SFP
 |
View all HP StorageWorks 8/80 manuals
Add to My Manuals
Save this manual to your list of manuals |
Page 54 highlights
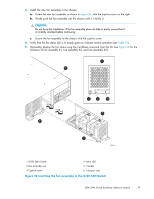
Interpreting POST results POST is a system check that is performed each time the switch is powered on, rebooted, or reset, and during which the LEDs flash different colors. To determine if POST completed successfully and whether any errors were detected: • Verify that the LEDs on the switch indicate that all components are healthy. (LED patterns are described in Table 10 and Table 11). If one or more LEDs do not display a healthy state: • Verify that the LEDs are not set to "beacon" (this can be determined through the switchShow command or Web Tools). For information about how to turn beaconing on and off, see the HP StorageWorks Fabric OS administrator guide or the Web Tools administrator's guide. • Follow the recommended action for the observed LED behavior, as listed in Table 10 and Table 11. • Verify that the diagShow command displays that the diagnostic status for all ports in the switch is OK. • Review the system log for errors. Errors detected during POST are written to the system log, which is viewed using the errShow command. For more information about this command, see the Fabric OS command reference manual. For information about specific error messages, see the Fabric OS message reference manual. Maintaining the 8Gb SAN Switch The 8Gb SAN Switch is designed for high availability and low failure; it does not require any regular physical maintenance. It includes diagnostic tests and field-replaceable units for the 8/40 and 8/80 SAN Switches, described in the following sections. Installing an SFP The 8Gb SAN Switch supports only HP-branded SFPs. See "Supported SFP transceiver options" on page 21, for ordering information. If you use an unqualified SFP, the switchShow command output will show the port in an Mod_Inv state. Additionally, the firmware will also log the issue in the system error log. To install an SFP: 1. Verify that the bail (wire handle) is in the unlocked position (see Figure 24). 2. Place the SFP in the correctly oriented position on the port. NOTE: Each SFP has a gold-plated PCB-edge connector on the bottom. The correct position to insert an SFP into the upper row of ports is with the gold edge down. The correct position to insert an SFP into the lower row of ports is with the gold edge up. 3. Slide the SFP into the port until you feel it click into place; then close the bail. 54 Operating the 8Gb SAN Switch
-
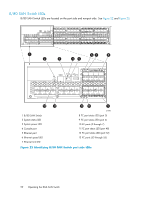
 1
1 -
2
-
3
-
4
-
5
-
6
-
7
-
8
-
9
-
10
-
11
-
12
-
13
-
14
-
15
-
16
-
17
-
18
-
19
-
20
-
21
-
22
-
23
-
24
-
25
-
26
-
27
-
28
-
29
-
30
-
31
-
32
-
33
-
34
-
35
-
36
-
37
-
38
-
39
-
40
-
41
-
42
-
43
-
44
-
45
-
46
-
47
-
48
-
 49
49 -
 50
50 -
 51
51 -
 52
52 -
 53
53 -
 54
54 -
 55
55 -
 56
56 -
 57
57 -
 58
58 -
 59
59 -
60
-
61
-
62
-
63
-
64
-
65
-
66
-
67
-
68
-
69
-
70
-
71
-
72
-
73
-
74
-
75
-
76
-
77
-
78
-
79
-
80
-
81
-
82
-
83
-
84
 |
 |
