HP Visualize J5000 hp Visualize J5000, J7000 workstations parts removal and re - Page 33
Floppy Disk Drive
 |
View all HP Visualize J5000 manuals
Add to My Manuals
Save this manual to your list of manuals |
Page 33 highlights
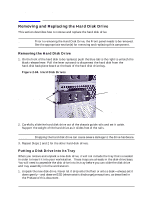
Parts Removal and Replacement Floppy Disk Drive Floppy Disk Drive This section describes how to remove and replace the floppy disk drive. NOTE Prior to removing the Floppy Disk Drive, the Front, Top, and Left Side panels need to be removed. See the appropriate section(s) for removing and replacing these components. Removing the Floppy Disk Drive 1. Remove the two T-15 Torx screws securing the Floppy Disk drive to the front panel of the workstation. Figure 2-27. Removing the Torx Screws T-15 Torx Screw T-15 Torx Screw 2. Remove the thin, metal EMI (electromagnetic interference) cover, which is snapped in place above the floppy drive bay. Figure 2-28. Removing the EMI Cover Floppy Disk Drive's EMI Cover Chapter 2 33
-
 1
1 -
2
-
3
-
4
-
5
-
6
-
7
-
8
-
9
-
10
-
11
-
12
-
13
-
14
-
15
-
16
-
17
-
18
-
19
-
20
-
21
-
22
-
23
-
24
-
25
-
26
-
27
-
 28
28 -
 29
29 -
 30
30 -
 31
31 -
 32
32 -
 33
33 -
 34
34 -
 35
35 -
 36
36 -
 37
37 -
 38
38 -
39
-
40
-
41
-
42
-
43
-
44
-
45
-
46
-
47
-
48
-
49
-
50
-
51
-
52
-
53
-
54
-
55
-
56
 |
 |

Chapter 2
33
Parts Removal and Replacement
Floppy Disk Drive
Floppy Disk Drive
This section describes how to remove and replace the floppy disk drive.
NOTE
Prior to removing the Floppy Disk Drive, the Front, Top, and Left Side panels
need to be removed. See the appropriate section(s) for removing and replacing
these components.
Removing the Floppy Disk Drive
1.
Remove the two T-15 Torx screws securing the Floppy Disk drive to the front panel of
the workstation.
Figure 2-27. Removing the Torx Screws
2.
Remove the thin, metal EMI (electromagnetic interference) cover, which is snapped in
place above the floppy drive bay.
Figure2-28. Removing the EMI Cover
T-15 Torx Screw
T-15 Torx Screw
Floppy Disk Drive’s
EMI Cover