HP Visualize J5000 hp Visualize J5000, J7000 workstations parts removal and re - Page 36
Replacing the DDS-3 Tape Drive
 |
View all HP Visualize J5000 manuals
Add to My Manuals
Save this manual to your list of manuals |
Page 36 highlights
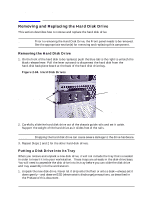
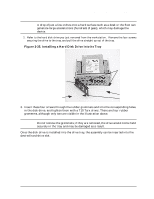
Parts Removal and Replacement Removing and Replacing the DDS-3 Tape Drive 3. Gently slide the DDS-3 drive tray assembly out of the chassis and disconnect the power and ribbon cables from the DDS-3 tape drive. 4. Remove the DDS-3 drive tray assembly from the drive bay. Replacing the DDS-3 Tape Drive Figure 2-32. Replacing the DDS-3 Tape Drive DDS-3 tape drive Figure 2-33. Securing the DDS-3 Tape Drive TST-c1-r15e5wTTsoorxrxscrew T-T1-515TToorxrxSsccrreewws 1. Reconnect the power and ribbon cables and gently slide the DDS-3 drive carrier halfway into the tape drive bay. 2. From the front of the workstation, push the DDS-3 drive carrier assembly into the drive bay so that the assembly rests flush against the front panel. Take care not to pinch the drive ribbon cable; reach in through the top of the workstation, where the EMI cover was, to make any required adjustments. 36 Chapter 2
-
 1
1 -
2
-
3
-
4
-
5
-
6
-
7
-
8
-
9
-
10
-
11
-
12
-
13
-
14
-
15
-
16
-
17
-
18
-
19
-
20
-
21
-
22
-
23
-
24
-
25
-
26
-
27
-
28
-
29
-
30
-
 31
31 -
 32
32 -
 33
33 -
 34
34 -
 35
35 -
 36
36 -
 37
37 -
 38
38 -
 39
39 -
 40
40 -
 41
41 -
42
-
43
-
44
-
45
-
46
-
47
-
48
-
49
-
50
-
51
-
52
-
53
-
54
-
55
-
56
 |
 |
