HP Visualize J5000 hp Visualize J5000, J7000 workstations parts removal and re - Page 45
Removing and Replacing the Hard Disk Backplane Board
 |
View all HP Visualize J5000 manuals
Add to My Manuals
Save this manual to your list of manuals |
Page 45 highlights
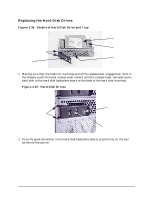
Parts Removal and Replacement Removing and Replacing the Hard Disk Backplane Board Removing and Replacing the Hard Disk Backplane Board This section describes how to remove and replace the Hard Disk backplane board. NOTE Prior to removing the Backplane Board, the Front, Top, and Left Side panels, the Power Supply, the PCI Retainer Clip and the Hard Disk Drives need to be removed. See the appropriate section(s) for removing and replacing these components. Replacing the Hard Disk Backplane Board 1. Two cables should be disconnected: • The SCSI ribbon cable from bottom of the hard disk backplane board. Pull on the loop to disconnect it. • Remove the backplane power cable from the top right edge of the hard disk backplane board: squeeze the tab and pull it out. 2. Remove the four T-15 Torx screws from the hard disk backplane board. 3. Gently pull the lower edge of the hard disk backplane board outward a short distance from the internal chassis wall. Then raise the backplane board straight up to release it from the chassis hooks at the top and the two retainer tabs at the bottom. 4. Lift the hard disk backplane board straight out. NOTE The hard disk backplane board will not be removable if you have forgotten to remove any of the hard disk drives. Chapter 2 45
-
 1
1 -
2
-
3
-
4
-
5
-
6
-
7
-
8
-
9
-
10
-
11
-
12
-
13
-
14
-
15
-
16
-
17
-
18
-
19
-
20
-
21
-
22
-
23
-
24
-
25
-
26
-
27
-
28
-
29
-
30
-
31
-
32
-
33
-
34
-
35
-
36
-
37
-
38
-
39
-
 40
40 -
 41
41 -
 42
42 -
 43
43 -
 44
44 -
 45
45 -
 46
46 -
 47
47 -
 48
48 -
 49
49 -
 50
50 -
51
-
52
-
53
-
54
-
55
-
56
 |
 |
