HP Visualize J5000 hp Visualize J5000, J7000 workstations parts removal and re - Page 44
Back View of the Workstation, Replacing the I/O Board
 |
View all HP Visualize J5000 manuals
Add to My Manuals
Save this manual to your list of manuals |
Page 44 highlights
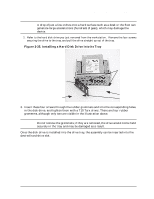
Parts Removal and Replacement Removing and Replacing the I/O Board Figure 2-42. Back View of the Workstation T-15 Torx Screws 4. Facing the opened workstation, move any cables away from the I/O board. CAUTION To avoid damaging system components with electrostatic discharge (static electricity), make sure your grounding strap is securely connected to your wrist and to the bare metal of the workstation. 5. Grasping the I/O board with both hands, slide it toward the front of the workstation and pull it off of its ten keyhole standoffs. Place it on the conductive sheeting. Replacing the I/O Board 1. Align the I/O board with the ten keyhole standoffs on the chassis wall, making sure the keyhole standoffs are aligned properly. Slide the board toward the back of the workstation to lock it into place. 2. Replace the two T-15 Torx screws that secure the I/O board to the rear wall of the chassis as shown above. You may have to hold the I/O board in place while replacing the screws. 44 Chapter 2
-
 1
1 -
2
-
3
-
4
-
5
-
6
-
7
-
8
-
9
-
10
-
11
-
12
-
13
-
14
-
15
-
16
-
17
-
18
-
19
-
20
-
21
-
22
-
23
-
24
-
25
-
26
-
27
-
28
-
29
-
30
-
31
-
32
-
33
-
34
-
35
-
36
-
37
-
38
-
 39
39 -
 40
40 -
 41
41 -
 42
42 -
 43
43 -
 44
44 -
 45
45 -
 46
46 -
 47
47 -
 48
48 -
 49
49 -
50
-
51
-
52
-
53
-
54
-
55
-
56
 |
 |
