HP Visualize J5000 hp Visualize J5000, J7000 workstations parts removal and re - Page 40
Replacing the Hard Disk Drives
 |
View all HP Visualize J5000 manuals
Add to My Manuals
Save this manual to your list of manuals |
Page 40 highlights
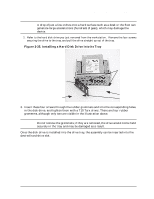
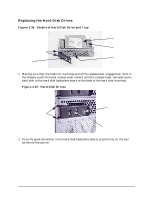
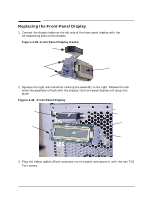
Parts Removal and Replacement Removing and Replacing the Hard Disk Drive Replacing the Hard Disk Drives Figure 2-36. Details of Hard Disk Drive and Tray Release Lever Hinge Hooks Release Lever Hard Disk Drive Hard Disk Drive Tray Release Hook 1. Making sure that the hooks on the hinge end of the release lever engage their slots in the chassis, push the black release lever inward onto the release hook, connecting the hard disk to the hard disk backplane board at the back of the hard disk drive bay. Figure 2-37. Hard Disk Drives Release Lever Hinge Hooks Release Hook Release Lever 2. To verify good connection to the hard disk backplane board, press firmly on the four corners of the carrier. 40 Chapter 2
-
 1
1 -
2
-
3
-
4
-
5
-
6
-
7
-
8
-
9
-
10
-
11
-
12
-
13
-
14
-
15
-
16
-
17
-
18
-
19
-
20
-
21
-
22
-
23
-
24
-
25
-
26
-
27
-
28
-
29
-
30
-
31
-
32
-
33
-
34
-
 35
35 -
 36
36 -
 37
37 -
 38
38 -
 39
39 -
 40
40 -
 41
41 -
 42
42 -
 43
43 -
 44
44 -
 45
45 -
46
-
47
-
48
-
49
-
50
-
51
-
52
-
53
-
54
-
55
-
56
 |
 |

40
Chapter 2
Parts Removal and Replacement
Removing and Replacing the Hard Disk Drive
Replacing the Hard Disk Drives
Figure2-36. Details of Hard Disk Drive and Tray
1.
Making sure that the hooks on the hinge end of the release lever engage their slots in
the chassis, push the black release lever inward onto the release hook, connecting the
hard disk to the hard disk backplane board at the back of the hard disk drive bay.
Figure2-37. Hard Disk Drives
2.
To verify good connection to the hard disk backplane board, press firmly on the four
corners of the carrier.
Release Hook
Hard Disk Drive Tray
Hard Disk Drive
Release Lever Hinge Hooks
Release Lever
Release Lever
Release Hook
Release Lever Hinge Hooks