HP Visualize J5000 hp Visualize J5000, J7000 workstations parts removal and re - Page 47
backplane board. Make sure that it is seated all the way into the connector.
 |
View all HP Visualize J5000 manuals
Add to My Manuals
Save this manual to your list of manuals |
Page 47 highlights
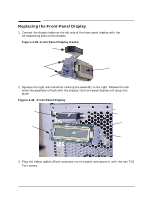
Parts Removal and Replacement Removing and Replacing the Hard Disk Backplane Board 2. Insert and tighten the four T-15 screws. 3. Connect the two cables: • Push the backplane power cable into the connector at the upper right side of the hard disk backplane board. • Push the SCSI ribbon cable into the connector at the bottom of the hard disk backplane board. Make sure that it is seated all the way into the connector. CAUTION Place both cables behind the retainer clips in the chassis wall. This will clear the rails for the power supply and ensure that the cables are not cut when the power supply is reinstalled. Chapter 2 47
-
 1
1 -
2
-
3
-
4
-
5
-
6
-
7
-
8
-
9
-
10
-
11
-
12
-
13
-
14
-
15
-
16
-
17
-
18
-
19
-
20
-
21
-
22
-
23
-
24
-
25
-
26
-
27
-
28
-
29
-
30
-
31
-
32
-
33
-
34
-
35
-
36
-
37
-
38
-
39
-
40
-
41
-
 42
42 -
 43
43 -
 44
44 -
 45
45 -
 46
46 -
 47
47 -
 48
48 -
 49
49 -
 50
50 -
 51
51 -
 52
52 -
53
-
54
-
55
-
56
 |
 |

Chapter 2
47
Parts Removal and Replacement
Removing and Replacing the Hard Disk Backplane Board
2.
Insert and tighten the four T-15 screws.
3.
Connect the two cables:
•
Push the backplane power cable into the connector at the upper right side of the
hard disk backplane board.
•
Push the SCSI ribbon cable into the connector at the bottom of the hard disk
backplane board. Make sure that it is seated all the way into the connector.
CAUTION
Place both cables behind the retainer clips in the chassis wall. This will clear
the rails for the power supply and ensure that the cables are not cut when the
power supply is reinstalled.