HP Visualize J5000 hp Visualize J5000, J7000 workstations parts removal and re - Page 34
Installing the Floppy Disk Drive
 |
View all HP Visualize J5000 manuals
Add to My Manuals
Save this manual to your list of manuals |
Page 34 highlights
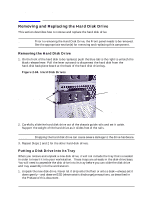
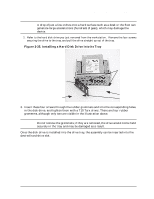
Parts Removal and Replacement Floppy Disk Drive 3. Gently slide the floppy disk drive tray assembly out of the chassis and disconnect the power and ribbon cables from the floppy disk drive. 4. Remove the floppy disk drive tray assembly from the drive bay. Installing the Floppy Disk Drive Figure 2-29. Installing the Floppy Disk Drive TT--1155TToorxrsxcrSecwrews T-15 Torx Screws T-15Torxscrew 1. Reconnect the power and ribbon cables and gently slide the floppy disk drive carrier assembly about halfway into the floppy disk drive bay. 2. From the front of the workstation, push the floppy disk drive carrier assembly into the drive bay so that the assembly rests flush against the front panel. Take care not to pinch the drive ribbon cable. Prevent the cables from being pinched by reaching through in the top of the workstation where the EMI cover was to make any required adjustments. 3. Insert and tighten the two T-15 Torx screws to secure the floppy disk drive to the front panel. Replace the EMI cover. 34 Chapter 2
-
 1
1 -
2
-
3
-
4
-
5
-
6
-
7
-
8
-
9
-
10
-
11
-
12
-
13
-
14
-
15
-
16
-
17
-
18
-
19
-
20
-
21
-
22
-
23
-
24
-
25
-
26
-
27
-
28
-
 29
29 -
 30
30 -
 31
31 -
 32
32 -
 33
33 -
 34
34 -
 35
35 -
 36
36 -
 37
37 -
 38
38 -
 39
39 -
40
-
41
-
42
-
43
-
44
-
45
-
46
-
47
-
48
-
49
-
50
-
51
-
52
-
53
-
54
-
55
-
56
 |
 |
