HP Visualize J5000 hp Visualize J5000, J7000 workstations parts removal and re - Page 41
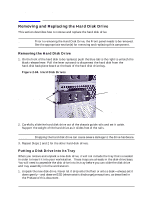
Removing the Front-Panel Display
 |
View all HP Visualize J5000 manuals
Add to My Manuals
Save this manual to your list of manuals |
Page 41 highlights
Removing the Front-Panel Display Figure 2-38. Front Panel Display T-15 Torx Screw Power Switch Parts Removal and Replacement Removing the Front-Panel Display 25-pin Connector T-15 Torx Screw Front-Panel Display Release Tab 1. Remove the two T-15 Torx screws that secure the front-panel display's connector. 2. Unplug the ribbon cable's 25-pin connector from its socket. 3. The power switch/LCD assembly has two chassis hooks on the left side and a release tab on the right side. Squeeze the release tab (push it toward the power switch) until it releases from the chassis, and then rotate the bracket left and outward to lift the hooks out of the chassis slots. Chapter 2 41
-
 1
1 -
2
-
3
-
4
-
5
-
6
-
7
-
8
-
9
-
10
-
11
-
12
-
13
-
14
-
15
-
16
-
17
-
18
-
19
-
20
-
21
-
22
-
23
-
24
-
25
-
26
-
27
-
28
-
29
-
30
-
31
-
32
-
33
-
34
-
35
-
 36
36 -
 37
37 -
 38
38 -
 39
39 -
 40
40 -
 41
41 -
 42
42 -
 43
43 -
 44
44 -
 45
45 -
 46
46 -
47
-
48
-
49
-
50
-
51
-
52
-
53
-
54
-
55
-
56
 |
 |

Chapter 2
41
Parts Removal and Replacement
Removing the Front-Panel Display
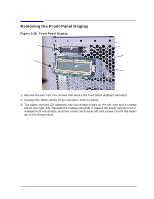
Removing the Front-Panel Display
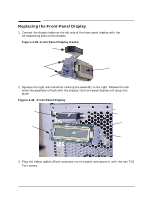
Figure 2-38. Front Panel Display
1.
Remove the two T-15 Torx screws that secure the front-panel display’s connector.
2.
Unplug the ribbon cable’s 25-pin connector from its socket.
3. The power switch/LCD assembly has two chassis hooks on the left side and a release
tab on the right side. Squeeze the release tab (push it toward the power switch) until it
releases from the chassis, and then rotate the bracket left and outward to lift the hooks
out of the chassis slots.
T-15 Torx Screw
Release Tab
Front-Panel
T-15 Torx Screw
Power Switch
25-pin Connector
Display