IBM 8668 Hardware Maintenance Manual - Page 63
Adapter considerations, The optional IBM Remote Supervisor Adapter must be installed in PCI slot 1
 |
UPC - 087944723158
View all IBM 8668 manuals
Add to My Manuals
Save this manual to your list of manuals |
Page 63 highlights
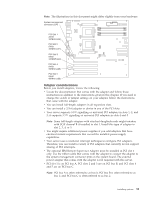
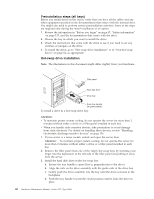
Note: The illustrations in this document might differ slightly from your hardware. System-management connector (J54) PCI Slot 1 32-bit 33 MHz (J44) PCI Slot 2 64-bit 33 MHz (J41) PCI Slot 3 64-bit 33 MHZ (J42) PCI Slot 4 64-bit 66 MHz (J29) PCI Slot 5 64-bit 66 MHz (J30) Adapter considerations Before you install adapters, review the following: v Locate the documentation that comes with the adapter and follow those instructions in addition to the instructions given in this chapter. If you need to change the switch or jumper settings on your adapter, follow the instructions that come with the adapter. v You can install full-length adapters in all expansion slots. v You can install a 32-bit adapter or device in any of the PCI slots. v Your server supports 5.0 V signalling or universal PCI adapters in slots 1, 2, and 3; it supports 3.3 V signalling or universal PCI adapters in slots 4 and 5. Note: Some full-length adapters with attached daughterboards might interfere with SCSI channel B if installed in slot 1. Install this type of adapter in slot 2, 3, 4, or 5. v You might require additional power supplies if you add adapters that have electrical current requirements that exceed the installed power-supply capabilities. v Your server uses a rotational interrupt technique to configure PCI adapters. Therefore, you can install a variety of PCI adapters that currently do not support sharing of PCI interrupts. v The optional IBM Remote Supervisor Adapter must be installed in PCI slot 1 only. Use the ribbon cable that comes with the adapter to connect the adapter to the system-management connector (J54) on the system board. The external power adapter that comes with the adapter is not required with this server. v PCI slot 1 is on PCI bus A, PCI slots 2 and 3 are on PCI bus B, and PCI slots 4 and 5 are on PCI bus C. Note: PCI bus A is often referred to as bus 0; PCI bus B is often referred to as bus 1; and PCI bus C is often referred to as bus 2. Installing options 55
-
 1
1 -
2
-
3
-
4
-
5
-
6
-
7
-
8
-
9
-
10
-
11
-
12
-
13
-
14
-
15
-
16
-
17
-
18
-
19
-
20
-
21
-
22
-
23
-
24
-
25
-
26
-
27
-
28
-
29
-
30
-
31
-
32
-
33
-
34
-
35
-
36
-
37
-
38
-
39
-
40
-
41
-
42
-
43
-
44
-
45
-
46
-
47
-
48
-
49
-
50
-
51
-
52
-
53
-
54
-
55
-
56
-
57
-
 58
58 -
 59
59 -
 60
60 -
 61
61 -
 62
62 -
 63
63 -
 64
64 -
 65
65 -
 66
66 -
 67
67 -
 68
68 -
69
-
70
-
71
-
72
-
73
-
74
-
75
-
76
-
77
-
78
-
79
-
80
-
81
-
82
-
83
-
84
-
85
-
86
-
87
-
88
-
89
-
90
-
91
-
92
-
93
-
94
-
95
-
96
-
97
-
98
-
99
-
100
-
101
-
102
-
103
-
104
-
105
-
106
-
107
-
108
-
109
-
110
-
111
-
112
-
113
-
114
-
115
-
116
-
117
-
118
-
119
-
120
-
121
-
122
-
123
-
124
-
125
-
126
-
127
-
128
-
129
-
130
-
131
-
132
-
133
-
134
-
135
-
136
-
137
-
138
-
139
-
140
-
141
-
142
-
143
-
144
-
145
-
146
-
147
-
148
-
149
-
150
-
151
-
152
-
153
-
154
-
155
-
156
-
157
-
158
-
159
-
160
-
161
-
162
-
163
-
164
-
165
-
166
-
167
-
168
-
169
-
170
-
171
-
172
-
173
-
174
-
175
-
176
-
177
-
178
 |
 |
