IBM 8668 Hardware Maintenance Manual - Page 75
Microprocessor kit installation, Notes, Attention, Models 11X, 13G, 1RX, 21X, 22X, 23G, 2RX, 2SX, 41X
 |
UPC - 087944723158
View all IBM 8668 manuals
Add to My Manuals
Save this manual to your list of manuals |
Page 75 highlights
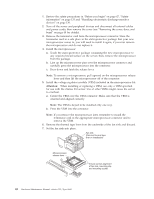
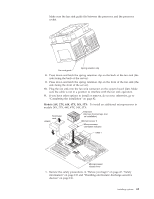
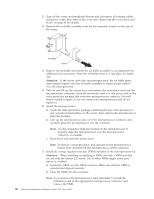
Microprocessor kit installation The server comes with one microprocessor installed on the system board. If you install an additional microprocessor, the server can operate as a symmetric multiprocessing (SMP) server. With SMP, certain operating systems and application programs can distribute the processing load between the microprocessors. This enhances performance for database and point-of-sale applications, integrated manufacturing solutions, and other applications. Notes: 1. Before you install a new microprocessor, review the documentation that comes with the microprocessor, so that you can determine whether you need to update the server basic input/output system (BIOS) code. The latest level of BIOS code for the server is available through the World Wide Web. 2. Obtain an SMP-capable operating system (optional). For a list of supported operating systems, see http://www.ibm.com/pc/compat/ on the World Wide Web. 3. The server comes with one microprocessor installed in the microprocessor connector (U68) that is closest to the power supply. This is the startup (boot) microprocessor. A microprocessor installed in connector U69 is microprocessor 2. If more than one microprocessor is installed, the microprocessor installed in microprocessor connector U69 is the startup processor, and the microprocessor installed in U68 is the application microprocessor. Attention: To avoid damage and ensure proper server operation when you install a new or additional microprocessor, use microprocessors that have the same cache size and type, and the same clock speed. See the ServerProven list at http://www.ibm.com/pc/compat/ for a list of microprocessors for use with the server. Note: The illustrations in this document might differ slightly from your hardware. Models 11X, 13G, 1RX, 21X, 22X, 23G, 2RX, 2SX, 41X, 42X, 43G, 4RX, 4SX: To install an additional microprocessor in models 11X, 13G, 1RX, 21X, 22X, 23G, 2RX, 2SX, 41X, 42X, 43G, 4RX, 4SX: Terminator card VRM 2 Fan sink (Remove themal tape liner on installation) Microprocessor 2 Microprocessor 1 location VRM 1 Microprocessor release lever Installing options 67
-
 1
1 -
2
-
3
-
4
-
5
-
6
-
7
-
8
-
9
-
10
-
11
-
12
-
13
-
14
-
15
-
16
-
17
-
18
-
19
-
20
-
21
-
22
-
23
-
24
-
25
-
26
-
27
-
28
-
29
-
30
-
31
-
32
-
33
-
34
-
35
-
36
-
37
-
38
-
39
-
40
-
41
-
42
-
43
-
44
-
45
-
46
-
47
-
48
-
49
-
50
-
51
-
52
-
53
-
54
-
55
-
56
-
57
-
58
-
59
-
60
-
61
-
62
-
63
-
64
-
65
-
66
-
67
-
68
-
69
-
 70
70 -
 71
71 -
 72
72 -
 73
73 -
 74
74 -
 75
75 -
 76
76 -
 77
77 -
 78
78 -
 79
79 -
 80
80 -
81
-
82
-
83
-
84
-
85
-
86
-
87
-
88
-
89
-
90
-
91
-
92
-
93
-
94
-
95
-
96
-
97
-
98
-
99
-
100
-
101
-
102
-
103
-
104
-
105
-
106
-
107
-
108
-
109
-
110
-
111
-
112
-
113
-
114
-
115
-
116
-
117
-
118
-
119
-
120
-
121
-
122
-
123
-
124
-
125
-
126
-
127
-
128
-
129
-
130
-
131
-
132
-
133
-
134
-
135
-
136
-
137
-
138
-
139
-
140
-
141
-
142
-
143
-
144
-
145
-
146
-
147
-
148
-
149
-
150
-
151
-
152
-
153
-
154
-
155
-
156
-
157
-
158
-
159
-
160
-
161
-
162
-
163
-
164
-
165
-
166
-
167
-
168
-
169
-
170
-
171
-
172
-
173
-
174
-
175
-
176
-
177
-
178
 |
 |
