IBM 8668 Hardware Maintenance Manual - Page 90
Completing the installation, air-baffle assembly from the server. Then, press the release latch to
 |
UPC - 087944723158
View all IBM 8668 manuals
Add to My Manuals
Save this manual to your list of manuals |
Page 90 highlights
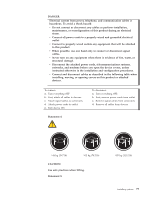
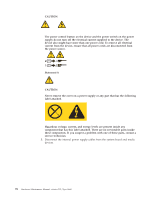
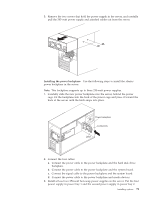
2. The illustrations in this document might differ slightly from your hardware. Hot-swap fan assembly 3 Air baffle Hot-swap fan assembly 2 Hot-swap fan assembly 1 To replace the fan assembly: 1. Review the safety precautions in "Before you begin" on page 47 and "Safety information" on page 133. 2. Remove the cover. See "Removing the cover, door, and bezel" on page 48 for details. 3. Determine which fan assembly to replace by checking the LED on each fan; a lit LED indicates the fan to replace. 4. Remove the fan assembly. Attention: The air-baffle should not be removed from the system for more than 2 minutes to avoid microprocessor overheating. a. If you are removing fan assembly 1 or fan assembly 2, press the release latch to the unlocked position; then, remove the fan assembly from the server. b. If you are removing fan assembly 3, you must first lift and remove the air-baffle assembly from the server. Then, press the release latch to the unlocked position and remove the fan assembly from the server. 5. Slide the replacement fan assembly into the server until it clicks into place. 6. If you removed the air-baffle assembly, replace it now. 7. Verify that the FAN LED on the diagnostic panel is not lit. If the FAN LED is lit, reseat the fan. 8. If you have other options to install or remove, do so now; otherwise, go to "Completing the installation". Completing the installation To complete the installation consists of replacing covers, doors and bezels that may have been removed, and then reconnecting external cables. The following sections describe how to replace covers, doors and bezels for the tower and rack models. 82 Hardware Maintenance Manual: xSeries 232, Type 8668
-
 1
1 -
2
-
3
-
4
-
5
-
6
-
7
-
8
-
9
-
10
-
11
-
12
-
13
-
14
-
15
-
16
-
17
-
18
-
19
-
20
-
21
-
22
-
23
-
24
-
25
-
26
-
27
-
28
-
29
-
30
-
31
-
32
-
33
-
34
-
35
-
36
-
37
-
38
-
39
-
40
-
41
-
42
-
43
-
44
-
45
-
46
-
47
-
48
-
49
-
50
-
51
-
52
-
53
-
54
-
55
-
56
-
57
-
58
-
59
-
60
-
61
-
62
-
63
-
64
-
65
-
66
-
67
-
68
-
69
-
70
-
71
-
72
-
73
-
74
-
75
-
76
-
77
-
78
-
79
-
80
-
81
-
82
-
83
-
84
-
 85
85 -
 86
86 -
 87
87 -
 88
88 -
 89
89 -
 90
90 -
 91
91 -
 92
92 -
 93
93 -
 94
94 -
 95
95 -
96
-
97
-
98
-
99
-
100
-
101
-
102
-
103
-
104
-
105
-
106
-
107
-
108
-
109
-
110
-
111
-
112
-
113
-
114
-
115
-
116
-
117
-
118
-
119
-
120
-
121
-
122
-
123
-
124
-
125
-
126
-
127
-
128
-
129
-
130
-
131
-
132
-
133
-
134
-
135
-
136
-
137
-
138
-
139
-
140
-
141
-
142
-
143
-
144
-
145
-
146
-
147
-
148
-
149
-
150
-
151
-
152
-
153
-
154
-
155
-
156
-
157
-
158
-
159
-
160
-
161
-
162
-
163
-
164
-
165
-
166
-
167
-
168
-
169
-
170
-
171
-
172
-
173
-
174
-
175
-
176
-
177
-
178
 |
 |
