IBM 8668 Hardware Maintenance Manual - Page 87
Installing the power backplane, Connect the power cable to the power backplane and the hard disk drive
 |
UPC - 087944723158
View all IBM 8668 manuals
Add to My Manuals
Save this manual to your list of manuals |
Page 87 highlights
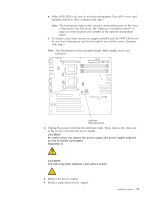
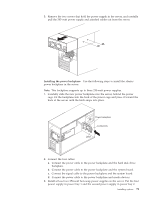
3. Remove the two screws that hold the power supply in the server, and carefully pull the 385-watt power supply and attached cables out from the server. Installing the power backplane: Use the following steps to install the xSeries power backplane in the server: Note: This backplane supports up to three 250-watt power supplies. 1. Carefully slide the new power backplane into the server, behind the power cage. Fit the backplane into the back of the power cage and press it toward the back of the server until the latch snaps into place. Power backplane Connectors Latch 2. Connect the four cables. a. Connect the power cable to the power backplane and the hard disk drive backplane. b. Connect the power cable to the power backplane and the system board. c. Connect the signal cable to the power backplane and the system board. d. Connect the power cable to the power backplane and media devices. 3. Install at least two 250-watt hot-swap power supplies in the server. Put the first power supply in power bay 1 and the second power supply in power bay 2. Installing options 79
-
 1
1 -
2
-
3
-
4
-
5
-
6
-
7
-
8
-
9
-
10
-
11
-
12
-
13
-
14
-
15
-
16
-
17
-
18
-
19
-
20
-
21
-
22
-
23
-
24
-
25
-
26
-
27
-
28
-
29
-
30
-
31
-
32
-
33
-
34
-
35
-
36
-
37
-
38
-
39
-
40
-
41
-
42
-
43
-
44
-
45
-
46
-
47
-
48
-
49
-
50
-
51
-
52
-
53
-
54
-
55
-
56
-
57
-
58
-
59
-
60
-
61
-
62
-
63
-
64
-
65
-
66
-
67
-
68
-
69
-
70
-
71
-
72
-
73
-
74
-
75
-
76
-
77
-
78
-
79
-
80
-
81
-
 82
82 -
 83
83 -
 84
84 -
 85
85 -
 86
86 -
 87
87 -
 88
88 -
 89
89 -
 90
90 -
 91
91 -
 92
92 -
93
-
94
-
95
-
96
-
97
-
98
-
99
-
100
-
101
-
102
-
103
-
104
-
105
-
106
-
107
-
108
-
109
-
110
-
111
-
112
-
113
-
114
-
115
-
116
-
117
-
118
-
119
-
120
-
121
-
122
-
123
-
124
-
125
-
126
-
127
-
128
-
129
-
130
-
131
-
132
-
133
-
134
-
135
-
136
-
137
-
138
-
139
-
140
-
141
-
142
-
143
-
144
-
145
-
146
-
147
-
148
-
149
-
150
-
151
-
152
-
153
-
154
-
155
-
156
-
157
-
158
-
159
-
160
-
161
-
162
-
163
-
164
-
165
-
166
-
167
-
168
-
169
-
170
-
171
-
172
-
173
-
174
-
175
-
176
-
177
-
178
 |
 |
