IBM 8668 Hardware Maintenance Manual - Page 69
Hot-swap drive replacement
 |
UPC - 087944723158
View all IBM 8668 manuals
Add to My Manuals
Save this manual to your list of manuals |
Page 69 highlights
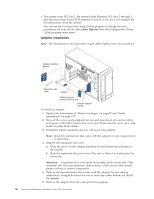
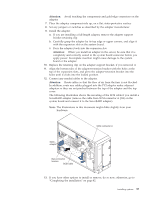
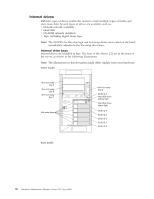
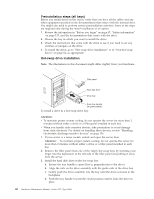
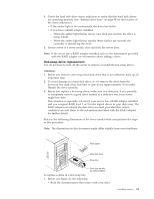
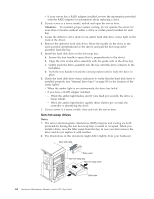
4. Check the hard disk drive status indicators to verify that the hard disk drives are operating properly (see "Internal drive bays" on page 58 for the location of the status indicators). v If the amber light is on continuously, the drive has failed. v If you have a RAID adapter installed: - When the amber light flashes slowly (one flash per second), the drive is being rebuilt. - When the amber light flashes rapidly (three flashes per second), the controller is identifying the drive. 5. If your server is a tower model, close and lock the server door. Note: If the server has a RAID adapter installed, refer to the information provided with the RAID adapter for information about adding a drive. Hot-swap drive replacement You do not have to turn off the server to remove or install the hot-swap drives. Attention: 1. Before you remove a hot-swap hard disk drive that is not defective, back up all important data. 2. To avoid damage to a hard disk drive, do not remove the drive from the hot-swap bay until it has had time to spin down (approximately 30 seconds). Handle the drive carefully. 3. Before you replace a hot-swap drive, make sure it is defective. If you partially or completely remove a good drive instead of a defective one, your server might lose data. This situation is especially relevant if your server has a RAID adapter installed and you assigned RAID level 1 or 5 to the logical drives in your disk array. The RAID adapter can rebuild the data that you need, provided that certain conditions are met. Refer to the information provided with the RAID adapter for further details. Refer to the following illustration of the tower model while you perform the steps in this procedure. Note: The illustrations in this document might differ slightly from your hardware. Filler panel Hard disk drive Drive tray Drive tray handle (in open position) To replace a drive in a hot-swap bay: 1. Before you begin, do the following: v Read the documentation that comes with your drive. Installing options 61
-
 1
1 -
2
-
3
-
4
-
5
-
6
-
7
-
8
-
9
-
10
-
11
-
12
-
13
-
14
-
15
-
16
-
17
-
18
-
19
-
20
-
21
-
22
-
23
-
24
-
25
-
26
-
27
-
28
-
29
-
30
-
31
-
32
-
33
-
34
-
35
-
36
-
37
-
38
-
39
-
40
-
41
-
42
-
43
-
44
-
45
-
46
-
47
-
48
-
49
-
50
-
51
-
52
-
53
-
54
-
55
-
56
-
57
-
58
-
59
-
60
-
61
-
62
-
63
-
 64
64 -
 65
65 -
 66
66 -
 67
67 -
 68
68 -
 69
69 -
 70
70 -
 71
71 -
 72
72 -
 73
73 -
 74
74 -
75
-
76
-
77
-
78
-
79
-
80
-
81
-
82
-
83
-
84
-
85
-
86
-
87
-
88
-
89
-
90
-
91
-
92
-
93
-
94
-
95
-
96
-
97
-
98
-
99
-
100
-
101
-
102
-
103
-
104
-
105
-
106
-
107
-
108
-
109
-
110
-
111
-
112
-
113
-
114
-
115
-
116
-
117
-
118
-
119
-
120
-
121
-
122
-
123
-
124
-
125
-
126
-
127
-
128
-
129
-
130
-
131
-
132
-
133
-
134
-
135
-
136
-
137
-
138
-
139
-
140
-
141
-
142
-
143
-
144
-
145
-
146
-
147
-
148
-
149
-
150
-
151
-
152
-
153
-
154
-
155
-
156
-
157
-
158
-
159
-
160
-
161
-
162
-
163
-
164
-
165
-
166
-
167
-
168
-
169
-
170
-
171
-
172
-
173
-
174
-
175
-
176
-
177
-
178
 |
 |
