IBM 8668 Hardware Maintenance Manual - Page 89
Models 24X, 2TX, 44X, 4TX, 54X, 5TX, Attention, Notes, Completing the installation
 |
UPC - 087944723158
View all IBM 8668 manuals
Add to My Manuals
Save this manual to your list of manuals |
Page 89 highlights
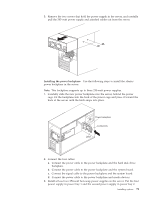
Note: The illustrations in this document might differ slightly from your hardware. Fan assembly Fan assembly latch Fan assembly latch Fan assembly To replace the fan assembly: 1. Review the safety precautions in "Before you begin" on page 47 and "Safety information" on page 133. 2. Turn off the server and peripherals. 3. Remove the cover. See "Removing the cover, door, and bezel" on page 48 for details. 4. Determine which fan assembly to replace by checking the LED on each fan; a lit LED indicates the fan to replace. 5. Remove the fan assembly from the server: a. Disconnect the fan cable from the system board. b. Press the blue release latch for the fan, and pull the fan away from the server. 6. Slide the replacement fan assembly into the server until it clicks into place. 7. Connect the fan cable to the system board. 8. Verify that the FAN LED on the diagnostic panel is not lit. If the FAN LED is lit, reseat the fan. 9. If you have other options to install or remove, do so now; otherwise, go to "Completing the installation" on page 82. Models 24X, 2TX, 44X, 4TX, 54X, 5TX: This configuration comes with three hot-swap fan assemblies. Attention: Immediately replace a fan that has failed to help ensure proper cooling. The following illustrations show the replacement of a hot-swap fan assembly. Refer to these illustrations while performing the steps in this procedure. Notes: 1. You do not need to turn off the power to the server to replace a hot-swap fan assembly. Installing options 81
-
 1
1 -
2
-
3
-
4
-
5
-
6
-
7
-
8
-
9
-
10
-
11
-
12
-
13
-
14
-
15
-
16
-
17
-
18
-
19
-
20
-
21
-
22
-
23
-
24
-
25
-
26
-
27
-
28
-
29
-
30
-
31
-
32
-
33
-
34
-
35
-
36
-
37
-
38
-
39
-
40
-
41
-
42
-
43
-
44
-
45
-
46
-
47
-
48
-
49
-
50
-
51
-
52
-
53
-
54
-
55
-
56
-
57
-
58
-
59
-
60
-
61
-
62
-
63
-
64
-
65
-
66
-
67
-
68
-
69
-
70
-
71
-
72
-
73
-
74
-
75
-
76
-
77
-
78
-
79
-
80
-
81
-
82
-
83
-
 84
84 -
 85
85 -
 86
86 -
 87
87 -
 88
88 -
 89
89 -
 90
90 -
 91
91 -
 92
92 -
 93
93 -
 94
94 -
95
-
96
-
97
-
98
-
99
-
100
-
101
-
102
-
103
-
104
-
105
-
106
-
107
-
108
-
109
-
110
-
111
-
112
-
113
-
114
-
115
-
116
-
117
-
118
-
119
-
120
-
121
-
122
-
123
-
124
-
125
-
126
-
127
-
128
-
129
-
130
-
131
-
132
-
133
-
134
-
135
-
136
-
137
-
138
-
139
-
140
-
141
-
142
-
143
-
144
-
145
-
146
-
147
-
148
-
149
-
150
-
151
-
152
-
153
-
154
-
155
-
156
-
157
-
158
-
159
-
160
-
161
-
162
-
163
-
164
-
165
-
166
-
167
-
168
-
169
-
170
-
171
-
172
-
173
-
174
-
175
-
176
-
177
-
178
 |
 |
