IBM 867431X Hardware Maintenance Manual - Page 101
Installing the cover, If the FAN LED is lit, reseat the fan.
 |
View all IBM 867431X manuals
Add to My Manuals
Save this manual to your list of manuals |
Page 101 highlights
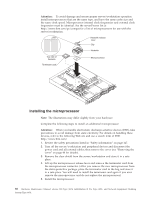
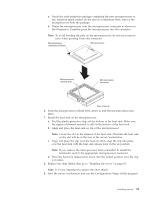
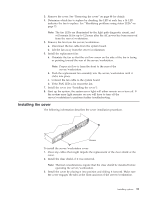
3. Remove the cover. See "Removing the cover" on page 48 for details. 4. Determine which fan to replace by checking the LED at each fan; a lit LED indicates the fan to replace. See "Identifying problems using status LEDs" on page 13. Note: The fan LEDs are illuminated by the light path diagnostic circuit, and will remain lit for up to 12 hours after the AC power has been removed from the server/workstation. 5. Remove the fan from the server/workstation: a. Disconnect the fan cable from the system board. b. Lift the fan away from the server/workstation. 6. Install the replacement fan: a. Orientate the fan so that the air flow arrow on the side of the fan is facing or pointing toward the rear of the server/workstation. Note: Proper air flow is from the front to the rear of the server/workstation. b. Push the replacement fan assembly into the server/workstation until it clicks into place. c. Connect the fan cable to the system board. d. If the FAN LED is lit, reseat the fan. 7. Install the cover (see "Installing the cover"). 8. Start up the system, the system error light will either remain on or turn off. If the system error light remains on you will have to turn off the server/workstation to perform further troubleshooting. Installing the cover The following information describes the cover installation procedure. Screws To install the server/workstation cover: 1. Clear any cables that might impede the replacement of the clear shield or the cover. 2. Install the clear shield, if it was removed. Note: Thermal considerations require that the clear shield be installed before operating the server/workstation. 3. Install the cover by placing it into position and sliding it forward. Make sure the cover engages the tabs at the front and rear of the server/workstation. Installing options 93
-
 1
1 -
2
-
3
-
4
-
5
-
6
-
7
-
8
-
9
-
10
-
11
-
12
-
13
-
14
-
15
-
16
-
17
-
18
-
19
-
20
-
21
-
22
-
23
-
24
-
25
-
26
-
27
-
28
-
29
-
30
-
31
-
32
-
33
-
34
-
35
-
36
-
37
-
38
-
39
-
40
-
41
-
42
-
43
-
44
-
45
-
46
-
47
-
48
-
49
-
50
-
51
-
52
-
53
-
54
-
55
-
56
-
57
-
58
-
59
-
60
-
61
-
62
-
63
-
64
-
65
-
66
-
67
-
68
-
69
-
70
-
71
-
72
-
73
-
74
-
75
-
76
-
77
-
78
-
79
-
80
-
81
-
82
-
83
-
84
-
85
-
86
-
87
-
88
-
89
-
90
-
91
-
92
-
93
-
94
-
95
-
 96
96 -
 97
97 -
 98
98 -
 99
99 -
 100
100 -
 101
101 -
 102
102 -
 103
103 -
 104
104 -
 105
105 -
 106
106 -
107
-
108
-
109
-
110
-
111
-
112
-
113
-
114
-
115
-
116
-
117
-
118
-
119
-
120
-
121
-
122
-
123
-
124
-
125
-
126
-
127
-
128
-
129
-
130
-
131
-
132
-
133
-
134
-
135
-
136
-
137
-
138
-
139
-
140
-
141
-
142
-
143
-
144
-
145
-
146
-
147
-
148
-
149
-
150
-
151
-
152
-
153
-
154
-
155
-
156
-
157
-
158
-
159
-
160
-
161
-
162
-
163
-
164
-
165
-
166
-
167
-
168
-
169
-
170
-
171
-
172
-
173
-
174
-
175
-
176
-
177
-
178
-
179
-
180
-
181
-
182
-
183
-
184
-
185
-
186
-
187
-
188
-
189
-
190
-
191
-
192
 |
 |
