Konica Minolta bizhub C3350 bizhub C3850/C3350 Scan Functions User Guide - Page 92
TWAIN scanning
 |
View all Konica Minolta bizhub C3350 manuals
Add to My Manuals
Save this manual to your list of manuals |
Page 92 highlights
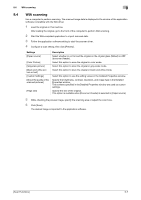
9.3 TWAIN scanning 9 9.3 TWAIN scanning Use a computer to perform scanning. The scanned image data is displayed in the window of the application software compatible with the TWAIN driver. 1 Load the original on this machine. After loading the original, go to the front of the computer to perform TWAIN scanning. 2 Start the TWAIN-compliant application to import scanned data. 3 Follow the application software setting to start the scanner driver. 4 If the original is loaded into the Original Glass, click [Prescan] to import the original to the preview area. % If the original is loaded into the ADF, [Prescan] is not available. Go to Step 5. 5 Configure scan settings. % [Basic Mode] setting items Settings [Scan Objective] [Scan Type] [Resolution] [Auto Color Adjustment] [Auto Deskew] [Paper source] [Original Size] [Rotation] [Image size] Clear icon [Before] / [After] (RGB) [Width] / [Height] Description Select the document type. Specify the type of image to be scanned. Select the desired one from full color, gray, or black and white. Select the resolution at which to scan the original. Specify whether or not to automatically adjust the color. Specify whether or not to automatically adjust the inclination of the original. Select whether or not to load the original on the original glass (flatbed) or ADF. When using the ADF to scan the original, select 1-sided or 2-sided. Specify the size of the original. Specify the orientation of the image to be scanned. Selecting the [Rotate back side] check box rotates the back side 180 degrees to scan the original (this setting is available when [Paper source] is set to [ADF (2-sided)]). Displays the data size of the image to be scanned. Clears the preview image. If you move the cursor on the preview image, the image at the cursor position is displayed with the tone before and after the adjustment. Displays the width and height of the selected range in the preview area. [Scan Functions] 9-5
-
 1
1 -
2
-
3
-
4
-
5
-
6
-
7
-
8
-
9
-
10
-
11
-
12
-
13
-
14
-
15
-
16
-
17
-
18
-
19
-
20
-
21
-
22
-
23
-
24
-
25
-
26
-
27
-
28
-
29
-
30
-
31
-
32
-
33
-
34
-
35
-
36
-
37
-
38
-
39
-
40
-
41
-
42
-
43
-
44
-
45
-
46
-
47
-
48
-
49
-
50
-
51
-
52
-
53
-
54
-
55
-
56
-
57
-
58
-
59
-
60
-
61
-
62
-
63
-
64
-
65
-
66
-
67
-
68
-
69
-
70
-
71
-
72
-
73
-
74
-
75
-
76
-
77
-
78
-
79
-
80
-
81
-
82
-
83
-
84
-
85
-
86
-
 87
87 -
 88
88 -
 89
89 -
 90
90 -
 91
91 -
 92
92 -
 93
93 -
 94
94 -
 95
95 -
 96
96 -
 97
97 -
98
-
99
-
100
-
101
 |
 |