Konica Minolta bizhub C3350 bizhub C3850/C3350 PC-Fax Functions User Guide - Page 53
Available operations in the [FAX] tab, Print Recipient File]
 |
View all Konica Minolta bizhub C3350 manuals
Add to My Manuals
Save this manual to your list of manuals |
Page 53 highlights
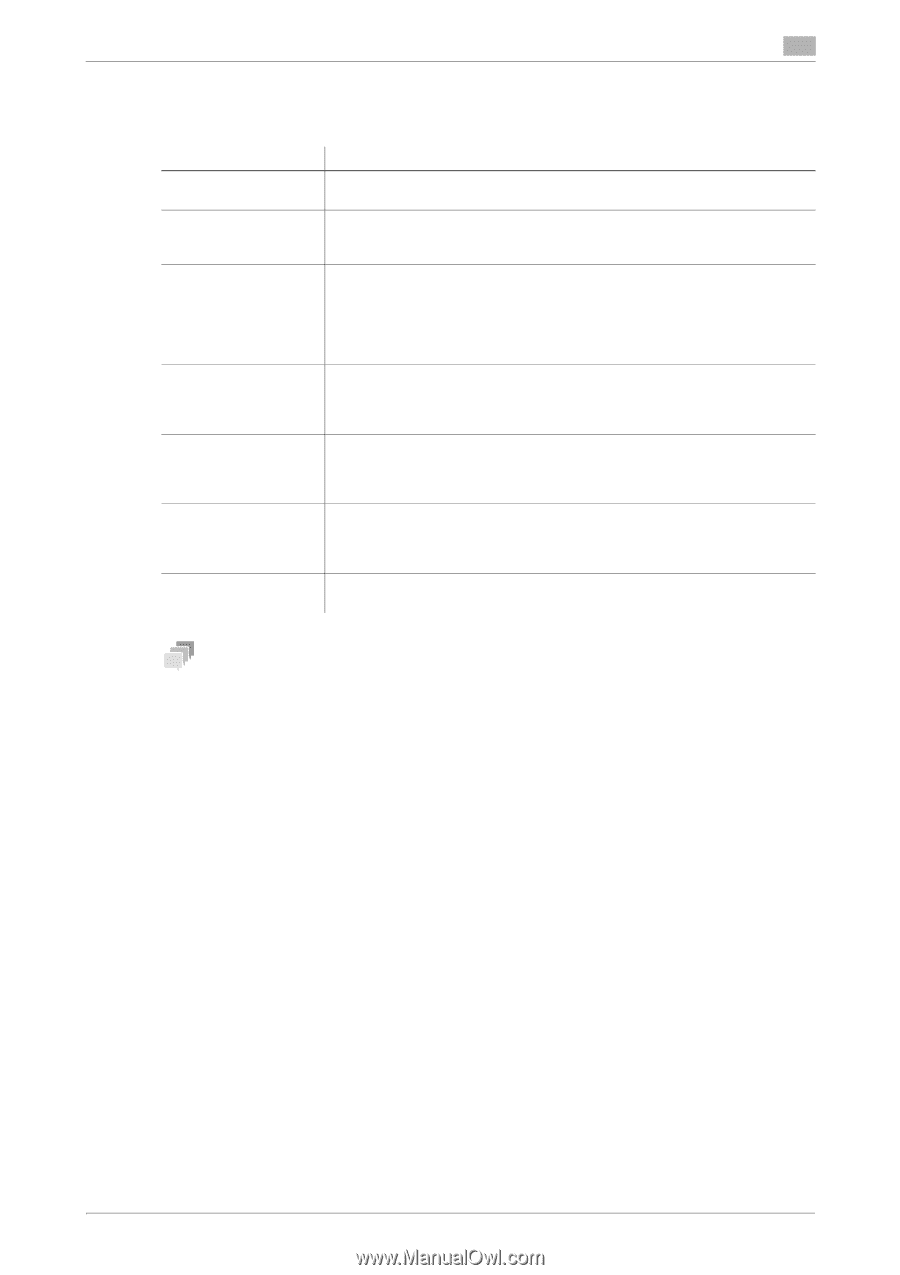
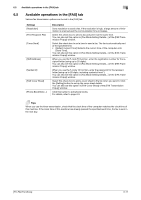
6.5 Available operations in the [FAX] tab 6 6.5 Available operations in the [FAX] tab Various fax transmission options can be set in the [FAX] tab. Settings [Resolution] [Print Recipient File] [Timer Send] [SUB Address] [Sender ID] [FAX Cover Sheet] [Phone Book Entry...] Description Set a resolution to send a fax. If the resolution is high, a large amount of information is scanned and the communication time increases. Select this check box to send a fax and print it at the same time. You can also set this option in [Fax Mode Setting Details...] of the [FAX Transmission Popup] window. Select this check box to set a time to send a fax. The fax is automatically sent at the specified time. • [Reflect Current Time]: Reflects the current time of the computer onto [Send Time]. You can also set this option in [Fax Mode Setting Details...] of the [FAX Transmission Popup] window. When you use the F-code TX function, enter the registration number for the recipient folder (using up to 20 digits). You can also set this option in [Fax Mode Setting Details...] of the [FAX Transmission Popup] window. When you use the F-code TX function, enter the password for the recipient folder (using up to 20 digits, including symbols # and *). You can also set this option in [Fax Mode Setting Details...] of the [FAX Transmission Popup] window. Select this check box to add a cover sheet to the fax when you send it. Click the [Setting] button to set up the cover sheet details. You can also set this option in [FAX Cover Sheet] of the [FAX Transmission Popup] window. Click this button to edit phone books. For details, refer to page 4-9. Tips When you use the timer transmission, check that the clock time of the computer matches the clock time of this machine. If the clock time of this machine has already passed the specified send time, the fax is sent in the next day. [PC-FAX Functions] 6-11
-
 1
1 -
2
-
3
-
4
-
5
-
6
-
7
-
8
-
9
-
10
-
11
-
12
-
13
-
14
-
15
-
16
-
17
-
18
-
19
-
20
-
21
-
22
-
23
-
24
-
25
-
26
-
27
-
28
-
29
-
30
-
31
-
32
-
33
-
34
-
35
-
36
-
37
-
38
-
39
-
40
-
41
-
42
-
43
-
44
-
45
-
46
-
47
-
 48
48 -
 49
49 -
 50
50 -
 51
51 -
 52
52 -
 53
53 -
 54
54 -
 55
55 -
 56
56 -
 57
57 -
 58
58 -
59
-
60
-
61
 |
 |