Konica Minolta bizhub C360 bizhub C220/C280/C360 Security Operations User Guid - Page 127
If two or more Secure Print Documents, each having an identical Secure Print ID and Secure Print
 |
View all Konica Minolta bizhub C360 manuals
Add to My Manuals
Save this manual to your list of manuals |
Page 127 highlights
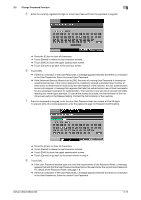
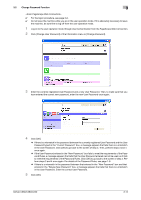
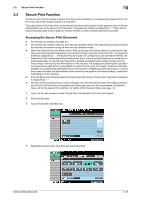
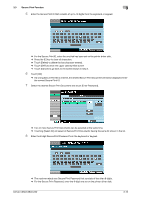
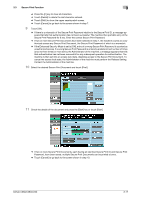
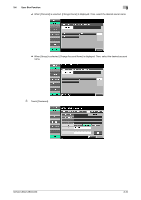
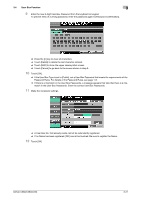
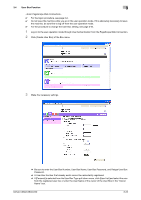
3.3 Secure Print Function 3 % Press the [C] key to clear all characters. % Touch [Delete] to delete the last character entered. % Touch [Shift] to show the upper case/symbol screen. % Touch [Cancel] to go back to the screen shown in step 7. 9 Touch [OK]. % If there is a mismatch of the Secure Print Password relative to the Secure Print ID, a message appears that tells that authentication has not been successful. The machine then prohibits entry of the Secure Print Password for 5 sec. Enter the correct Secure Print Password. % If two or more Secure Print Documents have been selected in step 7, the machine counts as unauthorized access any Secure Print Document, the Secure Print Password of which is a mismatch. % If the Enhanced Security Mode is set to [ON], entry of a wrong Secure Print Password is counted as unauthorized access. If a wrong Secure Print Password is entered a predetermined number of times (once to three times) or more set by the Administrator of the machine, a message appears that tells that authentication has not been successful for any subsequent operation for authentication. The machine is then set into an access lock state, disabling access to the Secure Print Document. To cancel the access lock state, the Administrator of the machine must perform the Release Setting. Contact the Administrator of the machine. 10 Select the desired Secure Print Document and touch [Print]. 11 Check the details of the document and press the [Start] key or touch [Start]. % If two or more Secure Print Documents, each having an identical Secure Print ID and Secure Print Password, have been saved, multiple Secure Print Documents can be printed at once. % Touch [Cancel] to go back to the screen shown in step 10. bizhub C360/C280/C220 3-17
-
 1
1 -
2
-
3
-
4
-
5
-
6
-
7
-
8
-
9
-
10
-
11
-
12
-
13
-
14
-
15
-
16
-
17
-
18
-
19
-
20
-
21
-
22
-
23
-
24
-
25
-
26
-
27
-
28
-
29
-
30
-
31
-
32
-
33
-
34
-
35
-
36
-
37
-
38
-
39
-
40
-
41
-
42
-
43
-
44
-
45
-
46
-
47
-
48
-
49
-
50
-
51
-
52
-
53
-
54
-
55
-
56
-
57
-
58
-
59
-
60
-
61
-
62
-
63
-
64
-
65
-
66
-
67
-
68
-
69
-
70
-
71
-
72
-
73
-
74
-
75
-
76
-
77
-
78
-
79
-
80
-
81
-
82
-
83
-
84
-
85
-
86
-
87
-
88
-
89
-
90
-
91
-
92
-
93
-
94
-
95
-
96
-
97
-
98
-
99
-
100
-
101
-
102
-
103
-
104
-
105
-
106
-
107
-
108
-
109
-
110
-
111
-
112
-
113
-
114
-
115
-
116
-
117
-
118
-
119
-
120
-
121
-
 122
122 -
 123
123 -
 124
124 -
 125
125 -
 126
126 -
 127
127 -
 128
128 -
 129
129 -
 130
130 -
 131
131 -
 132
132 -
133
-
134
-
135
-
136
-
137
-
138
-
139
-
140
-
141
-
142
-
143
-
144
-
145
-
146
-
147
-
148
-
149
-
150
-
151
-
152
-
153
-
154
-
155
-
156
-
157
-
158
-
159
-
160
-
161
-
162
-
163
-
164
-
165
-
166
-
167
-
168
-
169
-
170
-
171
-
172
-
173
-
174
-
175
-
176
-
177
-
178
-
179
-
180
-
181
-
182
-
183
 |
 |
