Konica Minolta bizhub C650 bizhub C650 Network Scanner Operations User Guide - Page 68
Sending data to a server (Scan to FTP), Scan to FTP, Selecting a destination from the address - scan to email
 |
View all Konica Minolta bizhub C650 manuals
Add to My Manuals
Save this manual to your list of manuals |
Page 68 highlights
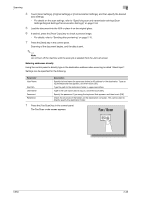
Scanning 2 2.8 Sending data to a server (Scan to FTP) Scan to FTP The Scan to FTP operation can be used in a network environment that contains an FTP server. The scan data can be sent to a folder specified on an FTP server on the network. This is suitable for transmitting large-sized data, such as high-resolution data. Destinations can be selected using any of the following methods. In addition, the methods can be combined, for example, by selecting a recipient from a group destination, then adding other destinations through direct input. Transmission may not be possible if the document name is too long according to the destination server conditions. Since the scanning settings are used, consult your network administrator when specifying the document name. Destinations can be selected for Scan to FTP operations using any of the following methods. For details, refer to the corresponding section. Selection method Selecting from the address book Entering addresses directly Selecting a group destination Selecting a destination that was searched for Page reference p. 2-41 p. 2-43 p. 2-28 p. 2-31 ! Detail If a mail server is available in the network environment, the e-mail notification function can be used to send notifications that jobs are completed. For details on the e-mail notification function, refer to "EMail Setting" on page 2-91. If a proxy server is available in the network environment, an FTP server on the Internet can be accessed through the proxy server. For an overview of the Scan to FTP operation, refer to "Scan to FTP" on page 1-3. Selecting a destination from the address book Follow the procedure described below to send data by selecting a recipient from the already registered destinations. For details on registering destinations, refer to "Registering an address book destination" on page 3-7. 1 Press the [Fax/Scan] key in the control panel. The Fax/Scan mode screen appears. 2 Touch [Address Book]. - The index appears if "Address Book Default" (displayed by touching [Custom Display Settings] on the User Settings screen, then [Fax/Scan Settings]) is set to "Index". If "Address Type" is selected, the index of destination types is displayed. - The corresponding address appears as the name of the registered destination when an index button is touched. C650 2-41
-
 1
1 -
2
-
3
-
4
-
5
-
6
-
7
-
8
-
9
-
10
-
11
-
12
-
13
-
14
-
15
-
16
-
17
-
18
-
19
-
20
-
21
-
22
-
23
-
24
-
25
-
26
-
27
-
28
-
29
-
30
-
31
-
32
-
33
-
34
-
35
-
36
-
37
-
38
-
39
-
40
-
41
-
42
-
43
-
44
-
45
-
46
-
47
-
48
-
49
-
50
-
51
-
52
-
53
-
54
-
55
-
56
-
57
-
58
-
59
-
60
-
61
-
62
-
 63
63 -
 64
64 -
 65
65 -
 66
66 -
 67
67 -
 68
68 -
 69
69 -
 70
70 -
 71
71 -
 72
72 -
 73
73 -
74
-
75
-
76
-
77
-
78
-
79
-
80
-
81
-
82
-
83
-
84
-
85
-
86
-
87
-
88
-
89
-
90
-
91
-
92
-
93
-
94
-
95
-
96
-
97
-
98
-
99
-
100
-
101
-
102
-
103
-
104
-
105
-
106
-
107
-
108
-
109
-
110
-
111
-
112
-
113
-
114
-
115
-
116
-
117
-
118
-
119
-
120
-
121
-
122
-
123
-
124
-
125
-
126
-
127
-
128
-
129
-
130
-
131
-
132
-
133
-
134
-
135
-
136
-
137
-
138
-
139
-
140
-
141
-
142
-
143
-
144
-
145
-
146
-
147
-
148
-
149
-
150
-
151
-
152
-
153
-
154
-
155
-
156
-
157
-
158
-
159
-
160
-
161
-
162
-
163
-
164
-
165
-
166
-
167
-
168
-
169
-
170
-
171
-
172
-
173
-
174
-
175
-
176
-
177
-
178
-
179
-
180
-
181
-
182
-
183
-
184
-
185
-
186
-
187
-
188
-
189
-
190
-
191
-
192
-
193
-
194
-
195
-
196
-
197
-
198
-
199
-
200
-
201
-
202
-
203
-
204
-
205
-
206
-
207
-
208
-
209
-
210
-
211
-
212
-
213
-
214
-
215
-
216
-
217
-
218
-
219
-
220
-
221
-
222
-
223
-
224
-
225
-
226
-
227
-
228
-
229
-
230
-
231
-
232
-
233
-
234
-
235
-
236
-
237
-
238
-
239
-
240
-
241
-
242
-
243
-
244
-
245
-
246
-
247
-
248
-
249
-
250
-
251
-
252
-
253
-
254
-
255
-
256
-
257
-
258
-
259
-
260
-
261
-
262
-
263
-
264
-
265
-
266
-
267
-
268
-
269
-
270
-
271
-
272
-
273
-
274
-
275
-
276
-
277
-
278
-
279
-
280
-
281
-
282
-
283
-
284
-
285
-
286
-
287
-
288
-
289
-
290
-
291
-
292
-
293
-
294
-
295
-
296
-
297
-
298
-
299
-
300
-
301
-
302
-
303
-
304
 |
 |