Konica Minolta bizhub C754 bizhub C654/C754 Copy Operations User Guide - Page 121
[Stamp Repeat
 |
View all Konica Minolta bizhub C754 manuals
Add to My Manuals
Save this manual to your list of manuals |
Page 121 highlights
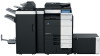
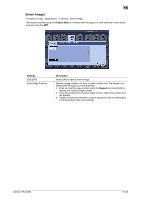
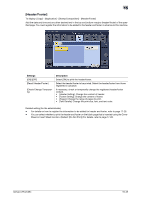
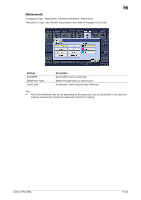
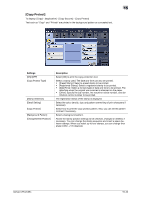
15 [Stamp Repeat] To display: [Copy] - [Application] - [Stamp/Composition] - [Stamp Repeat] Stamp such as "Copy" and "Private" are printed on the entire page. Settings [ON]/[OFF] [Stamp Repeat Type] [Stamp Selection] [Detail Setting] [Change/Delete Position] Description Press [ON] to repeat stamping. Select a stamp used. The date and time can also be printed. • [Preset Stamp]: Select a preset stamp to be printed. • [Registered Stamp]: Select a registered stamp to be printed. • [Date/Time]: Select a format (type) of date and time to be printed. The date/time when the original was scanned is stamped on the paper. • [Other]: Specify the job number, the machine's serial number, and dis- tribution control number to be printed. The registration status of the stamp is displayed. Select the color, density, size, and pattern overwriting of print characters if necessary. Allows the stamp position settings to be checked, changed or deleted, if necessary. You can change the stamp sequence and insert a space between stamps. When you select up to four stamps, you can change their angle (within +/-45 degrees). Tips - You can print multiple stamps, such as registered stamp, preset stamp, date/time, job number, and serial number, at a time. However, the number of stamps that can be printed may be limited depending on the type and angle of the selected stamps. bizhub C754/C654 15-44
-
 1
1 -
2
-
3
-
4
-
5
-
6
-
7
-
8
-
9
-
10
-
11
-
12
-
13
-
14
-
15
-
16
-
17
-
18
-
19
-
20
-
21
-
22
-
23
-
24
-
25
-
26
-
27
-
28
-
29
-
30
-
31
-
32
-
33
-
34
-
35
-
36
-
37
-
38
-
39
-
40
-
41
-
42
-
43
-
44
-
45
-
46
-
47
-
48
-
49
-
50
-
51
-
52
-
53
-
54
-
55
-
56
-
57
-
58
-
59
-
60
-
61
-
62
-
63
-
64
-
65
-
66
-
67
-
68
-
69
-
70
-
71
-
72
-
73
-
74
-
75
-
76
-
77
-
78
-
79
-
80
-
81
-
82
-
83
-
84
-
85
-
86
-
87
-
88
-
89
-
90
-
91
-
92
-
93
-
94
-
95
-
96
-
97
-
98
-
99
-
100
-
101
-
102
-
103
-
104
-
105
-
106
-
107
-
108
-
109
-
110
-
111
-
112
-
113
-
114
-
115
-
 116
116 -
 117
117 -
 118
118 -
 119
119 -
 120
120 -
 121
121 -
 122
122 -
 123
123 -
 124
124 -
 125
125 -
 126
126 -
127
-
128
-
129
-
130
-
131
-
132
-
133
-
134
-
135
-
136
-
137
-
138
-
139
-
140
-
141
-
142
-
143
-
144
-
145
-
146
-
147
-
148
-
149
-
150
-
151
-
152
-
153
-
154
-
155
-
156
-
157
-
158
-
159
-
160
-
161
-
162
-
163
-
164
-
165
-
166
-
167
-
168
-
169
-
170
-
171
-
172
-
173
-
174
-
175
-
176
-
177
-
178
-
179
-
180
-
181
-
182
-
183
-
184
-
185
-
186
-
187
-
188
-
189
-
190
-
191
-
192
-
193
-
194
-
195
-
196
-
197
-
198
-
199
-
200
-
201
-
202
-
203
-
204
-
205
-
206
-
207
-
208
-
209
-
210
-
211
-
212
-
213
-
214
-
215
-
216
-
217
-
218
-
219
-
220
-
221
-
222
 |
 |
