Konica Minolta bizhub C754 bizhub C654/C754 Copy Operations User Guide - Page 65
Inserting an original into the specified Insert Image]), then press
 |
View all Konica Minolta bizhub C754 manuals
Add to My Manuals
Save this manual to your list of manuals |
Page 65 highlights
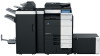
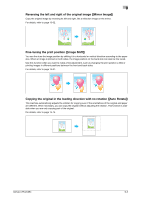
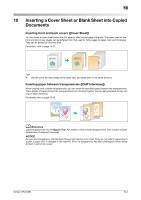
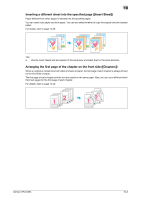
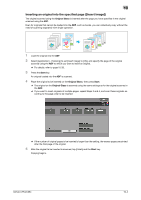
10 Inserting an original into the specified page ([Insert Image]) The original scanned using the Original Glass is inserted after the page you have specified in the original scanned using the ADF. Even for originals that cannot be loaded into the ADF, such as books, you can collectively copy without the need of scanning separately with single operation. 1 Load the original into the ADF. 2 Select [Application] - [Tailoring] to set [Insert Image] to [ON], and specify the page of the original scanned using the ADF to which you want to insert an original. % For details, refer to page 15-39. 3 Press the Start key. An original loaded into the ADF is scanned. 4 Place the original to be inserted on the Original Glass, then press Start. % The original on the Original Glass is scanned using the same settings as for the original scanned in the ADF. % If you want to insert originals of multiple pages, repeat Steps 3 and 4, and scan these originals according to the page order to be inserted. % If the number of original pages to be inserted is larger than the setting, the excess pages are printed after the final page of the original. 5 After the original to be inserted is scanned, tap [Finish] and the Start key. Copying begins. bizhub C754/C654 10-4
-
 1
1 -
2
-
3
-
4
-
5
-
6
-
7
-
8
-
9
-
10
-
11
-
12
-
13
-
14
-
15
-
16
-
17
-
18
-
19
-
20
-
21
-
22
-
23
-
24
-
25
-
26
-
27
-
28
-
29
-
30
-
31
-
32
-
33
-
34
-
35
-
36
-
37
-
38
-
39
-
40
-
41
-
42
-
43
-
44
-
45
-
46
-
47
-
48
-
49
-
50
-
51
-
52
-
53
-
54
-
55
-
56
-
57
-
58
-
59
-
 60
60 -
 61
61 -
 62
62 -
 63
63 -
 64
64 -
 65
65 -
 66
66 -
 67
67 -
 68
68 -
 69
69 -
 70
70 -
71
-
72
-
73
-
74
-
75
-
76
-
77
-
78
-
79
-
80
-
81
-
82
-
83
-
84
-
85
-
86
-
87
-
88
-
89
-
90
-
91
-
92
-
93
-
94
-
95
-
96
-
97
-
98
-
99
-
100
-
101
-
102
-
103
-
104
-
105
-
106
-
107
-
108
-
109
-
110
-
111
-
112
-
113
-
114
-
115
-
116
-
117
-
118
-
119
-
120
-
121
-
122
-
123
-
124
-
125
-
126
-
127
-
128
-
129
-
130
-
131
-
132
-
133
-
134
-
135
-
136
-
137
-
138
-
139
-
140
-
141
-
142
-
143
-
144
-
145
-
146
-
147
-
148
-
149
-
150
-
151
-
152
-
153
-
154
-
155
-
156
-
157
-
158
-
159
-
160
-
161
-
162
-
163
-
164
-
165
-
166
-
167
-
168
-
169
-
170
-
171
-
172
-
173
-
174
-
175
-
176
-
177
-
178
-
179
-
180
-
181
-
182
-
183
-
184
-
185
-
186
-
187
-
188
-
189
-
190
-
191
-
192
-
193
-
194
-
195
-
196
-
197
-
198
-
199
-
200
-
201
-
202
-
203
-
204
-
205
-
206
-
207
-
208
-
209
-
210
-
211
-
212
-
213
-
214
-
215
-
216
-
217
-
218
-
219
-
220
-
221
-
222
 |
 |
