Konica Minolta bizhub C754 bizhub C654/C754 Copy Operations User Guide - Page 155
[AE Level Adjustment], [Printer Adjustment]
 |
View all Konica Minolta bizhub C754 manuals
Add to My Manuals
Save this manual to your list of manuals |
Page 155 highlights
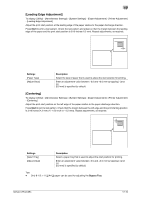
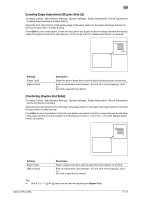
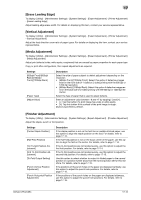
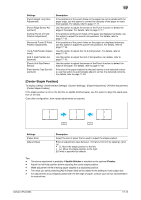
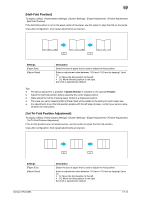
17 Settings [Erase Adjustment] [PS Designer Settings] Description Specify the operation and erase method when erasing the area outside the original by setting [Non-Image Area Erase]. Specify whether to reproduce the colors in the original strictly as they are when printing it using a PS driver from your computer. [AE Level Adjustment] To display: [Utility] - [Administrator Settings] - [System Settings] - [Expert Adjustment] - [AE Level Adjustment] Adjust the AE (Auto Exposure) level. Tap [Higher] or [Lower] to adjust the automatic exposure to one of the five levels. The larger the number, the darker the background. [2] is specified by default. [Printer Adjustment] To display: [Utility] - [Administrator Settings] - [System Settings] - [Expert Adjustment] - [Printer Adjustment] Adjust the print start position and defective print images. Settings [Leading Edge Adjustment] [Centering] [Leading Edge Adjustment (Duplex Side 2)] [Centering (Duplex 2nd Side)] [Erase Leading Edge] [Vertical Adjustment] [Media Adjustment] Description Adjust the print start position at the leading edge of the paper relative to the paper discharge direction. For details, refer to page 17-10. Adjust the print start position on the left edge of the paper relative to the paper discharge direction. For details, refer to page 17-10. Adjust the print start position at the leading edge of the back side of the paper relative to the paper discharge direction for printing the back side in 2-sided printing. For details, refer to page 17-11. Adjust the print start position at the left edge of the paper relative to the paper discharge direction for printing the back side in 2-sided printing. For details, refer to page 17-11. Adjust leading edge erase width. For details, contact your service representative. Adjust the feed direction zoom ratio of paper types. For details, contact your service representative. Adjust print defects (voids, white spots, roughness) that are caused by paper properties for each paper type. For details, refer to page 17-12. bizhub C754/C654 17-9
-
 1
1 -
2
-
3
-
4
-
5
-
6
-
7
-
8
-
9
-
10
-
11
-
12
-
13
-
14
-
15
-
16
-
17
-
18
-
19
-
20
-
21
-
22
-
23
-
24
-
25
-
26
-
27
-
28
-
29
-
30
-
31
-
32
-
33
-
34
-
35
-
36
-
37
-
38
-
39
-
40
-
41
-
42
-
43
-
44
-
45
-
46
-
47
-
48
-
49
-
50
-
51
-
52
-
53
-
54
-
55
-
56
-
57
-
58
-
59
-
60
-
61
-
62
-
63
-
64
-
65
-
66
-
67
-
68
-
69
-
70
-
71
-
72
-
73
-
74
-
75
-
76
-
77
-
78
-
79
-
80
-
81
-
82
-
83
-
84
-
85
-
86
-
87
-
88
-
89
-
90
-
91
-
92
-
93
-
94
-
95
-
96
-
97
-
98
-
99
-
100
-
101
-
102
-
103
-
104
-
105
-
106
-
107
-
108
-
109
-
110
-
111
-
112
-
113
-
114
-
115
-
116
-
117
-
118
-
119
-
120
-
121
-
122
-
123
-
124
-
125
-
126
-
127
-
128
-
129
-
130
-
131
-
132
-
133
-
134
-
135
-
136
-
137
-
138
-
139
-
140
-
141
-
142
-
143
-
144
-
145
-
146
-
147
-
148
-
149
-
 150
150 -
 151
151 -
 152
152 -
 153
153 -
 154
154 -
 155
155 -
 156
156 -
 157
157 -
 158
158 -
 159
159 -
 160
160 -
161
-
162
-
163
-
164
-
165
-
166
-
167
-
168
-
169
-
170
-
171
-
172
-
173
-
174
-
175
-
176
-
177
-
178
-
179
-
180
-
181
-
182
-
183
-
184
-
185
-
186
-
187
-
188
-
189
-
190
-
191
-
192
-
193
-
194
-
195
-
196
-
197
-
198
-
199
-
200
-
201
-
202
-
203
-
204
-
205
-
206
-
207
-
208
-
209
-
210
-
211
-
212
-
213
-
214
-
215
-
216
-
217
-
218
-
219
-
220
-
221
-
222
 |
 |
