Konica Minolta bizhub PRESS C6000 IC-601 Color Centro User Guide - Page 71
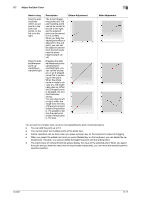
Adjust the Each Color, How to drag, Description, Before Adjustment, After Adjustment
 |
View all Konica Minolta bizhub PRESS C6000 manuals
Add to My Manuals
Save this manual to your list of manuals |
Page 71 highlights
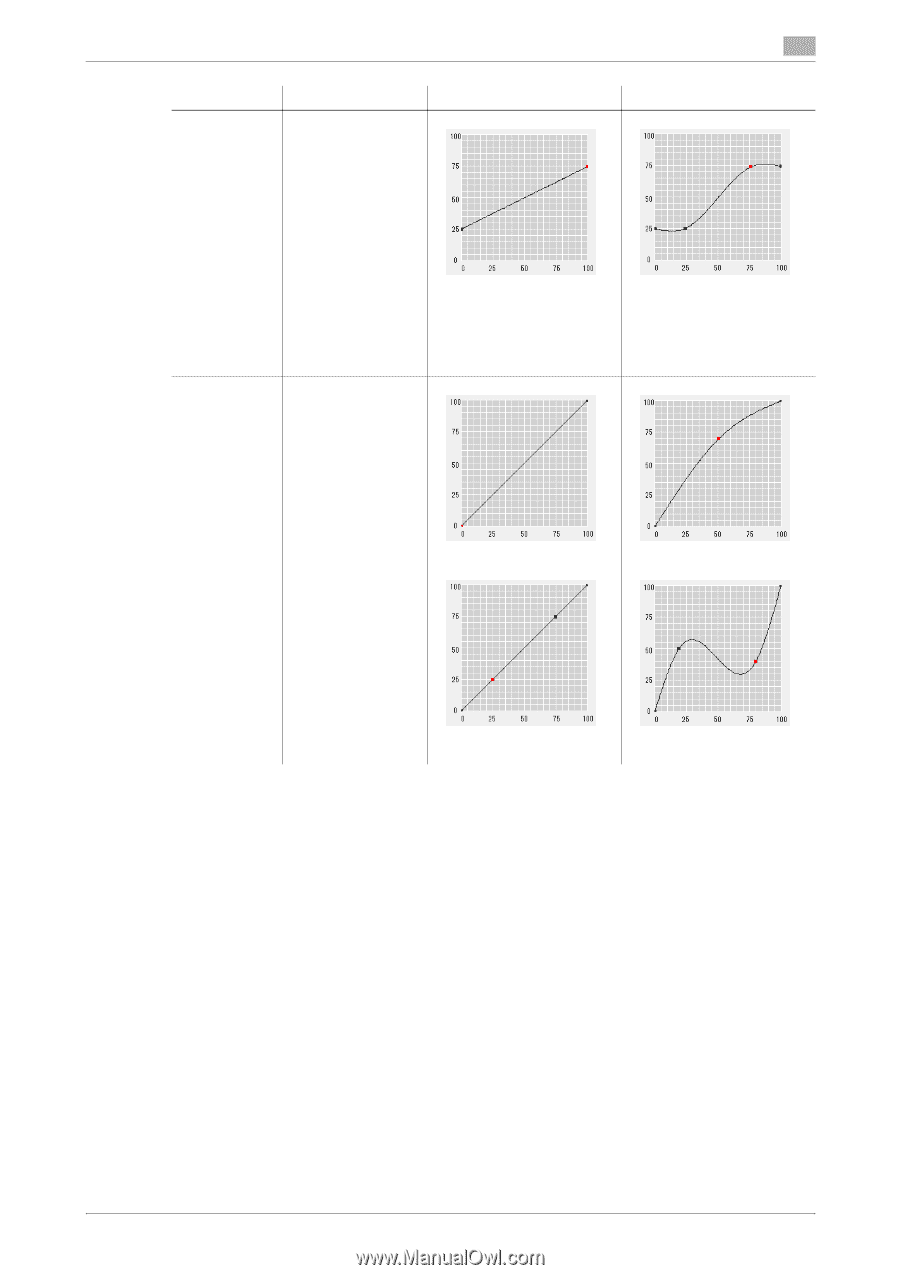
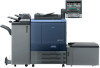
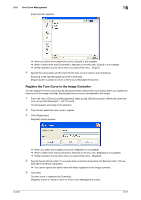
8.7 Adjust the Each Color 8 How to drag Drag the added points which are adjacent to the both end points, to the left or to the right. Drag the added/reference point upward/downward/left/right Description The 0 point (beginning point) and 100 point (ending point) cannot be moved to the left or the right, but the adjacent point can be moved to 1% or 99%. When you drag the added point which is adjacent to the end point, you can set the adjacent section from the both ends near the same height (output value). Dragging the added/reference points upward/downward/left/right, you can set the circular arc or an S-shaped curve that is centering on this point. When the whole curve is made to circular arc, the brightness goes up. When the S-shaped curve is enlarged, the contrast becomes strong. You can drag to left or right, within the range from the next of the previous point (value of the position is 1% greater) to before the next point (value of the position is 1% less). Before Adjustment After Adjustment You can set the complex tone curve by moving/adding the point mentioned above. - You can add the point up to 13. - You cannot select the multiple points at the same time. - Similar operation can be done when you press up/down key on the keyboard in stead of dragging. - When you select the added point and you press [Delete] key on the keyboard, you can delete the se- lected point. However, you cannot delete the beginning point and the ending point. - The input boxes of vertical/horizontal axises display the value of the selected point. When you select the point and you enter the value into the input boxes respectively, you can move the selected point to specified position. IC-601 8-17
-
 1
1 -
2
-
3
-
4
-
5
-
6
-
7
-
8
-
9
-
10
-
11
-
12
-
13
-
14
-
15
-
16
-
17
-
18
-
19
-
20
-
21
-
22
-
23
-
24
-
25
-
26
-
27
-
28
-
29
-
30
-
31
-
32
-
33
-
34
-
35
-
36
-
37
-
38
-
39
-
40
-
41
-
42
-
43
-
44
-
45
-
46
-
47
-
48
-
49
-
50
-
51
-
52
-
53
-
54
-
55
-
56
-
57
-
58
-
59
-
60
-
61
-
62
-
63
-
64
-
65
-
 66
66 -
 67
67 -
 68
68 -
 69
69 -
 70
70 -
 71
71 -
 72
72 -
 73
73 -
 74
74 -
 75
75 -
 76
76 -
77
-
78
-
79
-
80
-
81
-
82
-
83
-
84
-
85
-
86
-
87
-
88
-
89
-
90
-
91
-
92
-
93
-
94
-
95
-
96
-
97
-
98
-
99
-
100
-
101
-
102
-
103
-
104
-
105
-
106
-
107
-
108
-
109
-
110
-
111
-
112
-
113
-
114
-
115
-
116
-
117
-
118
-
119
-
120
-
121
-
122
-
123
-
124
-
125
-
126
-
127
-
128
-
129
-
130
-
131
-
132
-
133
-
134
-
135
-
136
-
137
-
138
-
139
-
140
-
141
-
142
-
143
-
144
-
145
-
146
-
147
-
148
-
149
-
150
-
151
-
152
-
153
-
154
-
155
-
156
-
157
-
158
-
159
-
160
-
161
-
162
-
163
-
164
-
165
-
166
-
167
-
168
-
169
-
170
-
171
-
172
-
173
-
174
-
175
-
176
-
177
-
178
-
179
-
180
-
181
-
182
-
183
-
184
-
185
-
186
-
187
-
188
-
189
-
190
-
191
-
192
-
193
-
194
-
195
-
196
-
197
-
198
-
199
-
200
-
201
-
202
-
203
-
204
-
205
-
206
-
207
-
208
-
209
-
210
-
211
-
212
-
213
-
214
-
215
-
216
-
217
-
218
-
219
-
220
-
221
-
222
-
223
-
224
-
225
-
226
-
227
-
228
-
229
-
230
-
231
-
232
-
233
-
234
-
235
-
236
-
237
-
238
-
239
-
240
-
241
-
242
-
243
-
244
-
245
-
246
-
247
-
248
-
249
-
250
-
251
-
252
-
253
-
254
-
255
-
256
-
257
-
258
-
259
-
260
-
261
-
262
-
263
-
264
-
265
-
266
-
267
-
268
-
269
-
270
-
271
-
272
-
273
-
274
-
275
-
276
-
277
-
278
-
279
 |
 |