Kyocera KM-3035 Network Fax Online Manual (Revision) - Page 13
Uninstalling the Network FAX Driver, Start, Control Panel, Printers and Other Hardware, Printers
 |
View all Kyocera KM-3035 manuals
Add to My Manuals
Save this manual to your list of manuals |
Page 13 highlights
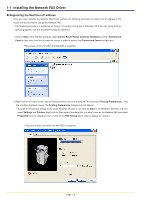
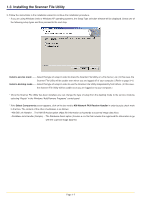
1-1 Installing the Network FAX Driver G Uninstalling the Network FAX Driver Perform the following procedure when you want to delete the Network FAX Driver from your computer. 1. Click on Start in the Task Bar and then select Control Panel, Printers and Other Hardware and then Printers and Faxes in that order from the successive menus in order to access the Printers and Faxes dialogue box. 2. Right-click on the name for this printer (normally: Kyocera Mita KM-XXXX NW-FAX), and then select Delete in the resulting menu. 3. Click on Yes when the confirmation dialogue box appears and the driver will be deleted. Page 1-4
-
 1
1 -
2
-
3
-
4
-
5
-
6
-
7
-
 8
8 -
 9
9 -
 10
10 -
 11
11 -
 12
12 -
 13
13 -
 14
14 -
 15
15 -
 16
16 -
 17
17 -
 18
18 -
19
-
20
-
21
-
22
-
23
-
24
-
25
-
26
-
27
-
28
-
29
-
30
-
31
-
32
-
33
-
34
-
35
-
36
-
37
-
38
-
39
-
40
-
41
-
42
-
43
-
44
-
45
-
46
-
47
-
48
-
49
-
50
-
51
-
52
-
53
-
54
-
55
-
56
-
57
-
58
-
59
-
60
-
61
-
62
-
63
-
64
-
65
-
66
-
67
-
68
-
69
-
70
-
71
-
72
-
73
-
74
-
75
-
76
-
77
-
78
-
79
-
80
-
81
-
82
-
83
-
84
-
85
-
86
-
87
-
88
-
89
-
90
-
91
-
92
-
93
-
94
-
95
-
96
-
97
-
98
-
99
-
100
-
101
-
102
-
103
-
104
-
105
-
106
-
107
-
108
 |
 |

Page 1-4
1-1
Installing the Network FAX Driver
●
Uninstalling the Network FAX Driver
Perform the following procedure when you want to delete the Network FAX Driver from your computer.
1. Click on
Start
in the Task Bar and then select
Control Panel
,
Printers and Other Hardware
and then
Printers and
Faxes
in that order from the successive menus in order to access the
Printers and Faxes
dialogue box.
2. Right-click on the name for this printer (normally: Kyocera Mita KM-XXXX NW-FAX), and then select
Delete
in the
resulting menu.
3. Click on
Yes
when the confirmation dialogue box appears and the driver will be deleted.