Kyocera KM-3035 Network Fax Online Manual (Revision) - Page 23
FAX Setting Tab
 |
View all Kyocera KM-3035 manuals
Add to My Manuals
Save this manual to your list of manuals |
Page 23 highlights
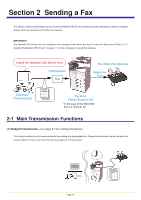
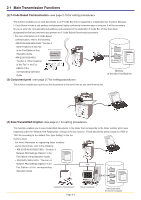
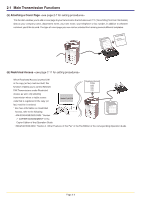
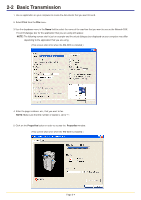
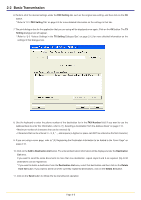
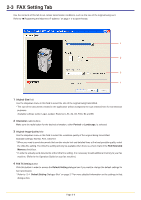
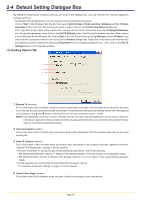
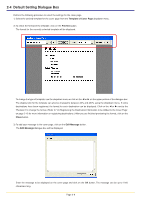
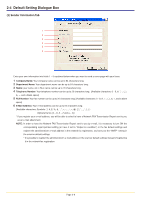
2-3 FAX Setting Tab Use the contents of this tab to set certain transmission conditions, such as the size of the original being sent. Refer to "G Registering the Machines IP address" on page 1-2 to open this tab. 1 2 3 4 1 Original Size field Use the dropdown menu in this field to select the size of the original being transmitted. * The size of the documents created in the application will be changed to the size selected here for transmission purposes. Available settings: Letter, Legal, Ledger, Statement, A3, A4, A5, Folio, B4 and B5 2 Orientation radio buttons Make sure the radio button for the desired orientation, either Portrait or Landscape, is selected. 3 Original Image Quality field Use the dropdown menu in this field to select the resolution quality of the original being transmitted. Available settings: Normal, Fine, Ultra fine * When you need to send documents that contain minute text and detailed lines at the best possible quality, select the Ultra fine setting. The Ultra fine setting will only be available when there is a check mark in the FAX Extended Memory check box. * In order to actually send documents at the Ultra fine setting, it is necessary to add additional memory to your fax machine. (Refer to the Operation Guide for your fax machine.) 4 FAX TX Setting button Click this button in order to access the Default Setting dialogue box if you want to change the default settings for fax transmission. * Refer to "2-4 Default Setting Dialogue Box" on page 2-7 for more detailed information on the settings in that dialogue box. Page 2-6
-
 1
1 -
2
-
3
-
4
-
5
-
6
-
7
-
8
-
9
-
10
-
11
-
12
-
13
-
14
-
15
-
16
-
17
-
 18
18 -
 19
19 -
 20
20 -
 21
21 -
 22
22 -
 23
23 -
 24
24 -
 25
25 -
 26
26 -
 27
27 -
 28
28 -
29
-
30
-
31
-
32
-
33
-
34
-
35
-
36
-
37
-
38
-
39
-
40
-
41
-
42
-
43
-
44
-
45
-
46
-
47
-
48
-
49
-
50
-
51
-
52
-
53
-
54
-
55
-
56
-
57
-
58
-
59
-
60
-
61
-
62
-
63
-
64
-
65
-
66
-
67
-
68
-
69
-
70
-
71
-
72
-
73
-
74
-
75
-
76
-
77
-
78
-
79
-
80
-
81
-
82
-
83
-
84
-
85
-
86
-
87
-
88
-
89
-
90
-
91
-
92
-
93
-
94
-
95
-
96
-
97
-
98
-
99
-
100
-
101
-
102
-
103
-
104
-
105
-
106
-
107
-
108
 |
 |
