Kyocera KM-3035 Network Fax Online Manual (Revision) - Page 32
(2) F-Code Based Communication, Setting, Option, Address Setting
 |
View all Kyocera KM-3035 manuals
Add to My Manuals
Save this manual to your list of manuals |
Page 32 highlights
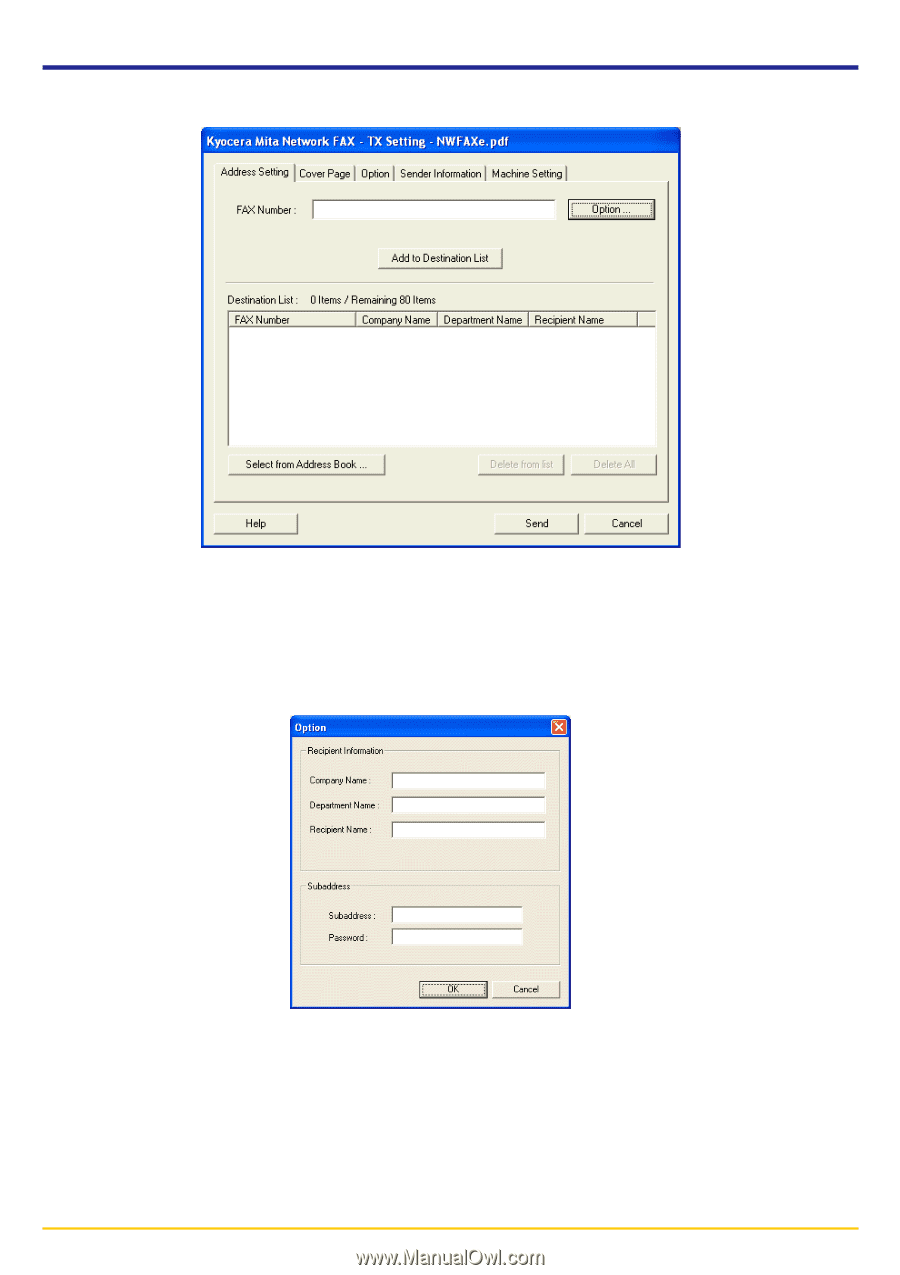
2-5 Various Settings in the TX Setting Dialogue Box (2) F-Code Based Communication 1. Click on the Option button in the Address Setting tab of the TX Setting dialogue box. The Option dialogue box will be displayed. 2. Enter the sub-address and password as it is registered in the destination fax. • Maximum number of characters that can be entered: 20 • Characters that can be entered: 0 - 9, #, *, and a space (a space can NOT be entered as the first character) 3. Click on the OK button. The TX Setting dialogue box will be displayed once again. Page 2-15
-
 1
1 -
2
-
3
-
4
-
5
-
6
-
7
-
8
-
9
-
10
-
11
-
12
-
13
-
14
-
15
-
16
-
17
-
18
-
19
-
20
-
21
-
22
-
23
-
24
-
25
-
26
-
 27
27 -
 28
28 -
 29
29 -
 30
30 -
 31
31 -
 32
32 -
 33
33 -
 34
34 -
 35
35 -
 36
36 -
 37
37 -
38
-
39
-
40
-
41
-
42
-
43
-
44
-
45
-
46
-
47
-
48
-
49
-
50
-
51
-
52
-
53
-
54
-
55
-
56
-
57
-
58
-
59
-
60
-
61
-
62
-
63
-
64
-
65
-
66
-
67
-
68
-
69
-
70
-
71
-
72
-
73
-
74
-
75
-
76
-
77
-
78
-
79
-
80
-
81
-
82
-
83
-
84
-
85
-
86
-
87
-
88
-
89
-
90
-
91
-
92
-
93
-
94
-
95
-
96
-
97
-
98
-
99
-
100
-
101
-
102
-
103
-
104
-
105
-
106
-
107
-
108
 |
 |
Page 2-15
(2) F-Code Based Communication
2. Enter the sub-address and password as it is registered in the destination fax.
•
Maximum number of characters that can be entered: 20
•
Characters that can be entered: 0
–
9, #, *, and a space (a space can NOT be entered as the first character)
3. Click on the
OK
button. The
TX
Setting
dialogue box will be displayed once again.
2-5
Various Settings in the TX Setting Dialogue Box
1. Click on the
Option
button in the
Address Setting
tab of the
TX Setting
dialogue box.
The
Option
dialogue box will be displayed.