Kyocera KM-3035 Network Fax Online Manual (Revision) - Page 77
One-Touch Dial Registration, TX Start Speed
 |
View all Kyocera KM-3035 manuals
Add to My Manuals
Save this manual to your list of manuals |
Page 77 highlights
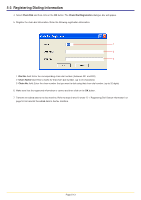
5-3 Registering Dialing Information 4. Select One-Touch Dial and then click on the OK button. The One-Touch Dial Registration dialogue box will appear. 5. Register the one-touch dial information. Enter the following registration information. 1 2 3 4 5 1 Dial No. field: Enter the corresponding one-touch dial number. (between 001 and 600) 2 Destination field: Enter a name for that one-touch dial number. (up to 20 characters. Available characters: 0 - 9, #, *, - and a space (a space can NOT be entered as the first character)) 3 Fax No. field: Enter the telephone number of the fax machine that you want to dial using that one-touch dial number. (up to 32 digits) 4 TX Start Speed field: Enter the communication speed that you want to use with that one-touch dial number. (HIGH/ MEDIUM/LOW) 5 Detailed setting button: Lets you make more detailed settings. Refer to the procedure from the following step. 6. Click on the Detailed setting button. The Detailed setting dialogue box will appear. 7. Enter the following registration information. 1 2 3 4 5 6 7 8 1 Normal TX radio button: Select this setting for standard fax transmission. 2 Subaddress TX radio button: Select this setting when performing F-Code Based Communication. 3 Subaddress field: Enter the corresponding subaddress when the Subaddress TX setting is selected. (up to 20 characters. Available characters: 0 - 9, #, * and a space (a space can NOT be entered as the first character)) 4 Password field: Enter the corresponding password when the Subaddress TX setting is selected. (up to 20 characters. Available characters: 0 - 9, #, * and a space (a space can NOT be entered as the first character)) 5 Encryption TX radio button: Select this setting when performing Encryption Communication. 6 Encryption Code field: When the Encryption TX setting is selected, enter the ID number that corresponds to the Encryption key to be used. (between 01 and 20) 7 ... button: Lets you register Encryption keys. Refer to the procedure from the following step. 8 Encryption Box No. field: When the Encryption TX setting is selected, enter the Encryption box number of the receiving station. (4 digits) Page 5-10
-
 1
1 -
2
-
3
-
4
-
5
-
6
-
7
-
8
-
9
-
10
-
11
-
12
-
13
-
14
-
15
-
16
-
17
-
18
-
19
-
20
-
21
-
22
-
23
-
24
-
25
-
26
-
27
-
28
-
29
-
30
-
31
-
32
-
33
-
34
-
35
-
36
-
37
-
38
-
39
-
40
-
41
-
42
-
43
-
44
-
45
-
46
-
47
-
48
-
49
-
50
-
51
-
52
-
53
-
54
-
55
-
56
-
57
-
58
-
59
-
60
-
61
-
62
-
63
-
64
-
65
-
66
-
67
-
68
-
69
-
70
-
71
-
 72
72 -
 73
73 -
 74
74 -
 75
75 -
 76
76 -
 77
77 -
 78
78 -
 79
79 -
 80
80 -
 81
81 -
 82
82 -
83
-
84
-
85
-
86
-
87
-
88
-
89
-
90
-
91
-
92
-
93
-
94
-
95
-
96
-
97
-
98
-
99
-
100
-
101
-
102
-
103
-
104
-
105
-
106
-
107
-
108
 |
 |
