Kyocera KM-3035 Network Fax Online Manual (Revision) - Page 30
Search, target, Registration, Company, Display, Destination, Detail, Confirm
 |
View all Kyocera KM-3035 manuals
Add to My Manuals
Save this manual to your list of manuals |
Page 30 highlights
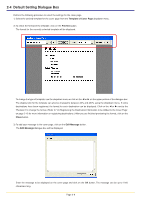
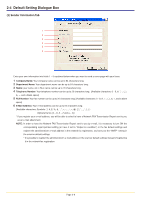
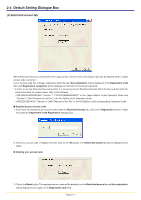
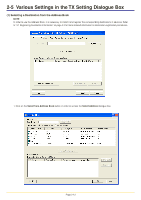
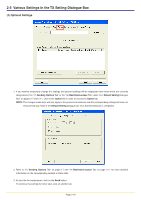
2-5 Various Settings in the TX Setting Dialogue Box 2. The registered destinations will be displayed in the list in the upper portion of the dialogue box. If you want to search for a particular destination, perform procedures 1) and 2) below. If you do NOT need to search for a destination, go directly to step 3. 1) Make sure that the desired Search target radio button, either Registration Name or Company Name, is selected. 2) Enter the text to be searched for in the Search Item field. The text can be up to 64 characters long. The search operation will begin as soon as the first character is entered. Only those entries that start with exactly the same character(s) as the search criteria will be displayed in the list. If there are no entries that match the search criteria in this way, nothing will be displayed in the list. * To display all of the entries registered in the Address Book once again, click on the Display all button. 3. To add a destination from the list of destinations in the Address Book (upper list) to the Destination List (lower list), click on the desired destination to select it and then click on the Add to Destination List button. * When you select an entry which multiple destinations have been registered as a group, the Detail button appears on the top of the dialogue box. * If you select an entry registered as a group and click on the Detail button, a Confirm members in selected group dialogue box will appear so that you can verify all of the destinations in that group. Once you are finished verifying the information, click on the OK button to return to the Select Address dialogue box. Page 2-13
-
 1
1 -
2
-
3
-
4
-
5
-
6
-
7
-
8
-
9
-
10
-
11
-
12
-
13
-
14
-
15
-
16
-
17
-
18
-
19
-
20
-
21
-
22
-
23
-
24
-
 25
25 -
 26
26 -
 27
27 -
 28
28 -
 29
29 -
 30
30 -
 31
31 -
 32
32 -
 33
33 -
 34
34 -
 35
35 -
36
-
37
-
38
-
39
-
40
-
41
-
42
-
43
-
44
-
45
-
46
-
47
-
48
-
49
-
50
-
51
-
52
-
53
-
54
-
55
-
56
-
57
-
58
-
59
-
60
-
61
-
62
-
63
-
64
-
65
-
66
-
67
-
68
-
69
-
70
-
71
-
72
-
73
-
74
-
75
-
76
-
77
-
78
-
79
-
80
-
81
-
82
-
83
-
84
-
85
-
86
-
87
-
88
-
89
-
90
-
91
-
92
-
93
-
94
-
95
-
96
-
97
-
98
-
99
-
100
-
101
-
102
-
103
-
104
-
105
-
106
-
107
-
108
 |
 |
