Kyocera KM-3035 Network Fax Online Manual (Revision) - Page 66
Destination Information, Confirm, imported, contents, Number, selected, addresses, added
 |
View all Kyocera KM-3035 manuals
Add to My Manuals
Save this manual to your list of manuals |
Page 66 highlights
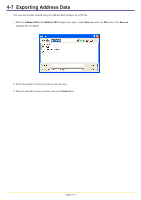
4-6 Importing Address Data 5. Click on the OK button in order to access the Confirm imported contents dialogue box. 6. Check the imported addresses and select those entries that you want to add to this Address Book. The number of entries that you select will be displayed in the Number of selected addresses field. Click on the Add To Address Book button and the total number of entries that will be added to this Address Book will be displayed in the Number of added addresses field. (The addresses you add will be deleted from the list.) NOTE If either of the following symbols appears in the list, that address can NOT be added to this Address Book as is. ?: That name is already registered in this Address Book, or the number of characters in the name exceed the acceptable limit. !: This information may include data which can not be handled by this Address Book. In either of the above cases, click on the Edit button and refer to the character limits for each field under "4-1 Registering Destination Information" on page 4-3 and correct the data as appropriate. 7. Once you are finished with the importing procedure, click on the OK button. Page 4-12
-
 1
1 -
2
-
3
-
4
-
5
-
6
-
7
-
8
-
9
-
10
-
11
-
12
-
13
-
14
-
15
-
16
-
17
-
18
-
19
-
20
-
21
-
22
-
23
-
24
-
25
-
26
-
27
-
28
-
29
-
30
-
31
-
32
-
33
-
34
-
35
-
36
-
37
-
38
-
39
-
40
-
41
-
42
-
43
-
44
-
45
-
46
-
47
-
48
-
49
-
50
-
51
-
52
-
53
-
54
-
55
-
56
-
57
-
58
-
59
-
60
-
 61
61 -
 62
62 -
 63
63 -
 64
64 -
 65
65 -
 66
66 -
 67
67 -
 68
68 -
 69
69 -
 70
70 -
 71
71 -
72
-
73
-
74
-
75
-
76
-
77
-
78
-
79
-
80
-
81
-
82
-
83
-
84
-
85
-
86
-
87
-
88
-
89
-
90
-
91
-
92
-
93
-
94
-
95
-
96
-
97
-
98
-
99
-
100
-
101
-
102
-
103
-
104
-
105
-
106
-
107
-
108
 |
 |
