Kyocera KM-3035 Network Fax Online Manual (Revision) - Page 43
Setup Dialogue Box
 |
View all Kyocera KM-3035 manuals
Add to My Manuals
Save this manual to your list of manuals |
Page 43 highlights
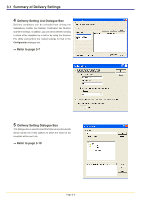
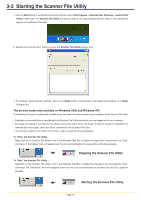
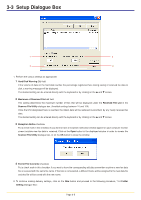
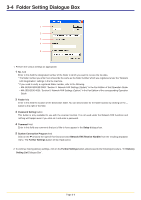
3-3 Setup Dialogue Box 1 2 3 4 1. Perform the various settings as appropriate. 1 Hard Disk Warning (%) field If the volume of data on the hard disk reaches the percentage registered here during saving of received fax data to disk, a warning message will be displayed. The desired setting can be entered directly with the keyboard or by clicking on the L and M arrows. 2 Maximum of Received File List field This setting determines the maximum number of files that will be displayed under the Received File List in the Scanner File Utility dialogue box. (Available setting: between 10 and 100) Once the limit designated here is reached, the oldest data will be replaced (overwritten) by any newly received fax data. The desired setting can be entered directly with the keyboard or by clicking on the L and M arrows. 3 Reception Notice checkbox Put a check mark in this checkbox if you want to have a reception notification window appear on your computer monitor screen anytime new fax data is received. Click on the Open button in the displayed window in order to access the Scanner File Utility dialogue box, or on the OK button to close the window. 4 Permit File Overwrite checkbox Put a check mark in this checkbox if you want to have the corresponding old data overwritten anytime a new fax data file is received with the same file name. If this box is not selected, a different name will be assigned to the new data file and that file will be saved with the new name. 2. To continue making delivery settings, click on the New button and proceed to the following procedure, "3-4 Folder Setting Dialogue Box". Page 3-5
-
 1
1 -
2
-
3
-
4
-
5
-
6
-
7
-
8
-
9
-
10
-
11
-
12
-
13
-
14
-
15
-
16
-
17
-
18
-
19
-
20
-
21
-
22
-
23
-
24
-
25
-
26
-
27
-
28
-
29
-
30
-
31
-
32
-
33
-
34
-
35
-
36
-
37
-
 38
38 -
 39
39 -
 40
40 -
 41
41 -
 42
42 -
 43
43 -
 44
44 -
 45
45 -
 46
46 -
 47
47 -
 48
48 -
49
-
50
-
51
-
52
-
53
-
54
-
55
-
56
-
57
-
58
-
59
-
60
-
61
-
62
-
63
-
64
-
65
-
66
-
67
-
68
-
69
-
70
-
71
-
72
-
73
-
74
-
75
-
76
-
77
-
78
-
79
-
80
-
81
-
82
-
83
-
84
-
85
-
86
-
87
-
88
-
89
-
90
-
91
-
92
-
93
-
94
-
95
-
96
-
97
-
98
-
99
-
100
-
101
-
102
-
103
-
104
-
105
-
106
-
107
-
108
 |
 |
