Kyocera KM-C2030 KM-C3130/C2030 Operation Guide Basic Oper Rev-1B - Page 27
Using the Touch Panel
 |
View all Kyocera KM-C2030 manuals
Add to My Manuals
Save this manual to your list of manuals |
Page 27 highlights
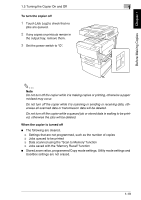
Before Making Copies Chapter 1 1 1.6 Using the Touch Panel 1.6 Using the Touch Panel Description of the Touch Panel When the copier is turned on (when the power switch is set to "I"), the screen shown below appears in the touch panel. This screen is the Basic screen. It shows, with messages and graphics, the currently selected settings, the settings that are available, and the copier status. Default Settings The settings selected when the copier is turned on (when the power switch is set to "I") are called the default settings. The default settings serve as a reference for all settings that are to be made. G Number of copies: 1 G Color: Auto Color G Finishing: Non-Sort G Zoom: 1.000 (Full Size) G Paper: Auto Paper G Mixed Orig Detection: Off G Copy 1 Set: Off G Original: Single-sided G Copy: Single-sided G Original Direction: None specified G Margin: None G Thick Original: Off G Photo/Density: Text&Photo G Background density: Standard G Density: Standard G Glossy Mode: Off G Auxiliary functions: All off G Color Image Adjust: Standard G Creation: All off 1-20
-
 1
1 -
2
-
3
-
4
-
5
-
6
-
7
-
8
-
9
-
10
-
11
-
12
-
13
-
14
-
15
-
16
-
17
-
18
-
19
-
20
-
21
-
 22
22 -
 23
23 -
 24
24 -
 25
25 -
 26
26 -
 27
27 -
 28
28 -
 29
29 -
 30
30 -
 31
31 -
 32
32 -
33
-
34
-
35
-
36
-
37
-
38
-
39
-
40
-
41
-
42
-
43
-
44
-
45
-
46
-
47
-
48
-
49
-
50
-
51
-
52
-
53
-
54
-
55
-
56
-
57
-
58
-
59
-
60
-
61
-
62
-
63
-
64
-
65
-
66
-
67
-
68
-
69
-
70
-
71
-
72
-
73
-
74
-
75
-
76
-
77
-
78
-
79
-
80
-
81
-
82
-
83
-
84
-
85
-
86
-
87
-
88
-
89
-
90
-
91
-
92
-
93
-
94
-
95
-
96
-
97
-
98
-
99
-
100
-
101
-
102
-
103
-
104
-
105
-
106
-
107
-
108
-
109
-
110
-
111
-
112
-
113
-
114
-
115
-
116
-
117
-
118
-
119
-
120
-
121
-
122
-
123
-
124
-
125
-
126
-
127
-
128
-
129
-
130
-
131
-
132
-
133
-
134
-
135
-
136
-
137
-
138
-
139
-
140
-
141
-
142
-
143
-
144
-
145
-
146
-
147
-
148
-
149
-
150
-
151
-
152
-
153
-
154
 |
 |
