Lexmark T630n User's Reference - Page 187
Using the Print and Hold function, Selecting a user name, Printing and deleting held jobs
 |
UPC - 734646532211
View all Lexmark T630n manuals
Add to My Manuals
Save this manual to your list of manuals |
Page 187 highlights
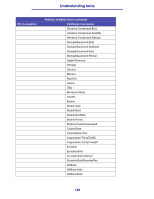
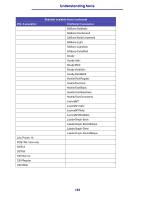
Using the Print and Hold function Using the Print and Hold function When sending a job to the printer, you can specify in the driver that you want the printer to hold the job in memory. When you are ready to print the job, you must go to the printer and use the operator panel menus to identify which held job you want to print. (See Understanding the operator panel for information on using the operator panel.) You can use this function to delay printing a job, verify one copy before printing additional copies, request extra copies of a job at a later time, or print a confidential job when you can be at the printer to retrieve it. Note: Print and Hold functions require a minimum of 16MB available printer memory. We recommend a minimum of 32MB available printer memory and a hard disk. Selecting a user name All confidential and held jobs have a user name associated with them. To access all held jobs or confidential jobs, you must first select your user name from a list of user names for print jobs. When the list is presented, press Menu to scroll through the list. Press Select once you find your user name for your job. Printing and deleting held jobs Once held jobs are stored in printer memory, you can use the printer operator panel to specify what you want to do with one or more of the jobs. You can select either Confidential Job or Held Jobs (Repeat Print, Reserve Print, and Verify Print jobs) from the Job Menu. Then, you select your user name from a list. If you select Confidential Job, you must enter the personal identification number (PIN) you specified in the driver when you sent the job. See Confidential jobs for more information. From either the Confidential Job or the Held Jobs menu items, you have five choices: • Print All Jobs • Print A Job • Delete All Jobs • Delete A Job • Print Copies Accessing held jobs from the operator panel 1 To access held jobs from the operator panel: • If the printer is Busy, press Menu and the Job Menu appears. • If the printer is Ready, continue to step 2. 2 Press and release Menu until you see Held Jobs or Confidential Job on the operator panel display, depending on the type of job you want to access. 187
-
 1
1 -
2
-
3
-
4
-
5
-
6
-
7
-
8
-
9
-
10
-
11
-
12
-
13
-
14
-
15
-
16
-
17
-
18
-
19
-
20
-
21
-
22
-
23
-
24
-
25
-
26
-
27
-
28
-
29
-
30
-
31
-
32
-
33
-
34
-
35
-
36
-
37
-
38
-
39
-
40
-
41
-
42
-
43
-
44
-
45
-
46
-
47
-
48
-
49
-
50
-
51
-
52
-
53
-
54
-
55
-
56
-
57
-
58
-
59
-
60
-
61
-
62
-
63
-
64
-
65
-
66
-
67
-
68
-
69
-
70
-
71
-
72
-
73
-
74
-
75
-
76
-
77
-
78
-
79
-
80
-
81
-
82
-
83
-
84
-
85
-
86
-
87
-
88
-
89
-
90
-
91
-
92
-
93
-
94
-
95
-
96
-
97
-
98
-
99
-
100
-
101
-
102
-
103
-
104
-
105
-
106
-
107
-
108
-
109
-
110
-
111
-
112
-
113
-
114
-
115
-
116
-
117
-
118
-
119
-
120
-
121
-
122
-
123
-
124
-
125
-
126
-
127
-
128
-
129
-
130
-
131
-
132
-
133
-
134
-
135
-
136
-
137
-
138
-
139
-
140
-
141
-
142
-
143
-
144
-
145
-
146
-
147
-
148
-
149
-
150
-
151
-
152
-
153
-
154
-
155
-
156
-
157
-
158
-
159
-
160
-
161
-
162
-
163
-
164
-
165
-
166
-
167
-
168
-
169
-
170
-
171
-
172
-
173
-
174
-
175
-
176
-
177
-
178
-
179
-
180
-
181
-
 182
182 -
 183
183 -
 184
184 -
 185
185 -
 186
186 -
 187
187 -
 188
188 -
 189
189 -
 190
190 -
 191
191 -
 192
192 -
193
-
194
-
195
-
196
-
197
-
198
-
199
-
200
-
201
-
202
-
203
-
204
-
205
-
206
-
207
-
208
-
209
-
210
-
211
-
212
-
213
-
214
-
215
-
216
-
217
-
218
-
219
-
220
-
221
-
222
-
223
-
224
-
225
-
226
-
227
-
228
-
229
-
230
-
231
-
232
-
233
-
234
-
235
-
236
-
237
-
238
-
239
-
240
-
241
-
242
-
243
-
244
-
245
-
246
-
247
-
248
-
249
-
250
-
251
-
252
-
253
-
254
-
255
-
256
-
257
-
258
-
259
-
260
-
261
-
262
-
263
-
264
-
265
-
266
-
267
-
268
-
269
-
270
-
271
-
272
-
273
-
274
-
275
-
276
-
277
-
278
-
279
-
280
-
281
-
282
-
283
-
284
-
285
-
286
-
287
-
288
-
289
-
290
-
291
 |
 |
