Lexmark X4550 Getting Started - Page 70
View Available Wireless Networks, Wireless Network Connections
 |
UPC - 734646040556
View all Lexmark X4550 manuals
Add to My Manuals
Save this manual to your list of manuals |
Page 70 highlights
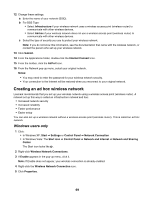
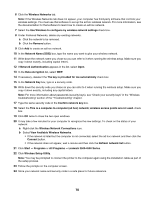
6 Click the Wireless Networks tab. Note: If the Wireless Networks tab does not appear, your computer has third-party software that controls your wireless settings. You must use that software to set up the ad hoc wireless network. For more information, see the documentation for that software to learn how to create an ad hoc network. 7 Select the Use Windows to configure my wireless network settings check box. 8 Under Preferred Networks, delete any existing networks. a Click the network to be removed. b Click the Remove button. 9 Click Add to create an ad hoc network. 10 In the Network Name (SSID) box, type the name you want to give your wireless network. 11 Write down the network name you chose so you can refer to it when running the wireless setup. Make sure you copy it down exactly, including capital letters. 12 If Network Authentication appears in the list, select Open. 13 In the Data encryption list, select WEP. 14 If necessary, deselect the The key is provided for me automatically check box. 15 In the Network Key box, type in a security code. 16 Write down the security code you chose so you can refer to it when running the wireless setup. Make sure you copy it down exactly, including any capital letters. Note: For more information about passwords (security keys), see "Check your security keys" in the "Wireless troubleshooting" section of the "Troubleshooting" chapter. 17 Type the same security code in the Confirm network key box. 18 Select the This is a computer-to-computer (ad hoc) network; wireless access points are not used. check box. 19 Click OK twice to close the two open windows. 20 It may take a few minutes for your computer to recognize the new settings. To check on the status of your network: a Right-click the Wireless Network Connections icon. b Select View Available Wireless Networks. • If the network is listed but the computer is not connected, select the ad hoc network and then click the Connect button. • If the network does not appear, wait a minute and then click the Refresh network list button. 21 Click Start Œ Programs or All Programs Œ Lexmark 3500-4500 Series. 22 Click Wireless Setup Utility. Note: You may be prompted to connect the printer to the computer again using the installation cable as part of the setup process. 23 Follow the prompts on the computer screen. 24 Store your network name and security code in a safe place for future reference. 70
-
 1
1 -
2
-
3
-
4
-
5
-
6
-
7
-
8
-
9
-
10
-
11
-
12
-
13
-
14
-
15
-
16
-
17
-
18
-
19
-
20
-
21
-
22
-
23
-
24
-
25
-
26
-
27
-
28
-
29
-
30
-
31
-
32
-
33
-
34
-
35
-
36
-
37
-
38
-
39
-
40
-
41
-
42
-
43
-
44
-
45
-
46
-
47
-
48
-
49
-
50
-
51
-
52
-
53
-
54
-
55
-
56
-
57
-
58
-
59
-
60
-
61
-
62
-
63
-
64
-
 65
65 -
 66
66 -
 67
67 -
 68
68 -
 69
69 -
 70
70 -
 71
71 -
 72
72 -
 73
73 -
 74
74
 |
 |