Netgear WAX204-WiFi User Manual - Page 118
Static routes, Add an IPv4 static route
 |
View all Netgear WAX204-WiFi manuals
Add to My Manuals
Save this manual to your list of manuals |
Page 118 highlights
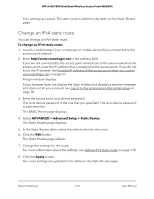
WiFi 6 AX1800 Dual Band Wireless Access Point WAX204 Static routes The access point supports IPv4 static routes. Static routes can provide detailed routing information to your access point. Typically, you do not need to add static routes. You must configure static routes only for unusual cases such as when you use multiple routers or multiple IP subnets on your network. As an example of when a static route is needed, consider the following case: • Your primary Internet access is through an ADSL modem to an ISP. • You use an ISDN router on your home network for connecting to the company where you are employed. This router's address on your LAN is 192.168.1.158. • Your company's network address is 203.0.113.0. When you first configured your access point, two implicit static routes were created. A default route was created with your ISP as the gateway and a second static route was created to your local network for all 192.168.1.x addresses. With this configuration, if you attempt to access a device on the 203.0.113.0 network, your access point forwards your request to the ISP. The ISP forwards your request to the company where you are employed, and the request is likely to be denied by the company's firewall. In this case, you must define a static route, instructing your router that 203.0.113.0 is accessed through the ISDN router at 192.168.1.158. Here is an example: • Through the destination IP address and IP subnet mask, specify that this static route applies to all 203.0.113.x addresses. • Through the gateway IP address, specify that all traffic for these addresses is forwarded to the ISDN router at 192.168.1.158. • A metric value of 2 works fine because the ISDN router is on the LAN. Add an IPv4 static route You can add an IPv4 static route to a destination IP address and specify the subnet mask, gateway IP address, and metric. To add an IPv4 static route: 1. Launch a web browser from a computer or mobile device that is connected to the access point network. 2. Enter http//www.routerlogin.net in the address field. If you are not connected to the access point network but to the same network as the access point, enter the IP address that is assigned to the access point. If you do not know the IP address, see Find the IP address of the access point when you cannot use routerlogin.net on page 27. Network Settings 118 User Manual
-
 1
1 -
2
-
3
-
4
-
5
-
6
-
7
-
8
-
9
-
10
-
11
-
12
-
13
-
14
-
15
-
16
-
17
-
18
-
19
-
20
-
21
-
22
-
23
-
24
-
25
-
26
-
27
-
28
-
29
-
30
-
31
-
32
-
33
-
34
-
35
-
36
-
37
-
38
-
39
-
40
-
41
-
42
-
43
-
44
-
45
-
46
-
47
-
48
-
49
-
50
-
51
-
52
-
53
-
54
-
55
-
56
-
57
-
58
-
59
-
60
-
61
-
62
-
63
-
64
-
65
-
66
-
67
-
68
-
69
-
70
-
71
-
72
-
73
-
74
-
75
-
76
-
77
-
78
-
79
-
80
-
81
-
82
-
83
-
84
-
85
-
86
-
87
-
88
-
89
-
90
-
91
-
92
-
93
-
94
-
95
-
96
-
97
-
98
-
99
-
100
-
101
-
102
-
103
-
104
-
105
-
106
-
107
-
108
-
109
-
110
-
111
-
112
-
 113
113 -
 114
114 -
 115
115 -
 116
116 -
 117
117 -
 118
118 -
 119
119 -
 120
120 -
 121
121 -
 122
122 -
 123
123 -
124
-
125
-
126
-
127
-
128
-
129
-
130
-
131
-
132
-
133
-
134
-
135
-
136
-
137
-
138
-
139
-
140
-
141
-
142
-
143
-
144
-
145
-
146
-
147
-
148
-
149
-
150
-
151
-
152
-
153
-
154
-
155
-
156
-
157
-
158
-
159
-
160
-
161
-
162
-
163
-
164
-
165
-
166
-
167
-
168
-
169
-
170
-
171
-
172
-
173
-
174
-
175
-
176
-
177
-
178
-
179
-
180
-
181
-
182
-
183
-
184
-
185
-
186
-
187
-
188
-
189
-
190
-
191
-
192
-
193
-
194
-
195
-
196
-
197
-
198
-
199
-
200
-
201
-
202
-
203
-
204
-
205
-
206
-
207
-
208
-
209
-
210
-
211
-
212
-
213
-
214
-
215
-
216
-
217
-
218
-
219
-
220
-
221
-
222
-
223
-
224
-
225
-
226
-
227
-
228
-
229
-
230
-
231
-
232
-
233
-
234
-
235
-
236
-
237
-
238
-
239
-
240
-
241
-
242
-
243
-
244
-
245
-
246
 |
 |
