Netgear WAX204-WiFi User Manual - Page 124
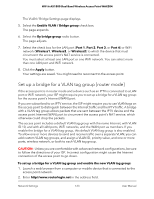
ADVANCED > Advanced Setup > VLAN / Bridge Settings
 |
View all Netgear WAX204-WiFi manuals
Add to My Manuals
Save this manual to your list of manuals |
Page 124 highlights
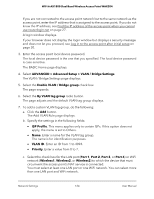
WiFi 6 AX1800 Dual Band Wireless Access Point WAX204 If you are not connected to the access point network but to the same network as the access point, enter the IP address that is assigned to the access point. If you do not know the IP address, see Find the IP address of the access point when you cannot use routerlogin.net on page 27. A login window displays. If your browser does not display the login window but displays a security message and does not let you proceed, see Log in to the access point after initial setup on page 30. 3. Enter the access point local device password. The local device password is the one that you specified. The local device password is case-sensitive. The BASIC Home page displays. 4. Select ADVANCED > Advanced Setup > VLAN / Bridge Settings. The VLAN / Bridge Settings page displays. 5. Select the Enable VLAN / Bridge group check box. The page expands. 6. Select the By VLAN tag group radio button. The page adjusts and the default VLAN tag group displays. 7. To add a custom VLAN tag group, do the following: a. Click the Add button. The Add VLAN Rule page displays. b. Specify the settings in the following fields: • ISP Profile. This menu applies only to certain ISPs. If this option does not apply, the menu is set to Others. • Name. Enter a name for the VLAN tag group. The name is for identification purposes. • VLAN ID. Enter an ID from 1 to 4094. • Priority. Enter a value from 0 to 7. c. Select the check box for the LAN port (Port 1, Port 2, Port 3, or Port 4) or WiFi network (Wireless1, Wireless2, or Wireless2) to which the device that must circumvent the access point's NAT service is connected. You must select at least one LAN port or one WiFi network. You can select more than one LAN port and WiFi network. Network Settings 124 User Manual
-
 1
1 -
2
-
3
-
4
-
5
-
6
-
7
-
8
-
9
-
10
-
11
-
12
-
13
-
14
-
15
-
16
-
17
-
18
-
19
-
20
-
21
-
22
-
23
-
24
-
25
-
26
-
27
-
28
-
29
-
30
-
31
-
32
-
33
-
34
-
35
-
36
-
37
-
38
-
39
-
40
-
41
-
42
-
43
-
44
-
45
-
46
-
47
-
48
-
49
-
50
-
51
-
52
-
53
-
54
-
55
-
56
-
57
-
58
-
59
-
60
-
61
-
62
-
63
-
64
-
65
-
66
-
67
-
68
-
69
-
70
-
71
-
72
-
73
-
74
-
75
-
76
-
77
-
78
-
79
-
80
-
81
-
82
-
83
-
84
-
85
-
86
-
87
-
88
-
89
-
90
-
91
-
92
-
93
-
94
-
95
-
96
-
97
-
98
-
99
-
100
-
101
-
102
-
103
-
104
-
105
-
106
-
107
-
108
-
109
-
110
-
111
-
112
-
113
-
114
-
115
-
116
-
117
-
118
-
 119
119 -
 120
120 -
 121
121 -
 122
122 -
 123
123 -
 124
124 -
 125
125 -
 126
126 -
 127
127 -
 128
128 -
 129
129 -
130
-
131
-
132
-
133
-
134
-
135
-
136
-
137
-
138
-
139
-
140
-
141
-
142
-
143
-
144
-
145
-
146
-
147
-
148
-
149
-
150
-
151
-
152
-
153
-
154
-
155
-
156
-
157
-
158
-
159
-
160
-
161
-
162
-
163
-
164
-
165
-
166
-
167
-
168
-
169
-
170
-
171
-
172
-
173
-
174
-
175
-
176
-
177
-
178
-
179
-
180
-
181
-
182
-
183
-
184
-
185
-
186
-
187
-
188
-
189
-
190
-
191
-
192
-
193
-
194
-
195
-
196
-
197
-
198
-
199
-
200
-
201
-
202
-
203
-
204
-
205
-
206
-
207
-
208
-
209
-
210
-
211
-
212
-
213
-
214
-
215
-
216
-
217
-
218
-
219
-
220
-
221
-
222
-
223
-
224
-
225
-
226
-
227
-
228
-
229
-
230
-
231
-
232
-
233
-
234
-
235
-
236
-
237
-
238
-
239
-
240
-
241
-
242
-
243
-
244
-
245
-
246
 |
 |
