Olympus E-300 EVOLT E-300 Advanced Manual (English) - Page 105
Noise Reduction
 |
UPC - 050332298859
View all Olympus E-300 manuals
Add to My Manuals
Save this manual to your list of manuals |
Page 105 highlights
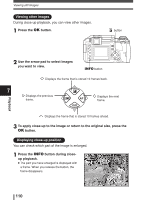
NOISE REDUCTION NR This function reduces the noise that is generated during long exposures. When shooting night scenes, shutter speeds are slower and noise tends to appear in images. When NOISE REDUCTION is set to ON, the camera automatically reduces noise to produce clearer images. However, shooting time is approximately twice as long as usual. For more information about noise generated in images during long exposures, refer to "Noise in images" (P. 51). NOISE REDUCTION: OFF NOISE REDUCTION: ON 6 Available modes P A S M Exposure, image and color 1 Menu T T NOISE REDUCTION T ON ~ "How to use the menus" (P. 25) MENU 2 Press the OK button. 3 Take a picture. ● The noise-reduction process is activated after OK button shooting. ● The card access lamp blinks during the noise-reduction process. You cannot take more pictures until the card access lamp goes out. ● Busy is displayed while noise reduction is operating. Note ● When , , , or mode is set, NOISE REDUCTION is fixed to ON. ● When NOISE REDUCTION is set to ON, sequential shooting is not available. ● This function may not work effectively with some shooting conditions or subjects. 105
-
 1
1 -
2
-
3
-
4
-
5
-
6
-
7
-
8
-
9
-
10
-
11
-
12
-
13
-
14
-
15
-
16
-
17
-
18
-
19
-
20
-
21
-
22
-
23
-
24
-
25
-
26
-
27
-
28
-
29
-
30
-
31
-
32
-
33
-
34
-
35
-
36
-
37
-
38
-
39
-
40
-
41
-
42
-
43
-
44
-
45
-
46
-
47
-
48
-
49
-
50
-
51
-
52
-
53
-
54
-
55
-
56
-
57
-
58
-
59
-
60
-
61
-
62
-
63
-
64
-
65
-
66
-
67
-
68
-
69
-
70
-
71
-
72
-
73
-
74
-
75
-
76
-
77
-
78
-
79
-
80
-
81
-
82
-
83
-
84
-
85
-
86
-
87
-
88
-
89
-
90
-
91
-
92
-
93
-
94
-
95
-
96
-
97
-
98
-
99
-
 100
100 -
 101
101 -
 102
102 -
 103
103 -
 104
104 -
 105
105 -
 106
106 -
 107
107 -
 108
108 -
 109
109 -
 110
110 -
111
-
112
-
113
-
114
-
115
-
116
-
117
-
118
-
119
-
120
-
121
-
122
-
123
-
124
-
125
-
126
-
127
-
128
-
129
-
130
-
131
-
132
-
133
-
134
-
135
-
136
-
137
-
138
-
139
-
140
-
141
-
142
-
143
-
144
-
145
-
146
-
147
-
148
-
149
-
150
-
151
-
152
-
153
-
154
-
155
-
156
-
157
-
158
-
159
-
160
-
161
-
162
-
163
-
164
-
165
-
166
-
167
-
168
-
169
-
170
-
171
-
172
-
173
-
174
-
175
-
176
-
177
-
178
-
179
-
180
-
181
-
182
-
183
-
184
-
185
-
186
-
187
-
188
-
189
-
190
-
191
-
192
-
193
-
194
-
195
-
196
-
197
-
198
-
199
-
200
-
201
-
202
-
203
-
204
-
205
-
206
-
207
-
208
-
209
-
210
-
211
-
212
 |
 |
