Olympus E-300 EVOLT E-300 Advanced Manual (English) - Page 147
Connecting the camera to a printer
 |
UPC - 050332298859
View all Olympus E-300 manuals
Add to My Manuals
Save this manual to your list of manuals |
Page 147 highlights
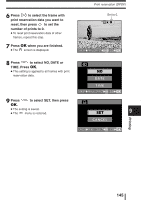
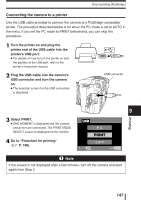
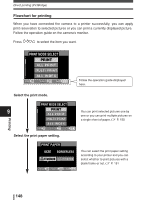
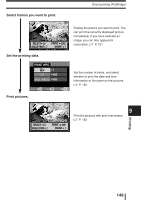
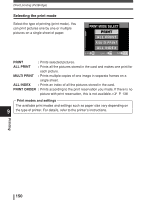
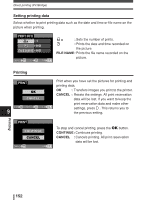
Direct printing (PictBridge) Connecting the camera to a printer Use the USB cable provided to connect the camera to a PictBridge-compatible printer. The procedure described below is for when the PC mode is set to AUTO in the menu. If you set the PC mode to PRINT beforehand, you can skip this procedure. 1 Turn the printer on and plug the printer end of the USB cable into the printer's USB port. ● For details on how to turn the printer on and the position of the USB port, refer to the printer's instruction manual. 2 Plug the USB cable into the camera's USB connector and turn the camera on. ● The selection screen for the USB connection is displayed. USB connector 9 Printing 3 Select PRINT. ● ONE MOMENT is displayed and the camera and printer are connected. The PRINT MODE SELECT screen is displayed on the monitor. 4 Go to "Flowchart for printing" (~ P. 148). USB P C PRINT SELECT EXIT GO Note If the screen is not displayed after a few minutes, turn off the camera and start again from Step 2. 147
-
 1
1 -
2
-
3
-
4
-
5
-
6
-
7
-
8
-
9
-
10
-
11
-
12
-
13
-
14
-
15
-
16
-
17
-
18
-
19
-
20
-
21
-
22
-
23
-
24
-
25
-
26
-
27
-
28
-
29
-
30
-
31
-
32
-
33
-
34
-
35
-
36
-
37
-
38
-
39
-
40
-
41
-
42
-
43
-
44
-
45
-
46
-
47
-
48
-
49
-
50
-
51
-
52
-
53
-
54
-
55
-
56
-
57
-
58
-
59
-
60
-
61
-
62
-
63
-
64
-
65
-
66
-
67
-
68
-
69
-
70
-
71
-
72
-
73
-
74
-
75
-
76
-
77
-
78
-
79
-
80
-
81
-
82
-
83
-
84
-
85
-
86
-
87
-
88
-
89
-
90
-
91
-
92
-
93
-
94
-
95
-
96
-
97
-
98
-
99
-
100
-
101
-
102
-
103
-
104
-
105
-
106
-
107
-
108
-
109
-
110
-
111
-
112
-
113
-
114
-
115
-
116
-
117
-
118
-
119
-
120
-
121
-
122
-
123
-
124
-
125
-
126
-
127
-
128
-
129
-
130
-
131
-
132
-
133
-
134
-
135
-
136
-
137
-
138
-
139
-
140
-
141
-
 142
142 -
 143
143 -
 144
144 -
 145
145 -
 146
146 -
 147
147 -
 148
148 -
 149
149 -
 150
150 -
 151
151 -
 152
152 -
153
-
154
-
155
-
156
-
157
-
158
-
159
-
160
-
161
-
162
-
163
-
164
-
165
-
166
-
167
-
168
-
169
-
170
-
171
-
172
-
173
-
174
-
175
-
176
-
177
-
178
-
179
-
180
-
181
-
182
-
183
-
184
-
185
-
186
-
187
-
188
-
189
-
190
-
191
-
192
-
193
-
194
-
195
-
196
-
197
-
198
-
199
-
200
-
201
-
202
-
203
-
204
-
205
-
206
-
207
-
208
-
209
-
210
-
211
-
212
 |
 |
