Olympus E-300 EVOLT E-300 Advanced Manual (English) - Page 120
Erasing images
 |
UPC - 050332298859
View all Olympus E-300 manuals
Add to My Manuals
Save this manual to your list of manuals |
Page 120 highlights
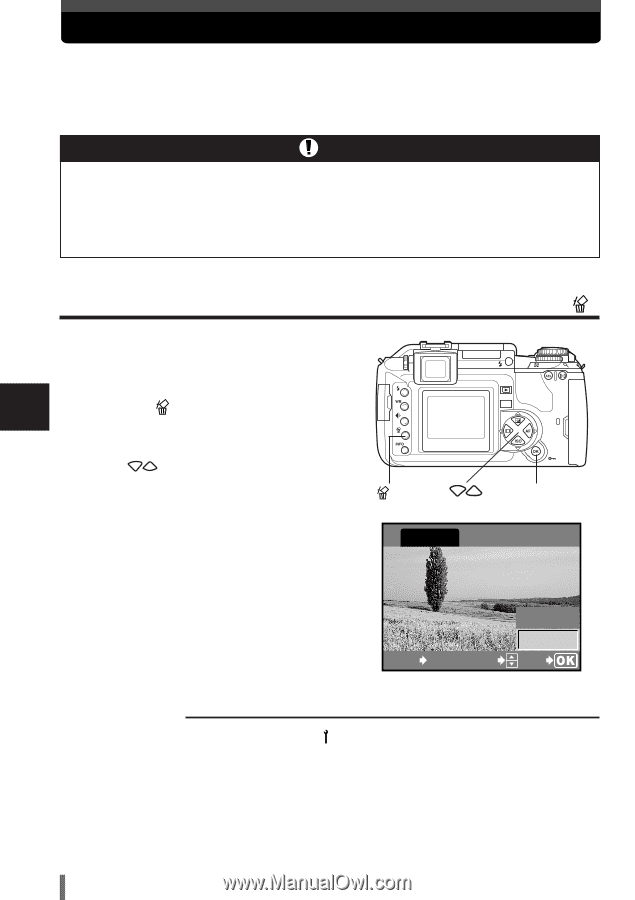
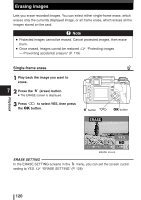
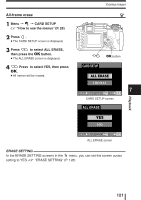
Erasing images Lets you erase recorded images. You can select either single-frame erase, which erases only the currently displayed image, or all-frame erase, which erases all the images stored on the card. Note ● Protected images cannot be erased. Cancel protected images, then erase them. ● Once erased, images cannot be restored. ~ "Protecting images - Preventing accidental erasure" (P. 119) Playback Single-frame erase 1 Play back the image you want to erase. 7 2 Press the (erase) button. ● The ERASE screen is displayed. 3 Press to select YES, then press the OK button. MENU button ERASE OK button CANCEL MENU SELECT YES NO GO ERASE screen ERASE SETTING In the ERASE SETTING screens in the 2 menu, you can set the screen cursor setting to YES. ~ "ERASE SETTING" (P. 128) 120
-
 1
1 -
2
-
3
-
4
-
5
-
6
-
7
-
8
-
9
-
10
-
11
-
12
-
13
-
14
-
15
-
16
-
17
-
18
-
19
-
20
-
21
-
22
-
23
-
24
-
25
-
26
-
27
-
28
-
29
-
30
-
31
-
32
-
33
-
34
-
35
-
36
-
37
-
38
-
39
-
40
-
41
-
42
-
43
-
44
-
45
-
46
-
47
-
48
-
49
-
50
-
51
-
52
-
53
-
54
-
55
-
56
-
57
-
58
-
59
-
60
-
61
-
62
-
63
-
64
-
65
-
66
-
67
-
68
-
69
-
70
-
71
-
72
-
73
-
74
-
75
-
76
-
77
-
78
-
79
-
80
-
81
-
82
-
83
-
84
-
85
-
86
-
87
-
88
-
89
-
90
-
91
-
92
-
93
-
94
-
95
-
96
-
97
-
98
-
99
-
100
-
101
-
102
-
103
-
104
-
105
-
106
-
107
-
108
-
109
-
110
-
111
-
112
-
113
-
114
-
 115
115 -
 116
116 -
 117
117 -
 118
118 -
 119
119 -
 120
120 -
 121
121 -
 122
122 -
 123
123 -
 124
124 -
 125
125 -
126
-
127
-
128
-
129
-
130
-
131
-
132
-
133
-
134
-
135
-
136
-
137
-
138
-
139
-
140
-
141
-
142
-
143
-
144
-
145
-
146
-
147
-
148
-
149
-
150
-
151
-
152
-
153
-
154
-
155
-
156
-
157
-
158
-
159
-
160
-
161
-
162
-
163
-
164
-
165
-
166
-
167
-
168
-
169
-
170
-
171
-
172
-
173
-
174
-
175
-
176
-
177
-
178
-
179
-
180
-
181
-
182
-
183
-
184
-
185
-
186
-
187
-
188
-
189
-
190
-
191
-
192
-
193
-
194
-
195
-
196
-
197
-
198
-
199
-
200
-
201
-
202
-
203
-
204
-
205
-
206
-
207
-
208
-
209
-
210
-
211
-
212
 |
 |