Olympus E-300 EVOLT E-300 Advanced Manual (English) - Page 130
REC VIEW, Checking the picture immediately after shooting
 |
UPC - 050332298859
View all Olympus E-300 manuals
Add to My Manuals
Save this manual to your list of manuals |
Page 130 highlights
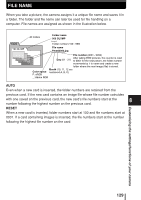
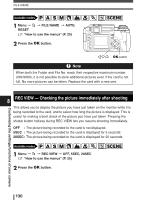
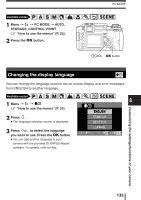
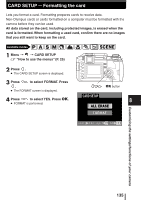
FILE NAME Available modes P A S M 1 Menu T 2 T FILE NAME T AUTO, RESET ~ "How to use the menus" (P. 25) 2 Press the OK button. SCENE MENU OK button Note When both the Folder and File No. reach their respective maximum number (999/9999), it is not possible to store additional pictures even if the card is not full. No more pictures can be taken. Replace the card with a new one. 8 REC VIEW - Checking the picture immediately after shooting This allows you to display the picture you have just taken on the monitor while it is being recorded to the card, and to select how long the picture is displayed. This is useful for making a brief check of the picture you have just taken. Pressing the shutter button halfway during REC VIEW lets you resume shooting immediately. OFF : The picture being recorded to the card is not displayed. 5SEC : The picture being recorded to the card is displayed for 5 seconds. 20SEC: The picture being recorded to the card is displayed for 20 seconds. Available modes P A S M 1 Menu T 2 T REC VIEW T OFF, 5SEC, 20SEC ~ "How to use the menus" (P. 25) SCENE 2 Press the OK button. Customizing the settings/functions of your camera 130
-
 1
1 -
2
-
3
-
4
-
5
-
6
-
7
-
8
-
9
-
10
-
11
-
12
-
13
-
14
-
15
-
16
-
17
-
18
-
19
-
20
-
21
-
22
-
23
-
24
-
25
-
26
-
27
-
28
-
29
-
30
-
31
-
32
-
33
-
34
-
35
-
36
-
37
-
38
-
39
-
40
-
41
-
42
-
43
-
44
-
45
-
46
-
47
-
48
-
49
-
50
-
51
-
52
-
53
-
54
-
55
-
56
-
57
-
58
-
59
-
60
-
61
-
62
-
63
-
64
-
65
-
66
-
67
-
68
-
69
-
70
-
71
-
72
-
73
-
74
-
75
-
76
-
77
-
78
-
79
-
80
-
81
-
82
-
83
-
84
-
85
-
86
-
87
-
88
-
89
-
90
-
91
-
92
-
93
-
94
-
95
-
96
-
97
-
98
-
99
-
100
-
101
-
102
-
103
-
104
-
105
-
106
-
107
-
108
-
109
-
110
-
111
-
112
-
113
-
114
-
115
-
116
-
117
-
118
-
119
-
120
-
121
-
122
-
123
-
124
-
 125
125 -
 126
126 -
 127
127 -
 128
128 -
 129
129 -
 130
130 -
 131
131 -
 132
132 -
 133
133 -
 134
134 -
 135
135 -
136
-
137
-
138
-
139
-
140
-
141
-
142
-
143
-
144
-
145
-
146
-
147
-
148
-
149
-
150
-
151
-
152
-
153
-
154
-
155
-
156
-
157
-
158
-
159
-
160
-
161
-
162
-
163
-
164
-
165
-
166
-
167
-
168
-
169
-
170
-
171
-
172
-
173
-
174
-
175
-
176
-
177
-
178
-
179
-
180
-
181
-
182
-
183
-
184
-
185
-
186
-
187
-
188
-
189
-
190
-
191
-
192
-
193
-
194
-
195
-
196
-
197
-
198
-
199
-
200
-
201
-
202
-
203
-
204
-
205
-
206
-
207
-
208
-
209
-
210
-
211
-
212
 |
 |
