Olympus E-300 EVOLT E-300 Advanced Manual (English) - Page 132
Sleep, Pc Mode
 |
UPC - 050332298859
View all Olympus E-300 manuals
Add to My Manuals
Save this manual to your list of manuals |
Page 132 highlights
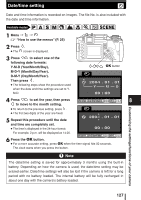
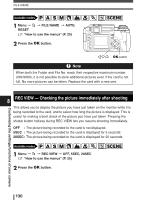
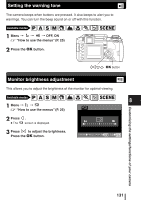
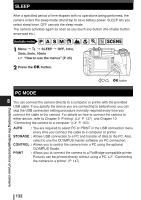
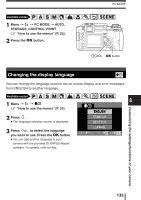
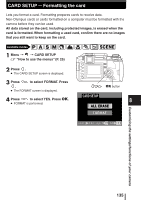
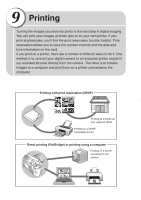
SLEEP After a specified period of time elapses with no operations being performed, the camera enters the sleep mode (stand-by) to save battery power. SLEEP lets you select sleep timer. OFF cancels the sleep mode. The camera activates again as soon as you touch any button (the shutter button, arrow pad etc.) Available modes P A S M SCENE 1 Menu T 2 T SLEEP T OFF, 1min, 3min, 5min, 10min ~ "How to use the menus" (P. 25) MENU 2 Press the OK button. OK button PC MODE 8 You can connect the camera directly to a computer or printer with the provided USB cable. If you specify the device you are connecting to beforehand, you can skip the USB connection setting procedure normally required every time you connect the cable to the camera. For details on how to connect the camera to either device, refer to Chapter 9 "Printing" (~ P. 137) and Chapter 10 "Connecting the camera to a computer" (~ P. 163). AUTO : You are required to select PC or PRINT in the USB connection menu every time you connect the cable to a computer or printer. STORAGE : Allows USB connection to a PC and transfer of data to the PC. Also, select to use the OLYMPUS master software via PC connection. CONTROL : Allows you to control the camera from a PC using the optional OLYMPUS Studio. PRINT : Allows you to connect the camera to a PictBridge-compatible printer. Pictures can be printed directly without using a PC. ~ "Connecting the camera to a printer" (P. 147) Customizing the settings/functions of your camera 132
-
 1
1 -
2
-
3
-
4
-
5
-
6
-
7
-
8
-
9
-
10
-
11
-
12
-
13
-
14
-
15
-
16
-
17
-
18
-
19
-
20
-
21
-
22
-
23
-
24
-
25
-
26
-
27
-
28
-
29
-
30
-
31
-
32
-
33
-
34
-
35
-
36
-
37
-
38
-
39
-
40
-
41
-
42
-
43
-
44
-
45
-
46
-
47
-
48
-
49
-
50
-
51
-
52
-
53
-
54
-
55
-
56
-
57
-
58
-
59
-
60
-
61
-
62
-
63
-
64
-
65
-
66
-
67
-
68
-
69
-
70
-
71
-
72
-
73
-
74
-
75
-
76
-
77
-
78
-
79
-
80
-
81
-
82
-
83
-
84
-
85
-
86
-
87
-
88
-
89
-
90
-
91
-
92
-
93
-
94
-
95
-
96
-
97
-
98
-
99
-
100
-
101
-
102
-
103
-
104
-
105
-
106
-
107
-
108
-
109
-
110
-
111
-
112
-
113
-
114
-
115
-
116
-
117
-
118
-
119
-
120
-
121
-
122
-
123
-
124
-
125
-
126
-
 127
127 -
 128
128 -
 129
129 -
 130
130 -
 131
131 -
 132
132 -
 133
133 -
 134
134 -
 135
135 -
 136
136 -
 137
137 -
138
-
139
-
140
-
141
-
142
-
143
-
144
-
145
-
146
-
147
-
148
-
149
-
150
-
151
-
152
-
153
-
154
-
155
-
156
-
157
-
158
-
159
-
160
-
161
-
162
-
163
-
164
-
165
-
166
-
167
-
168
-
169
-
170
-
171
-
172
-
173
-
174
-
175
-
176
-
177
-
178
-
179
-
180
-
181
-
182
-
183
-
184
-
185
-
186
-
187
-
188
-
189
-
190
-
191
-
192
-
193
-
194
-
195
-
196
-
197
-
198
-
199
-
200
-
201
-
202
-
203
-
204
-
205
-
206
-
207
-
208
-
209
-
210
-
211
-
212
 |
 |
