Panasonic KX-FLB851 Multi-function Laser Fax - Page 29
Using the scanner glass, To redial the last number, Sending from memory Quick scan feature
 |
UPC - 037988809851
View all Panasonic KX-FLB851 manuals
Add to My Manuals
Save this manual to your list of manuals |
Page 29 highlights
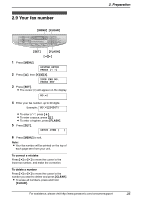
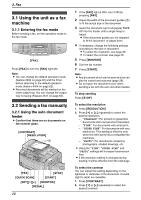
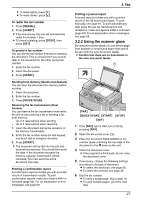
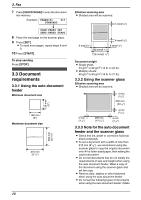
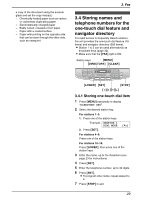
L To make lighter, press {V}. L To make darker, press {^}. To redial the last number 1. Press {REDIAL}. 2. Press {START}. L If the line is busy, the unit will automatically redial the number 1 time. L To cancel redialing, press {STOP}, then press {SET}. To predial a fax number You can dial the fax number first before inserting the document. This is convenient if you need to refer to the document for the other party's fax number. 1. Enter the fax number. 2. Insert the document. 3. Press {START}. Sending from memory (Quick scan feature) You can scan the document into memory before sending. 1. Insert the document. 2. Enter the fax number. 3. Press {QUICK SCAN}. Reserving the fax transmission (Dual Access) You can reserve the fax transmission even when the unit is just receiving a fax or sending a fax from memory. - Up to 3 reservations when sending - Up to 4 reservations when receiving 1. Insert the document during fax reception or fax memory transmission. 2. Enter the fax number using the dial keypad, one-touch dial or navigator directory. 3. Press {START}. L The document will be fed into the unit and scanned into memory. The unit will then send the data. If the document exceeds the memory capacity, transmission will be canceled. You must send the entire document manually. Printing a confirmation report A confirmation report provides you with a printed record of transmission results. To print confirmation reports, make sure feature #401 is activated (page 63). For an explanation of error messages, see page 69. 3. Fax Printing a journal report A journal report provides you with a printed record of the 30 most recent faxes. To print manually, see page 91. To print automatically after every 30 new fax transmissions and receptions, make sure feature #402 is activated (page 63). For an explanation of error messages, see page 69. 3.2.2 Using the scanner glass By using the scanner glass, you can send a page from booklets or small sized paper that cannot be sent with the auto document feeder. L Confirm that there are no documents in the auto document feeder. 1 {FAX} {QUICK SCAN} {START} {STOP} {SET} 1 If the {FAX} light is OFF, turn it ON by pressing {FAX}. 2 Open the document cover (1). 3 Place the document FACE DOWN on the scanner glass, matching the top edge of the document to the l mark on the unit. 4 Close the document cover. L If the original is a thick book, do not close the document cover. 5 If necessary, change the following settings according to the type of document. L To select the resolution, see page 26. L To select the contrast, see page 26. 6 Dial the fax number. L To send a single page, skip to step 10. L To send multiple pages, go to the next step. 27
-
 1
1 -
2
-
3
-
4
-
5
-
6
-
7
-
8
-
9
-
10
-
11
-
12
-
13
-
14
-
15
-
16
-
17
-
18
-
19
-
20
-
21
-
22
-
23
-
 24
24 -
 25
25 -
 26
26 -
 27
27 -
 28
28 -
 29
29 -
 30
30 -
 31
31 -
 32
32 -
 33
33 -
 34
34 -
35
-
36
-
37
-
38
-
39
-
40
-
41
-
42
-
43
-
44
-
45
-
46
-
47
-
48
-
49
-
50
-
51
-
52
-
53
-
54
-
55
-
56
-
57
-
58
-
59
-
60
-
61
-
62
-
63
-
64
-
65
-
66
-
67
-
68
-
69
-
70
-
71
-
72
-
73
-
74
-
75
-
76
-
77
-
78
-
79
-
80
-
81
-
82
-
83
-
84
-
85
-
86
-
87
-
88
-
89
-
90
-
91
-
92
-
93
-
94
-
95
-
96
-
97
-
98
-
99
-
100
-
101
-
102
-
103
-
104
-
105
-
106
-
107
-
108
-
109
-
110
 |
 |
