Panasonic KX-FLB851 Multi-function Laser Fax - Page 66
Setting the Error Correction, Activating the Distinctive Ring
 |
UPC - 037988809851
View all Panasonic KX-FLB851 manuals
Add to My Manuals
Save this manual to your list of manuals |
Page 66 highlights
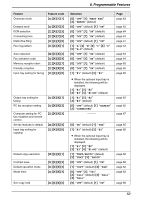
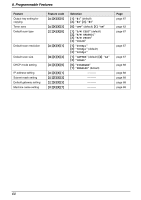
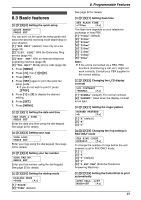
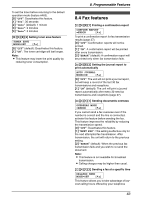
8. Programmable Features company. This feature can be set up to 24 hours in advance of the desired time. {0} "OFF" (default) {1} "ON" To send a document: 1. Insert the document into the auto document feeder. 2. If necessary, change to the desired resolution (page 26) and the desired contrast (page 26). 3. Press {MENU}. 4. Press {#}, then {4}{1}{2}. 5. Press {1} to select "ON". 6. Press {SET}. 7. Enter the fax number. L To enter an item using one-touch dial feature and navigator directory, see step 4 on page 31. (When using navigator directory, you do not have to press {DIRECTORY} before pressing {V} or {^}.) 8. Press {SET}. 9. Enter the transmission start time. L Press {*} repeatedly to select "AM" or "PM". 10. Press {SET}. L The document will be fed into the unit and scanned into memory. The unit will then send the data at the specified time. Note: L To cancel after programming, press {STOP} then {SET}. L You can also send a document using the scanner glass. Press {SET} in step 10, then press {START}. {#}{4}{1}{3} Setting the Error Correction Mode (ECM) ECM SELECTION MODE=ON [V^] This feature is available when the sending / receiving fax machines are ECM compatible. {0} "OFF": Deactivates this feature. {1} "ON" (default): If there is an error during fax transmission / reception, the unit will support the communication. {#}{4}{1}{6} Setting the connecting tone CONNECTING TONE MODE=ON [V^] If you often have trouble when sending faxes, this feature allows you to hear connecting tones: fax tone, ring back tone and busy tone. You can 64 use these tones to confirm the status of the other party's machine. {0} "OFF": Deactivates this feature. {1} "ON" (default): You will hear connecting tones. Note: L If the ring back tone continues, the other party's machine may not be a fax machine or may have run out of paper. Check with the other party. L The connecting tone volume cannot be adjusted. {#}{4}{3}{0} Activating the Distinctive Ring feature DISTINCTIVE RING MODE=OFF [V^] {0} "OFF" (default) {1} "ON" See page 41 for details. {#}{4}{3}{1} Setting the ring pattern for fax (Distinctive Ring feature) FAX RING PATTERN RING=B-D [V^] {1} "A" {2} "B" {3} "C" {4} "D" {5} "B-D" (default) See page 42 for details. {#}{4}{3}{2} Receiving other size documents AUTO REDUCTION MODE=ON [V^] To receive a fax document that is longer than your recording paper. {0} "OFF": The unit will print the original size. {1} "ON" (default): The unit will fit received documents onto your recording paper. {#}{4}{3}{4} Changing the fax activation code FAX ACTIVATION MODE=ON [V^] If you wish to use an extension telephone to receive faxes, activate this feature and program the activation code. {0} "OFF" {1} "ON" (default) 1. Press {MENU}. 2. Press {#}, then {4}{3}{4}.
-
 1
1 -
2
-
3
-
4
-
5
-
6
-
7
-
8
-
9
-
10
-
11
-
12
-
13
-
14
-
15
-
16
-
17
-
18
-
19
-
20
-
21
-
22
-
23
-
24
-
25
-
26
-
27
-
28
-
29
-
30
-
31
-
32
-
33
-
34
-
35
-
36
-
37
-
38
-
39
-
40
-
41
-
42
-
43
-
44
-
45
-
46
-
47
-
48
-
49
-
50
-
51
-
52
-
53
-
54
-
55
-
56
-
57
-
58
-
59
-
60
-
 61
61 -
 62
62 -
 63
63 -
 64
64 -
 65
65 -
 66
66 -
 67
67 -
 68
68 -
 69
69 -
 70
70 -
 71
71 -
72
-
73
-
74
-
75
-
76
-
77
-
78
-
79
-
80
-
81
-
82
-
83
-
84
-
85
-
86
-
87
-
88
-
89
-
90
-
91
-
92
-
93
-
94
-
95
-
96
-
97
-
98
-
99
-
100
-
101
-
102
-
103
-
104
-
105
-
106
-
107
-
108
-
109
-
110
 |
 |
