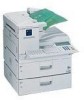
Ricoh 5510L Operating Instructions
Ricoh 5510L - FAX B/W Laser Manual
 |
View all Ricoh 5510L manuals
Add to My Manuals
Save this manual to your list of manuals |
Ricoh 5510L manual content summary:
- Ricoh 5510L | Operating Instructions - Page 1
Operating Instructions Getting Started Faxing Programming Troubleshooting For safe and correct use of this machine, please be sure to read the Safety Information before you use it. - Ricoh 5510L | Operating Instructions - Page 2
Operating Instructions Type for 3799/F9199/LF510 AG/5510L Type for 3799nf/F9199nf/LF515e AG/5510NF Printed in Japan UE USA H310-8600A - Ricoh 5510L | Operating Instructions - Page 3
all customer modes of operation and maintenance. Caution: Use of controls or adjustment or performance of procedures other than those specified in this manual might result in hazardous radiation exposure. Machine Types The model names of the machine do not appear in the following pages. Check the - Ricoh 5510L | Operating Instructions - Page 4
modifications to maintain uninterrupted service. 6. In the event of operation problems (document jam, copy jam, communication error indication), refer to the solving problems section in this manual. 7. If you cannot correct the problem, please contact the RICOH CORP. CUSTOMER SUPPORT DEPT. at 1-800 - Ricoh 5510L | Operating Instructions - Page 5
...6 Important Safety Instructions 6 Caution ...6 Position of Label for RCAUTION 7 ENERGY STAR Program 8 Energy Saver Modes 9 How to Read this Manual 11 Paper Mark...12 Operation ...12 Manuals for This Machine 14 Basic Features (this manual 14 Advanced Features 14 NIC FAX Unit manual (on CD - Ricoh 5510L | Operating Instructions - Page 6
...44 Original Type...44 Changing Scan Settings 45 Dialing ...46 Entering Numbers Directly 46 Pause ...47 Tone ...47 Using Quick Dials...49 Using Speed Dials...49 Using Groups ...50 When Specifying a Group with a Quick Dial 51 When Specifying a Group with the Group Key 51 Reception Modes 53 - Ricoh 5510L | Operating Instructions - Page 7
Fax Header/Own Fax Number 55 Programming Own Name / Fax Header 56 Editing Own Name / Fax Header 57 Deleting Own Name / Fax Header 58 Programming Own Fax Number 59 Editing Own Fax Number 60 Deleting Own Fax Number 61 Quick Dial ...63 Programming...63 Editing ...67 Deleting ...72 Quick Dial Key - Ricoh 5510L | Operating Instructions - Page 8
Jams 108 Clearing Original Jams in the ADF 108 Clearing Original Jams in the Bypass Tray 109 Clearing Paper Jams 110 Clearing Paper Jams in the Fusing Unit 110 Clearing Paper Jams in the Main Paper Tray 112 Replacing the Toner Cartridge 113 Error Messages 115 Solving Problems 116 INDEX - Ricoh 5510L | Operating Instructions - Page 9
laser beam exposure to the operator. Note to users in the United States of America -Notice: reception, which can be determined by turning the equipment off and on, the user is encouraged to try to correct the interference by one more of the following measures: • Reorient or relocate the receiving - Ricoh 5510L | Operating Instructions - Page 10
a telephone fax machine unless such message clearly contains in a margin at the top or bottom of each transmitted page or on the first page of the feature. In order for you to meet the requirement, your machine must be programmed by following the instructions in the accompanying Operation Manual - Ricoh 5510L | Operating Instructions - Page 11
number. The abbreviation, IC, before the registration number signifies machine, the following safety precautions should always be followed. Safety During Operation In this manual, the following important symbols are used: R WARNING: Indicates a potentially hazardous situation which, if instructions - Ricoh 5510L | Operating Instructions - Page 12
that your machine needs service or repair. • The external housing of your machine has been damaged. • Do not incinerate spilled toner or used toner. Toner dust might ignite when exposed to an open flame. • Disposal can take place at our authorized dealer. • Dispose of the used toner cartridge in - Ricoh 5510L | Operating Instructions - Page 13
) and toner cartridge out of the reach of children. • For environmental reasons, do not dispose of the machine or expended supply waste at household waste collection points. Disposal can take place at an authorized dealer. • The inside of the machine could be very hot. Do not touch the parts with - Ricoh 5510L | Operating Instructions - Page 14
report the leak. • Use only the power cord and batteries indicated in this manual. Do not dis- pose of batteries in a fire. They may explode. Check with local codes for possible special disposal instructions. Save these instructions alimentation et le type de piles indiqués dans ce manual. Ne pas - Ricoh 5510L | Operating Instructions - Page 15
Position of Label for RCAUTION This machine has a label for RCAUTION at the position shown below. For safety, please follow the instructions and handle the machine as indicated. The inside of the machine becomes very hot. Do not touch the inside. Doing so could result in a burn. 7 - Ricoh 5510L | Operating Instructions - Page 16
means of energy-saving features, such as Low-power mode. • Low-power Mode At the factory, this fax machine was set to enter the low power mode 5 minutes after the last operation is completed. To exit the low power mode, press the {Clear Modes / Energy Saver} key. The machine can start printing in - Ricoh 5510L | Operating Instructions - Page 17
Receive File indicator lights, exit Energy Saver mode and take the appropriate action. Energy Saver Mode Type Status How long before you can print after exiting Energy Saver mode Power consumption *1 Fax Standby Energy Saver Standby Display turns off The machine maintains the heating roller - Ricoh 5510L | Operating Instructions - Page 18
if the tray is not pushed in correctly. ❒ After loading paper, press the Energy Saver key and check that "Ready" is shown on the display. Reception in Energy Saver mode In Energy Saver mode, originals that have been stored in memory are still sent and the machine can still receive messages. When - Ricoh 5510L | Operating Instructions - Page 19
set of symbols is used in this manual. R WARNING: This symbol indicates a potentially hazardous situation that might result in death or serious injury when you misuse the machine without following the instructions under this symbol. Be sure to read the instructions, all of which are described in the - Ricoh 5510L | Operating Instructions - Page 20
shown as K, and landscape direction for paper in the paper tray is shown as L. Note ❒ represents originals or paper. Reference For details about "Auto Document Feeder (ADF)", see p.18 "Guide to Components". Operation Displays and keys in the operating flows of this book are shown as follows. ❖ For - Ricoh 5510L | Operating Instructions - Page 21
❖ For example, when selecting standby files • Press the 0 1 keys to scroll the display to find a file. 13 - Ricoh 5510L | Operating Instructions - Page 22
the most frequently used fax functions and operations. Advanced Features The Advanced Features manual describes more advanced functions and also explains settings for key operators. ❖ Chapter 1 Transmission Mode Explains sending at a specific time without having to be by the machine and also taking - Ricoh 5510L | Operating Instructions - Page 23
❖ Chapter 8 Solving Operation Problems Explains clearing paper jams in the optional paper tray unit and the optional bypass tray unit. Things you should do when an Error Report or a Power Failure Report is printed are also explained. ❖ Chapter 9 Maintaining Your Machine Explains changing the paper - Ricoh 5510L | Operating Instructions - Page 24
8 Troubleshooting Explains error messages and user parameter settings. When the display shows unusual information, check the list in this chapter and take the appropriate action. ❖ Chapter 9 Appendix Explains important reports and lists that are printed when using Internet Fax function or PC FAX - Ricoh 5510L | Operating Instructions - Page 25
1. Getting Started Machine Types This machine comes in two types. NIC FAX Unit Optional Paper Tray Unit Type1 Option Standard *1 *1 Type1 has two paper tray units as standard. Type2 Standard Option 17 - Ricoh 5510L | Operating Instructions - Page 26
. Control Panel Operate the machine using keys and watching the display on the Control Panel. 11. Optional Card Slot Insert an Optional 40MB Memory Card or Fax On Demand unit (option). 12. Optional Paper Tray Unit This paper tray unit is option for Type2. Type1 has two paper tray units as standard. - Ricoh 5510L | Operating Instructions - Page 27
Type1. Guide to Components 1 1. Handset / External Telephone Connector 2. G3 Line Connector 3. Manual Pocket 4. Original Bypass Tray Set non-standard size originals here. 5. Main Side Cover Open this cover when changing the toner cartridge or installing the fusing maintenance unit. 6. Bypass Tray - Ricoh 5510L | Operating Instructions - Page 28
Installed 1 1. Optional Bypass Tray Unit Set non-standard size paper or special paper for receiving fax messages or copying. 2. Paper Tray Unit Side Cover Open to clear paper jams. ZGFH030N 3. Main Paper Tray Load paper for received fax messages. 4. Optional Paper Tray Unit Provides an extra paper - Ricoh 5510L | Operating Instructions - Page 29
Press to access the User Tools settings and customize various functions to meet your specific requirements. 2. {Line Selection} key Press to select G3, G4 or PABX. 3. Scan Setting Selection Keys ❖ {Original Type} key • Color Scan (Only for Type2, and Type1 with the optional NIC FAX Unit) Select when - Ricoh 5510L | Operating Instructions - Page 30
and p.261 "Clearing a Paper Jam in the Optional Paper Supply Units", . ❖ DAdd Toner Indicator Blinks when toner is low and lights when toner has completely run out. See p.113 "Replacing the Toner Cartridge". ❖ LCall Service Indicator Lights to indicate when the machine has broken - Ricoh 5510L | Operating Instructions - Page 31
. 12. {Copy} key Press to copy the original currently loaded in the ADF. 17. {Pause/Redial} key Pause: Inserts a pause when you are dialing or storing a fax number. A pause cannot be inserted as the first digit. Redial: Press to redial one of the last ten numbers. 18. {Clear} key - Ricoh 5510L | Operating Instructions - Page 32
whether the options are installed or not. Reading the Display and Using Keys ❖ Standby Display A The display of the currently selected function B Machine status and messages C Amount of free memory D Entered fax number and number of destinations entered so far E Display for items which can be se - Ricoh 5510L | Operating Instructions - Page 33
", . C Press [OK]. The user name is displayed. Note ❒ When you enter a user code which is not programmed, an error message appears and the display from step A is shown. Standby Display While the machine is in standby (immediately after it is turned on or after the {Clear Modes - Ricoh 5510L | Operating Instructions - Page 34
set an original, press the {Clear Modes/Energy Saver} key. • If you are in User Tools mode, press the {User Tools} key. Communication Display While the machine is communicating, the status is displayed. ❖ Display during Memory Transmission The destination's name or fax number appears at the top of - Ricoh 5510L | Operating Instructions - Page 35
Energy Saver Mode -Exiting Energy Saver Mode To exit Energy Saver mode manually: • In Energy Saver Standby mode, press the {Clear Modes/Energy Saver} key. • In Fax Standby mode, press any key. • Set an original. • Pick up the optional handset. Reading the Display 1 27 - Ricoh 5510L | Operating Instructions - Page 36
Getting Started 1 28 - Ricoh 5510L | Operating Instructions - Page 37
to help you identify deleted originals. See p.264 "Power Failure Report", . Switching between Memory Transmission and Immediate Transmission Press the {Transmission Mode} key to switch between Memory Transmission and Immediate Transmission. When the indicator of the {Immediate - Ricoh 5510L | Operating Instructions - Page 38
Faxing Note ❒ You can set whether the machine is in Memory Transmission mode or Immediate Transmission mode right after the power is turned on or the {Clear Modes/Energy Saver} key is pressed with the User Pa- 2 rameters (switch 00 bit 6). See p.178 "User Parameters", - Ricoh 5510L | Operating Instructions - Page 39
alarm sounds. See p.101 "Blank Sheet Detect", . ❒ You can set the original any time up until you press the {Start} key. Loading Originals in the Document Feeder Use the Document Feeder to scan in a stack of originals in one operation. The Document Feeder can handle single-sided - Ricoh 5510L | Operating Instructions - Page 40
❒ If an original jams, press the {Clear/Stop} key, and then remove Set your original in the original by- the original carefully. pass tray if it falls under any of the ❒ The maximum number of originals following categories: 2 you can set in the ADF is 75 pages • It is longer than 600mm (23 - Ricoh 5510L | Operating Instructions - Page 41
the original into the original bypass tray while it is automatically fed in. ❒ If your fax original or copy original is longer than 420mm (16.6"), support it with your hand. Originals Unsuitable for the Auto Document Feeder (ADF) Do not set the following types of originals in the Auto Document - Ricoh 5510L | Operating Instructions - Page 42
. See p.264 "Power Failure Report", . Limitation ❒ If memory is full (0% appears on the display), Memory Transmission is disabled. Use Immediate Transmission instead. Note ❒ Maximum number of destinations per Memory Transmission: 250 ❒ The maximum number of destinations awaiting - Ricoh 5510L | Operating Instructions - Page 43
, press the {Clear} or {Stop} key, and then enter the correct number again. to press [Add] when specifying destinations using Quick Dials successively with the User Pa- 2 rameters (sw 09, bit 6). See p.178 "User Parameters", . F when you - Ricoh 5510L | Operating Instructions - Page 44
Faxing Canceling a Memory Transmission Before the Start Key is Pressed A Press the {Stop} key or the {Clear 2 Modes / Energy Saver} key. The the original from the machine. While the Original is Being Scanned A Press the {Stop} key. B Remove the original. The machine will stop storing the - Ricoh 5510L | Operating Instructions - Page 45
the transmission by pressing the {Stop} key. A Press [Info.]. When the Optional Extra G3 Interface Unit is installed and fax messages are sent by each line, you can select which message is stopped. The Information menu is shown. B Enter the code for "Check/Cancel Files" with the number keys. 37 - Ricoh 5510L | Operating Instructions - Page 46
Faxing C Press 0 or 1 until the file you want to delete is shown. F Press [Exit]. 2 D Press [Delete]. The file is erased, and the machine will return to the standby display. Note ❒ When the file is awaiting trans- mission, the following display is shown. E Press [Yes]. 38 - Ricoh 5510L | Operating Instructions - Page 47
and transmitted page by page without being stored in memory. 2 If you make a mistake, press the {Clear} key or the {Stop} key, and then enter the correct number again. Reference p.46 "Dialing" See p.75 "Chain Dial", . Note ❒ You can only specify one destination for Immediate - Ricoh 5510L | Operating Instructions - Page 48
to connect with the other party. The machine dials to the other party every minute. Switching to Memory Transmission A Press [Mem Tx]. The machine switches to Memory Transmission, and starts scanning originals. After the fax message is stored into memory, the machine sends the fax message. 40 - Ricoh 5510L | Operating Instructions - Page 49
the original, you can also cancel the transmission by removing the original from the machine. B Remove the original. Reference See p.108 "Clearing Original Jams". After the Start key is Pressed A Press the {Stop} key, and then re- move the original. Note ❒ If the transmission finishes while you - Ricoh 5510L | Operating Instructions - Page 50
❒ You can set whether the machine returns to the same settings after the power switch is turned on for each communication with the User Parameters (switch 01 bit 7). See p.178 "User Parameters", . The scanner function can be used with NIC FAX Unit (Option for Type1). When you - Ricoh 5510L | Operating Instructions - Page 51
. When sending fax messages with 300x300dpi, the machine switches to Detail automatically. ❒ You can set the resolution type after the power is turned on or the {Clear Modes / Energy Saver} key is pressed with the user parameters (switch 00 bit 5,4). See p.178 "User Parameters", - Ricoh 5510L | Operating Instructions - Page 52
the NIC FAX Unit manual. Use if the image is dark and would otherwise be reproduced as black Note at the other end. ❒ If you select Halftone, the trans- Note ❒ You can set the Image Density when the machine is turned on or the {Clear Modes/Energy Saver} key is pressed with the User Parameters - Ricoh 5510L | Operating Instructions - Page 53
Standard Mode. Note ❒ You can set Halftone Method with the User Parameters (switch 10, bit 7). See p.178 "User Parameters", . Changing Scan Settings When sending multiple originals using the document feeder (ADF), you can set scan settings for every page. A Check which pages you - Ricoh 5510L | Operating Instructions - Page 54
-Limitations when dialing with the number keys Fax numbers entered with the number keys are stored in internal memory (separate from memory for storing original data). Therefore, using the number keys, you cannot program more than 100 numbers (1,000 numbers when the Optional Function Upgrade Unit is - Ricoh 5510L | Operating Instructions - Page 55
can insert a pause in numbers stored in Quick Dials and Speed Dials. Tone This function allows a machine connected to a pulse dialing line to send tonal signals (for example if you want to use a special service on a tone dialing line). When you press the User Function key in which Tone function is - Ricoh 5510L | Operating Instructions - Page 56
Faxing Preparation D Enter a code number for receiving You need to assign the Tone func- a special service with the number tion to a User Function key before- keys. hand. See p.154 "User Function Keys", . Note ❒ The entered number will be sent Limitation by tonal signals - Ricoh 5510L | Operating Instructions - Page 57
dial codes in the range 000 to 999. ❒ If a search letter is programmed with a Speed Dial, you can find this number quickly using the Telephone Directory function. See p.76 "Telephone Directory", . ❒ You can have the label stored with a Speed Dial printed on the first page received - Ricoh 5510L | Operating Instructions - Page 58
the number keys. See p.154 "User Function Keys", . Note ❒ Quick Dials programmed for Groups cannot be used for any other function. ❒ To program, edit, or delete Groups, see p.87 "Groups". ❒ To check the contents of all Groups, print the Group Dial list. See p.149 "Reports/Lists - Ricoh 5510L | Operating Instructions - Page 59
the {Transmission Mode} key to light it. Note ❒ You must program Groups in ❒ Group Dial is assigned to {F4} as a default setting. If this setting is changed, you must program the Group function in a User Function key beforehand. See p.154 "User Function Keys", - Ricoh 5510L | Operating Instructions - Page 60
Faxing C Enter the Group number (01 to 09) with the number keys. 2 Group number is displayed. If the When you want to check the Group Dial List, press the [GpD List]. ❒ If you make a mistake, press the {Clear} key or the {Stop} key. ❒ The number of destinations which are programmed in the Group - Ricoh 5510L | Operating Instructions - Page 61
yourself. If you hear a voice, con- beforehand. See p.154 "User Func- tinue your conversation as you tion Keys", . would using a normal telephone. If you hear high pitched beeps, instruct the machine to receive the fax by following the procedure below. Use this setting if you - Ricoh 5510L | Operating Instructions - Page 62
Faxing C Press [OK]. 2 The machine returns to the standby display. Note ❒ When you want to cancel the setting, press [Cancel]. 54 - Ricoh 5510L | Operating Instructions - Page 63
Own Name, Fax Header, and Own Fax Number settings in the User Parameters List. See p.189 "Printing the User Parameter List", . Note ❒ Make sure that the machine is in standby mode before performing the following procedures. ❒ When the Optional Extra G3 Interface Unit is installed - Ricoh 5510L | Operating Instructions - Page 64
p.192 "G3 Digital Line", . E Enter the code for "Program Own Name" with the number keys. Programming Own Name / Fax Header F Enter your Own Name. The following procedure describes how to program Own Name and Fax 3 Header. A Press the {User Tools} key. Reference See p.98 - Ricoh 5510L | Operating Instructions - Page 65
the {User Tools} key. The machine returns to the display in step H. Note B Enter the code for "Fax Features" with the number keys. 3 ❒ When you program both Fax Header1 and Fax Header2, re- peat from step H. K Press [PrevMenu] three times. L Press [Exit]. C Enter the code for "Setup" with - Ricoh 5510L | Operating Instructions - Page 66
. ❒ When the {Clear} key is pressed, only one character is deleted. B Enter the code for "Fax Features" with the number keys. Reference See p.98 "Entering Characters" for how to enter characters. G Press [OK]. C Enter the code for "Setup" with the number keys. The Own Name is changed. H Press - Ricoh 5510L | Operating Instructions - Page 67
" with the number keys. Programming Own Fax Number The following procedure describes how to program Own Fax Number. A Press the {User Tools} key. F Press the code for "Own Fax Number" with the number keys. B Enter the code for "Key Op. Tools" with the number keys. Then press the {#} key. G Enter - Ricoh 5510L | Operating Instructions - Page 68
number keys. Editing Own Fax Number The following procedure describes how to edit Own Fax Number. A Press the {User Tools} key. F Press the code for "Own Fax Number" with the number keys. B Enter the code for "Key Op. Tools" with the number keys. Then press the {#} key. G Press the {Clear} key - Ricoh 5510L | Operating Instructions - Page 69
. J Press [Exit]. Own Name/Fax Header/Own Fax Number Deleting Own Fax Number The following procedure describes how to delete Own Fax Number. A Press the {User Tools} key. 3 B Enter the code for "Key Op. Tools" with the number keys. Then press the {#} key. The machine returns to the standby display - Ricoh 5510L | Operating Instructions - Page 70
the code for "Own Fax Number" with the number keys. G Press the {Stop} key to delete the Number. 3 H Press [OK]. Note ❒ If you press [Cancel], the Own Fax Number is not deleted and the machine returns to the dis- play in step F. I Press [PrevMenu] four times. J Press [Exit]. The machine returns - Ricoh 5510L | Operating Instructions - Page 71
to use (G3 or G4) before Quick Dial list and keep it when entering the fax number. See p.89 you program or change fax num- "Selecting the Line", . . You can select SUB code, SEP code, SID, PWD (maximum 20 digits), Sub - Ricoh 5510L | Operating Instructions - Page 72
. ❒ Make sure that the machine is in standby mode before the following procedure is performed. 3 A Press the {User Tools} key. Checking a Programmed Quick Dial A Press [Status]. B Press the Quick Dial key in which you want to program the destination. B Enter the code for "Fax - Ricoh 5510L | Operating Instructions - Page 73
line function is programmed. See p.154 "User Function Keys", . G Press [Name]. J If you want to set the other items, press [Others]. Note ❒ If you do not want to program "Others", go to step K. Turning the Label Insertion On A Enter the code for "Label" with the number keys. 65 - Ricoh 5510L | Operating Instructions - Page 74
in step A. D Press [Exit]. The machine returns to the display in step A. D Press [Exit]. Selecting Fax Header A Enter the code for "Select Fax Header" with the number keys. Setting the Fax Information Service A Enter the code for "Fax Info. Service" with the number keys. B Press 0 or 1 to select - Ricoh 5510L | Operating Instructions - Page 75
. M Press [Exit]. B Enter the code for "Fax Features" with the number keys. C Enter the code for "Program/De- lete" with the number keys. The machine returns to the standby display. D Enter the code for "Prog. Quick Dial" with the number keys. E Press the Quick Dial key that you want to edit - Ricoh 5510L | Operating Instructions - Page 76
See p.154 "User Function Keys", . Note ❒ The {Clear} key deletes one character at a time, and the {Stop} key deletes the whole line. G When you want to edit the desti- nation's name, press [Name] ❒ When you want to change or insert a number in the middle of numbers, press 0 or - Ricoh 5510L | Operating Instructions - Page 77
OK]. Quick Dial B Press 0 or 1 to select "On" or "Off". C Press [OK]. 3 J When you want to edit other items, press [Others]. The machine returns to the display in step A. D Press [Exit]. Changing Fax Header A Enter the code for "Select Fax Header" with the number keys. Changing Label Insertion - Ricoh 5510L | Operating Instructions - Page 78
step E. D Press [Exit]. Note Changing Fax Information Service ❒ If you press [Cancel], the information you have just entered is A Enter the code for "Fax Info. Service" with the number deleted and the machine re- turns to the display in step E. keys. L Press [PrevMenu] three times. M Press - Ricoh 5510L | Operating Instructions - Page 79
Moved or Copied to the Quick Dial key B Enter the code for "Fax Features" with the number keys. C Enter the code for "Program/Delete" with the number keys. D Enter the code for "Prog. Quick Dial" with the number keys. E Press [Move/Copy]. Note ❒ You can change the settings for the destination in - Ricoh 5510L | Operating Instructions - Page 80
procedure describes how to delete fax numbers programmed in Quick Dial keys. A Press the {User Tools} key. Checking the Programmed Destinations on the Quick Dial keys A Press [Status]. 3 B Enter the code for "Fax Features" with the number keys. B Press the Quick Dial key in which the destination - Ricoh 5510L | Operating Instructions - Page 81
the code for "Fax Features" with the number keys. H Press [PrevMenu] three times. I Press [Exit]. C Enter the code for "Reports/Lists" with the number keys. The machine returns to the standby display. D Enter the code for "Quick Dial List" with the number keys. E Press 0 or 1 to select "Dial La - Ricoh 5510L | Operating Instructions - Page 82
Programming Label Paper 3 1. Quick Dial key number The number of the Quick Dial key the destination is programmed in. 2. Destination The other party's name or Group name programmed in the Quick Dial. 74 - Ricoh 5510L | Operating Instructions - Page 83
3. The name for Auto Document The name for the document programmed as the Auto Document. 4. The name for the program When a program is stored on the Quick Dial key, the name is printed. 5. The content for the User Function key The content of the User Function keys is printed. Quick Dial 3 75 - Ricoh 5510L | Operating Instructions - Page 84
or Fax Header2 on fax messages that the other party receives. Important ❒ We recommend that you print the Speed Dial list and keep it when you program or change a destination. See p.149 "Reports/Lists", . Limitation ❒ When a programmed Speed Dial is being used for a standby Memory - Ricoh 5510L | Operating Instructions - Page 85
the machine is in standby mode before performing the following procedures. A Press the {User Tools} key. Note ❒ If you make a mistake, press the {Clear} key or the {Stop} key, 3 and then enter again. B Enter the code for "Fax Features" with the number keys. Checking a Programmed Speed Dial - Ricoh 5510L | Operating Instructions - Page 86
Speed Dial, the number is shown on the display. If you want to change the fax number, press the {Clear} key and enter another number. Selecting the line A Press the {Line Selection} key to select line. ❒ You cannot omit the fax number. Be sure to program it. 3 ❒ When the Optional ISDN Unit or - Ricoh 5510L | Operating Instructions - Page 87
Label Insertion on A Enter the code for "Label" with the number keys. The machine returns to the display in step A. D Press [Exit]. Specifying a Search Letter A Enter the code for "Speed Dial Dir." with the number keys. B Press one of the Quick Dial keys to specify the Speed Dial search letter. 79 - Ricoh 5510L | Operating Instructions - Page 88
are programmed. D Press [Exit]. The machine returns to the display Selecting Fax Header in step E. Note A Enter the code for "Select Fax ❒ If you press [Cancel], the con- Header" with the number tents you have just entered is keys. deleted and the machine re- turns to the display in step - Ricoh 5510L | Operating Instructions - Page 89
{User Tools} key. B Enter the code for "Fax Features" with the number keys. Note ❒ If you make a mistake, press the {Clear} key and enter again. Checking Programmed Speed Dial A Press [Status]. B Enter the code for the Speed Dial you want to change using the number keys. 3 C Enter the code - Ricoh 5510L | Operating Instructions - Page 90
F10}) in which the Line Selection function is assigned. See p.154 "User Function Keys", . G Press [Name]. Changing Label Insertion A Enter the code for "Label" with the number keys. H Press the {Clear} key or the {Stop} key and enter again. B Press 0 or 1 to select "On" or "Off - Ricoh 5510L | Operating Instructions - Page 91
with the number keys. The machine returns to the display in step A. D Press [Exit]. Changing a Search Letter A Enter the code for "Speed Dial Dir."with the number keys. B Press 0 or 1 to select "Fax Header 1" or "Fax Header 2". 3 B Press one of the Quick Dial keys to change the Speed Dial Search - Ricoh 5510L | Operating Instructions - Page 92
a Speed Dial key which is already used. A Press the {User Tools} key. B Enter the code for "Fax Features" with the number keys. C Enter the code for "Program/Delete" with the number keys. 3 D Enter the code for "Prog. Speed Di- al" with the number keys. E Press [Move/Copy]. The machine returns - Ricoh 5510L | Operating Instructions - Page 93
{User Tools} key. The programmed contents are displayed. Note ❒ If you make a mistake, press the {Clear} key and enter again. Checking a Programmed Speed Dial A Press [Status]. B Enter the Speed Dial code you want to delete using the number keys. B Enter the code for "Fax Features" with the number - Ricoh 5510L | Operating Instructions - Page 94
Note ❒ If the Speed Dial code is not displayed, press [↑Prev.] or [↓Next] to find it. ❒ If you press [Cancel], the machine returns to the display in step E. F Press [Yes]. I Press [Exit]. 3 The machine returns to the standby display. Note ❒ If you press [No], the Speed Dial is not deleted and - Ricoh 5510L | Operating Instructions - Page 95
, you must first assign the Group function to a User Function key. To send a fax, press the Group key, and then enter the group number (1 to 9). To select a Group using a Group key, one more step is required than when using a Quick Dial key. However, multiple Groups (a maximum of nine or 30 with the - Ricoh 5510L | Operating Instructions - Page 96
destinations even when the number of specified destination is 99 or less. ❒ It is recommended that you print the Group Dial list and keep it when you program or change destinations. See p.149 "Reports/Lists", . ❒ Make sure that the machine is in standby mode before performing the - Ricoh 5510L | Operating Instructions - Page 97
the fax number. Groups ❒ If you make a mistake, press the {Clear} key or the {Stop} key and try again. The {Clear} key deletes one character at a time, and the {Stop} key deletes the whole line. ❒ You can use "Redial" when specifying the destination. See p.77 "Redial", . ❒ To - Ricoh 5510L | Operating Instructions - Page 98
code for "Assign Key" with the number keys. B Press the Quick Dial key in which you want to assign the Group. Programming a Group Name A Enter the code for "Group Name" with the number keys. 90 Note ❒ To search for a free Quick Dial, press [Status]. ❒ If you make a mistake, press the {Clear} key - Ricoh 5510L | Operating Instructions - Page 99
display in step E. N Press [PrevMenu] three times. O Press [Exit]. B Enter the code for "Fax Features" with the number keys. C Enter the code for "Program/De- lete" with the number keys. D Enter the code for "Prog. Group Dial" with the number keys. The machine returns to the standby display. 91 - Ricoh 5510L | Operating Instructions - Page 100
ways: • Enter a fax number using the number keys. • Press a Quick Dial key in which the destination is programmed. • Press the {Speed Dial} key and enter a Speed Dial code. ❒ If you make a mistake, press the {Clear} key or {Stop} key and try again. The {Clear} key deletes one character at a time - Ricoh 5510L | Operating Instructions - Page 101
D Press [Exit]. Changing Assigned Quick Dial keys A Enter the code for "Assign Key" with the number keys. Note ❒ If you do not want to set other items, go to step H. Editing Group Name A Enter the code for "Group Name" with the number keys. B Press the {Clear} key or the {Stop} key, and enter the - Ricoh 5510L | Operating Instructions - Page 102
you press [Cancel], the Group is not changed or added and the A Press the {User Tools} key. machine returns to the display in step E. I Press [PrevMenu] three times. J Press [Exit]. B Enter the code for "Fax Features" with the number keys. The machine returns to the standby display. C Enter - Ricoh 5510L | Operating Instructions - Page 103
the {Clear} key or {Stop} key to delete the fax number. Checking Programmed Group Dial A Press [Status]. B Enter the number of the Group in which you want to delete a destination with the number keys. Note ❒ If you programmed the destina- tion using the number keys, the {Clear} key deletes one - Ricoh 5510L | Operating Instructions - Page 104
- ber keys. 3 The machine returns to the standby display. To Delete an Entire Group A Press the {User Tools} key. Checking a Programmed Group Dial A Press [Status]. B Enter the number of the Group you want to delete with the number keys. B Enter the code for "Fax Features" with the number keys - Ricoh 5510L | Operating Instructions - Page 105
G Press [Yes]. The group is deleted. The machine returns to the display in step E. Note ❒ If you press [No], the machine returns to the display in step E. H Press [PrevMenu] three times. I Press [Exit]. The machine returns to the standby display. Groups 3 97 - Ricoh 5510L | Operating Instructions - Page 106
the Control Pan- el. Keys ❖ Number keys Use to enter numbers. ❖ A to Z Press these keys to enter upper and lower case letters. There are two types of keyboard layout. See p.205 "Key Layout", . • QWERTY layout ❖ {Space} Press to enter a space. ❖ {Clear} Deletes the character at - Ricoh 5510L | Operating Instructions - Page 107
. B Display the page with the desired symbol by pressing [↑Prev.] and [↓Next]. B Press a Quick Dial letter key. A letter is Dial letter key or select a symbol. The inserted character is inserted left of the cursor position. C Enter the code of the symbol you want to enter with the number keys - Ricoh 5510L | Operating Instructions - Page 108
Characters Deleting One Character A Press the 0 or 1 keys to move the cursor to a character you want to delete. 3 How to Insert Characters A Press 0 or 1 to move the cursor to a position you want to insert a letter. B Press the {Clear} key. B Press a Quick Dial letter key or select a symbol - Ricoh 5510L | Operating Instructions - Page 109
Reception", . • Specified Tray See p.220 "Specified Tray", . • Forwarding See p.223 "Forwarding", . • Memory Lock See p.233 "Memory Lock", . • TX/RX File Save See p.236 "TX/RX File Save Settings", - Ricoh 5510L | Operating Instructions - Page 110
Programming 3 102 - Ricoh 5510L | Operating Instructions - Page 111
sheets in the paper unit. ❒ Regarding paper types and sizes that can be used, see p.298 "Paper", . A Pull out the paper tray as shown. B Adjust the dial to match the paper size. Important ❒ If the dial does not match the size and direction of loaded paper, parts of printed images - Ricoh 5510L | Operating Instructions - Page 112
you press the {On Hook Dial} key. B Enter the code for "Fax Features" with the number keys. ❖ Transmission Sounds when the machine sends a message. C Enter the code for "Setup" with the number keys. 4 ❖ Reception Sounds when the machine receives a message. ❖ Dialing After pressing the {Start - Ricoh 5510L | Operating Instructions - Page 113
a beep will be emitted when a communication is complete. This is useful for knowing when a fax message has been received or a transmission is complete. See p.178 "User Parameters", . 4 The machine returns to the display in step D. Note ❒ If you press [Cancel], the setting you - Ricoh 5510L | Operating Instructions - Page 114
and re- p.113 "Replacing the Toner Cartridge" Faxing when toner has run out move the jammed paper. Reference You can still send faxes from this machine even if toner has run out. p.108 "Clearing Original Jams" Important p.110 "Clearing Paper Jams" D When the Add Toner Indicator is Lit or - Ricoh 5510L | Operating Instructions - Page 115
- lights. tial File Report", , Reference For how to load paper, see p.103 "Loading Paper in the Main Paper Tray". p.67 "Printing Personal Box Messages", . If this indicator is blinking, a message has been received with the Memory Lock function. For how - Ricoh 5510L | Operating Instructions - Page 116
following procedure to clear the jammed original. 4 Clearing Original Jams in the ADF If you experience frequent original jams in the ADF, clean the ADF or obtain a new ADF Maintenance Unit. See p.267 "Maintaining Your Machine", . C Remove the original in one of the following - Ricoh 5510L | Operating Instructions - Page 117
In the lower unit A While supporting the ADF unit with your hand, gently pull out the jammed original. Clearing Original Jams in the Bypass Tray A While squeezing the release le- ver, open the ADF unit. 4 Important ❒ If you pull the original out too strongly, it could rip or the machine could be - Ricoh 5510L | Operating Instructions - Page 118
to output tray, paper may be jammed in clear the jammed paper. the fusing unit. Important ❒ The fusing unit and surrounding area inside the machine becomes hot during printing. To avoid injury when removing paper jams, do not touch any parts other than those specified in this manual. Follow - Ricoh 5510L | Operating Instructions - Page 119
paper is caught in the upper unit Clearing Paper Jams When paper is caught in the lower unit A Remove the paper by pulling the whole page upwards. 4 ❖ When paper is caught in the upper and lower unit Important ❒ If you pull the paper out too strongly, it could rip or the machine could be damaged - Ricoh 5510L | Operating Instructions - Page 120
Troubleshooting Clearing Paper Jams in the Main Paper Tray A Open the main paper tray side cover in the direction of the arrow. C Close the side cover making sure it clicks firmly into place. D Pull out the main paper tray or the machine could be damaged. F Close the main paper tray making sure it - Ricoh 5510L | Operating Instructions - Page 121
p.262 "Clearing a Paper Jam in • Dispose of the used toner car- the Optional Bypass Tray Unit", tridge in accordance with the . local regulations. A Open the main side cover in the R CAUTION: direction of the arrow. • Keep toner (used or unused) and toner cartridge out - Ricoh 5510L | Operating Instructions - Page 122
the sides of the cartridge end and push it into the machine. TKST020N Note ❒ Unevenly distributed toner within the cartridge may result in reduced print quality. D Place the toner cartridge on a flat surface. While supporting the cartridge with one hand, pull the toner seal horizontally to remove - Ricoh 5510L | Operating Instructions - Page 123
Fusing Maintenance Transfer Roller and clear the counter. unit. Limit reached: replace the ADF Roller and clear the counter. Service call error. Press OK to end alarm. It is time to install a new ADF Unit Maintenance unit. There is a problem with the fax function. Record the code number shown - Ricoh 5510L | Operating Instructions - Page 124
Types of Originals", When using moist, rough or processed paper, the printed image may be partly invisible. Only use recommended paper types. When D is blinking, toner is beginning to run out. Replace the toner cartridge soon. See p.113 "Replacing the Toner Cartridge - Ricoh 5510L | Operating Instructions - Page 125
in that tray or unit. You want to cancel copying. Press the {Stop} key. See p.127 "Copying", . You want to exit the energy Press the {Clear Modes/Ener- See p.26 "Display Prompts". saver mode. gy Saver} key. Set an original. See p.31 "Setting Originals". Some part of - Ricoh 5510L | Operating Instructions - Page 126
Volume Alarm, 104 Dialing, 104 On Hook, 104 Reception, 104 Scroll key, 104 Transmission, 104 Advanced Features, 14 Alarm Indicators, 22 Auto Document Feeder (ADF), 18 Auto Receive, 53 B Basic Features (this manual), 14 Bypass Tray Cover, 19 Bypass Tray (Option), 20 C Call Service Indicator, 22, 107 - Ricoh 5510L | Operating Instructions - Page 127
, 18 Low-power Mode, 8 M Machine Types, 17 Main Paper Tray, 18, 20, 103 Main Side Cover, 19 Manual Pocket, 19 Manuals for This Machine, 14 Memory Transmission, 29, 34 Canceling, 36 N NOTICE, 1 Number keys, 23 Dialing, 46 O {On Hook Dial} key, 23 Optional Bypass Tray Unit, 20 Optional Handset - Ricoh 5510L | Operating Instructions - Page 128
Dial} key, 23 Standard, 42 {Start} key, 23 Status Indicators, 18, 22 {Stop} key, 23 Super Fine, 42 T Telephone Mode, 53 tonal signals, 47 Tone, 47 Toner Cartridge Replacing, 113 {Transmission Mode} key, 22 Transmission Modes, 29 Troubleshooting, 103 Error Messages, 115 TTI→Fax Header, 55 U User
-
 1
1 -
 2
2 -
 3
3 -
 4
4 -
 5
5 -
 6
6 -
 7
7 -
8
-
9
-
10
-
11
-
12
-
13
-
14
-
15
-
16
-
17
-
18
-
19
-
20
-
21
-
22
-
23
-
24
-
25
-
26
-
27
-
28
-
29
-
30
-
31
-
32
-
33
-
34
-
35
-
36
-
37
-
38
-
39
-
40
-
41
-
42
-
43
-
44
-
45
-
46
-
47
-
48
-
49
-
50
-
51
-
52
-
53
-
54
-
55
-
56
-
57
-
58
-
59
-
60
-
61
-
62
-
63
-
64
-
65
-
66
-
67
-
68
-
69
-
70
-
71
-
72
-
73
-
74
-
75
-
76
-
77
-
78
-
79
-
80
-
81
-
82
-
83
-
84
-
85
-
86
-
87
-
88
-
89
-
90
-
91
-
92
-
93
-
94
-
95
-
96
-
97
-
98
-
99
-
100
-
101
-
102
-
103
-
104
-
105
-
106
-
107
-
108
-
109
-
110
-
111
-
112
-
113
-
114
-
115
-
116
-
117
-
118
-
119
-
120
-
121
-
122
-
123
-
124
-
125
-
126
-
127
-
128
 |
 |
Operating Instructions
<Basic Features>
For safe and correct use of this machine, please be sure to read the Safety Information be-
fore you use it.
Getting Started
Faxing
Programming
Troubleshooting