Ricoh 5510L Operating Instructions - Page 59
When Specifying a Group with a Quick, When Specifying a Group with the Group
 |
View all Ricoh 5510L manuals
Add to My Manuals
Save this manual to your list of manuals |
Page 59 highlights
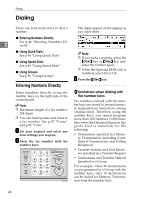
Dialing ❒ Groups can contain Transfer Station Note codes, but note that these Groups cannot be used for normal transmission because the Transfer Station codes are not dialable numbers. ❒ If you make a mistake, press the {Clear} key or the {Stop} key and try again. ❒ When the optional Function Upgrade Unit is installed, enter a Group number in the range 01 to 30. ❒ You can store up to 250 destina- ❒ The number of destinations which are programmed in the Group is displayed after "Dest:" C Press the {Start} key. 2 tions. If you register the same des- tination with a Speed Dial, Quick Dial or number keys in different groups, it is only counted as one When Specifying a Group with the Group Key item. Make sure that the Memory Trans- mission indicator is lit, if not, press When Specifying a Group with a Quick the {Transmission Mode} key to light it. Dial Note Make sure that the Memory Transmission indicator is lit, if not, press the {Transmission Mode} key to light it. Note ❒ You must program Groups in ❒ Group Dial is assigned to {F4} as a default setting. If this setting is changed, you must program the Group function in a User Function key beforehand. See p.154 "User Function Keys", . "Groups". A Set your original and select any A Set your original and select any scan settings you require. scan settings you require. B Press the Quick Dial key in which B Press the User Function key pro- grammed with the Group func- the Group is programmed. tion. Group Number is displayed. If the group name is programmed, the group name is also displayed. 51
-
 1
1 -
2
-
3
-
4
-
5
-
6
-
7
-
8
-
9
-
10
-
11
-
12
-
13
-
14
-
15
-
16
-
17
-
18
-
19
-
20
-
21
-
22
-
23
-
24
-
25
-
26
-
27
-
28
-
29
-
30
-
31
-
32
-
33
-
34
-
35
-
36
-
37
-
38
-
39
-
40
-
41
-
42
-
43
-
44
-
45
-
46
-
47
-
48
-
49
-
50
-
51
-
52
-
53
-
 54
54 -
 55
55 -
 56
56 -
 57
57 -
 58
58 -
 59
59 -
 60
60 -
 61
61 -
 62
62 -
 63
63 -
 64
64 -
65
-
66
-
67
-
68
-
69
-
70
-
71
-
72
-
73
-
74
-
75
-
76
-
77
-
78
-
79
-
80
-
81
-
82
-
83
-
84
-
85
-
86
-
87
-
88
-
89
-
90
-
91
-
92
-
93
-
94
-
95
-
96
-
97
-
98
-
99
-
100
-
101
-
102
-
103
-
104
-
105
-
106
-
107
-
108
-
109
-
110
-
111
-
112
-
113
-
114
-
115
-
116
-
117
-
118
-
119
-
120
-
121
-
122
-
123
-
124
-
125
-
126
-
127
-
128
 |
 |
