Ricoh 5510L Operating Instructions - Page 26
Guide to Components
 |
View all Ricoh 5510L manuals
Add to My Manuals
Save this manual to your list of manuals |
Page 26 highlights
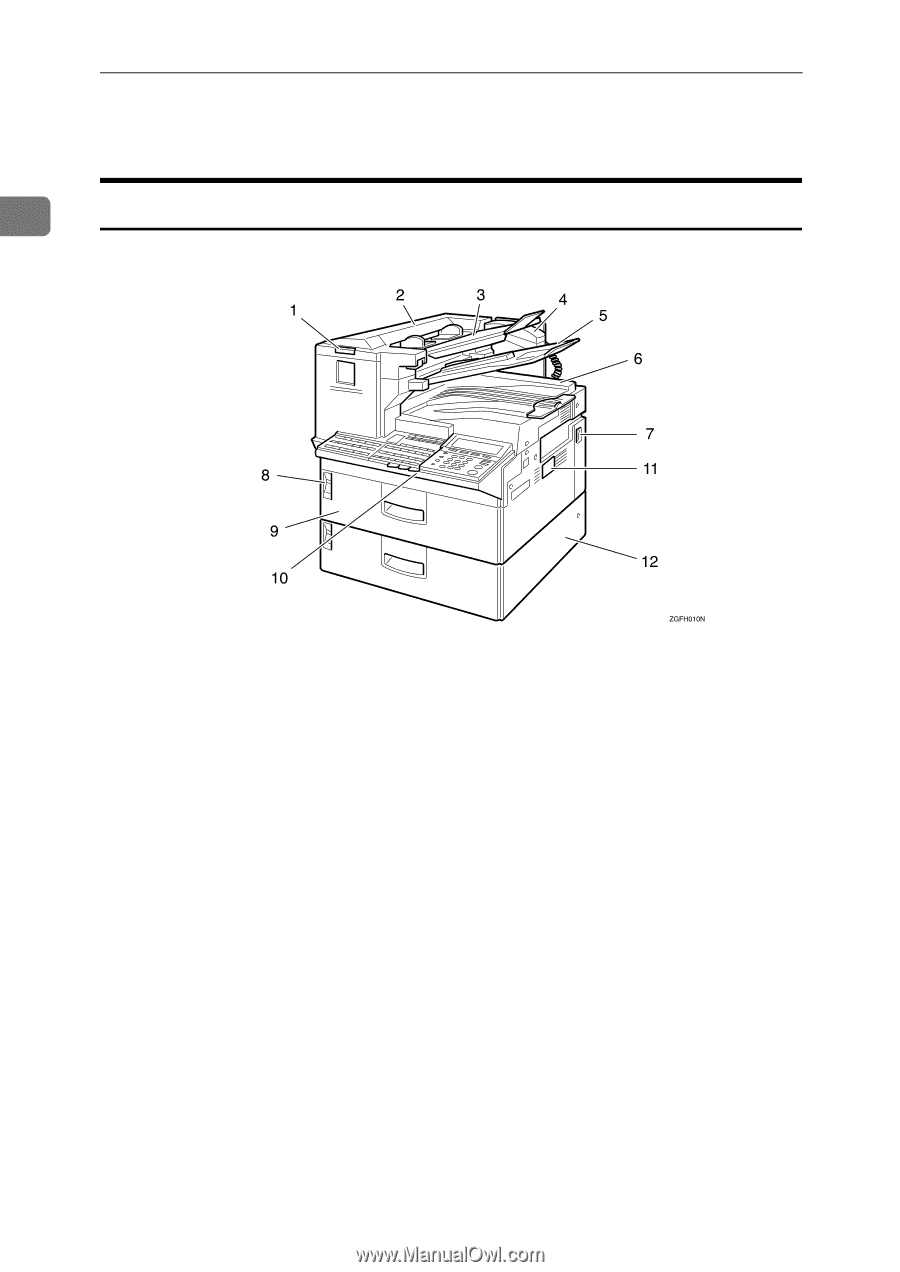
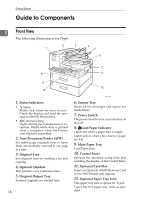
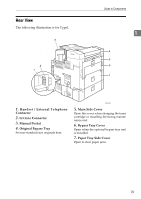
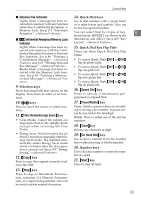
Getting Started Guide to Components 1 Front View The following illustration is for Type1. 1. Status Indicators • hAlarm Blinks red when an error occurs. Check the display and read the message to identify the problem. • 0Communicating Lights during fax transmission or reception. Blinks while data is printed from a computer when the Printer Unit (Option) is installed. 2. Auto Document Feeder (ADF) Set multi-page originals here to have them automatically scanned in one page at a time. 3. Original Tray Set originals here for sending a fax and copying. 4. Optional Handset This permits voice communication. 5. Original Output Tray Scanned originals are stacked here. 18 6. Output Tray Received fax messages and copies are stacked here. 7. Power Switch The power switch turns your machine on and off. 8. BLoad Paper Indicator Lights red when a paper tray is empty. Lights yellow when a few sheets of paper are left. 9. Main Paper Tray Load Paper here. 10. Control Panel Operate the machine using keys and watching the display on the Control Panel. 11. Optional Card Slot Insert an Optional 40MB Memory Card or Fax On Demand unit (option). 12. Optional Paper Tray Unit This paper tray unit is option for Type2. Type1 has two paper tray units as standard.
-
 1
1 -
2
-
3
-
4
-
5
-
6
-
7
-
8
-
9
-
10
-
11
-
12
-
13
-
14
-
15
-
16
-
17
-
18
-
19
-
20
-
 21
21 -
 22
22 -
 23
23 -
 24
24 -
 25
25 -
 26
26 -
 27
27 -
 28
28 -
 29
29 -
 30
30 -
 31
31 -
32
-
33
-
34
-
35
-
36
-
37
-
38
-
39
-
40
-
41
-
42
-
43
-
44
-
45
-
46
-
47
-
48
-
49
-
50
-
51
-
52
-
53
-
54
-
55
-
56
-
57
-
58
-
59
-
60
-
61
-
62
-
63
-
64
-
65
-
66
-
67
-
68
-
69
-
70
-
71
-
72
-
73
-
74
-
75
-
76
-
77
-
78
-
79
-
80
-
81
-
82
-
83
-
84
-
85
-
86
-
87
-
88
-
89
-
90
-
91
-
92
-
93
-
94
-
95
-
96
-
97
-
98
-
99
-
100
-
101
-
102
-
103
-
104
-
105
-
106
-
107
-
108
-
109
-
110
-
111
-
112
-
113
-
114
-
115
-
116
-
117
-
118
-
119
-
120
-
121
-
122
-
123
-
124
-
125
-
126
-
127
-
128
 |
 |